CentOS7安装MariaDB

MariaDB简介

官网:https://mariadb.org/

MariaDB Github地址:https://github.com/MariaDB/server

安装MariaDB

1
2
3
4
su root ## 切换root用户
yum -y install mariadb-server mariadb ## 下载MariaDB
yum -y install mariadb-server mariadb ## 启动MariaDB服务
systemctl enable mariadb ## 设置默认开机启动 可选

测试是否成功

1
2
3
4
5
6
7
8
[root@localhost toor]# mysql
Welcome to the MariaDB monitor. Commands end with ; or \g.
Your MariaDB connection id is 2
Server version: 5.5.56-MariaDB MariaDB Server

Copyright (c) 2000, 2017, Oracle, MariaDB Corporation Ab and others.

Type 'help;' or '\h' for help. Type '\c' to clear the current input statement.

运行一次mysql_secure_installation安全配置向导

1
2
3
4
5
6
7
8
9
10
11
12
13
14
15
16
17
18
19
20
21
22
23
24
25
26
27
#由于一开始安装MariaDB数据库后, root用户默认密码为空, 所以只需要按Enter键
Enter current password for root (enter for none):
OK, successfully used password, moving on...

#是否设置root用户的新密码
Set root password? [Y/n] y

#录入新密码
New password:

#确认新密码
Re-enter new password:

#是否删除匿名用户,生产环境建议删除
Remove anonymous users? [Y/n] y
... Success!

#是否禁止root远程登录,根据自己的需求选择
Disallow root login remotely? [Y/n] n
... skipping.

#是否删除test数据库
Remove test database and access to it? [Y/n] y

#是否重新加载权限表
Reload privilege tables now? [Y/n] y
... Success!

开放端口

1
2
firewall-cmd --zone=public --add-port=3306/tcp --permanent
firewall-cmd --reload

开放远程连接

1
mysql -u root -p ## 登录mysql xing123123
1
2
3
4
5
6
#任何远程主机都可以访问数据库
mysql> grant all privileges on *.* to 'root'@'%' identified by '123456';

#使修改生效
mysql> flush privileges;
mysql> exit

修改编码为UTF-8

1
vim /etc/my.cnf

添加以下内容:

1
2
[mysqld]
character-set-server=utf8

需要重启数据库

1
2
3
4
## 查看数据库编码

mysql -uroot -p
show variables like 'character%';

结果:

1
2
3
4
5
6
7
8
9
10
11
12
13
14
MariaDB [(none)]> show variables like 'character%';
+--------------------------+----------------------------+
| Variable_name | Value |
+--------------------------+----------------------------+
| character_set_client | utf8 |
| character_set_connection | utf8 |
| character_set_database | utf8 |
| character_set_filesystem | binary |
| character_set_results | utf8 |
| character_set_server | utf8 |
| character_set_system | utf8 |
| character_sets_dir | /usr/share/mysql/charsets/ |
+--------------------------+----------------------------+
8 rows in set (0.00 sec)

使用mysql workbench连接

微信截图_20180905104709.png

参考:

Centos7 安装配置MariaDB

SSH密钥对验证登录

SSH为Secure Shell的缩写,SSH是目前较可靠,专为远程登录会话和其他网络服务提供安全性的协议。Linux一般自带的是OpenSSH,可以用 ssh -V 查看当前版本。

1
2
[toor@localhost .ssh]$ ssh -V
OpenSSH_6.6.1p1, OpenSSL 1.0.1e-fips 11 Feb 2013

生成密钥对

1
ssh-keygen -t rsa

回车会在~/.ssh目录(用户所在家目录下的.ssh目录,如果没有请自行创建.ssh目录)生成id_rsa, id_rsa.pub文件
第一个是私有密钥 第二个是公共密钥。

将用户.ssh目录内的两个密钥下载到本地.

配置ssh使用密钥

1
cp id_rsa.pub authorized_keys

修改authorized_keys权限为700(必须修改为700,不能为其他)

1
chmod 700 authorized_keys

修改配置文件:

vim /etc/ssh/sshd_config

1
2
3
StrictModes no  
RSAAuthentication yes
PubkeyAuthentication yes

重启ssh服务

1
systemctl restart sshd.service

win下使用puttygen生成.ppk文件

QQ截图20180807163438.png

QQ截图20180807163528.png

QQ截图20180807163703.png

QQ截图20180807163742.png

测试连接centos主机

使用pageant Key List管理.ppk文件,如下:

QQ截图20180807164027.png

QQ截图20180807164414.png

参考:

linux使用密钥+密码登录ssh(centos7)

CentOS 7配置SSH基于密钥对验证登录

API网关

API网关是一个服务器,是系统的唯一入口。从面向对象设计的角度看,它与外观模式类似。API网关封装了系统内部架构,为每个客户端提供一个定制的API。它可能还具有其它职责,如身份验证、监控、负载均衡、缓存、请求分片与管理、静态响应处理。
API网关方式的核心要点是,所有的客户端和消费端都通过统一的网关接入微服务,在网关层处理所有的非业务功能。通常,网关也是提供REST/HTTP的访问API。服务端通过API-GW注册和管理服务。

Ocelot简介

Ocelot是一个使用.NET Core平台上的一个API Gateway,这个项目的目标是在.NET上面运行微服务架构。Ocelot框架内部集成了IdentityServer(身份验证)和Consul(服务注册发现),还引入了Polly(上一篇博文中提到过)来处理进行故障处理。
Ocelot的实现原理就是把客户端对网关的请求(Request),按照configuration.json的映射配置,转发给对应的后端http service,然后从后端http service获取响应(Response)后,再返回给客户端。当然有了网关后,我们可以在网关这层去做统一验证,也可以在网关处统一作监控。

集成Ocelot网关

新建项目

新建三个项目,ProductService,ClientService,APIGateWay;

APIGateWay项目新建配置文件。

注意新建的json文件需要更改属性,选择【如果较新则复制】或【始终复制】

参考代码:

https://github.com/syxdevcode/GateWayDemo.git

部署项目

1
2
3
git clone https://github.com/syxdevcode/GateWayDemo.git ## 下载项目
git pull origin master ## 更新代码
docker-compose up -d --build ## 执行docker-compose命令

项目成功启动之后,查看运行后的IP

1
2
3
docker inspect -f '{{range .NetworkSettings.Networks}}{{.IPAddress}}{{end}}' gatewaydemo_demo.productservice_1

docker inspect -f '{{range .NetworkSettings.Networks}}{{.IPAddress}}{{end}}' gatewaydemo_demo.clientservice_1

记录ClientService和ProductService容器的IP。

开放主机端口

主要供consul可以访问到网关项目地址。

1
2
3
4
sudo firewall-cmd --zone=public --add-port=5000/tcp --permanent
sudo firewall-cmd --zone=public --add-port=5001/tcp --permanent
sudo firewall-cmd --zone=public --add-port=5002/tcp --permanent
sudo firewall-cmd --reload

重新运行Consul客户端容器

在consul运行目录->config目录,新建ocelot_apigateway.json文件,填入已下内容:

1
2
3
4
5
6
7
8
9
10
11
12
13
14
15
16
17
18
19
20
21
22
23
24
25
26
27
28
29
30
31
32
33
34
35
36
37
38
{
"services":[
{
"id": "gatewaydemo_demo.clientservice_1",
"name" : "Demo.ClientService",
"tags": [
"urlprefix-/clientservice"
],
"address": "172.18.0.4", // 对应clientservice容器IP
"port": 5001,
"checks": [
{
"name": "clientservice_check",
"http": "http://172.18.0.4:5001/api/health",// 对应clientservice项目连接
"interval": "10s",
"timeout": "5s"
}
]
},
{
"id": "gatewaydemo_demo.productservice_1",
"name" : "Demo.ProductService",
"tags": [
"urlprefix-/productservice"
],
"address": "172.18.0.3", // 对应productserver容器IP
"port": 5002,
"checks": [
{
"name": "productservice_check",
"http": "http://172.18.0.3:5002/api/health", // 对应productservice项目连接
"interval": "10s",
"timeout": "5s"
}
]
}
]
}

重新运行client1容器,如果容器存在,应当先删除容器

需要在consul目录的上一级运行docker run命令

1
2
sudo docker rm -f client1
sudo docker run --name=client1 -it -d -p 8500:8500 -v $PWD/consul:/consul consul agent -config-dir=/consul/config -config-file=/consul/client1.json

QQ截图20180803095300.png

QQ截图20180803095334.png

负载均衡

新建项目:clientservice1,并且修改如下方法,
clientservice项目同样需要修改:

1
2
3
4
5
6
7
// GET api/values/5
[HttpGet("{id}")]
public string[] Get(int id)
{
return new string[] { $"ClinetService: {DateTime.Now.ToString()} {Environment.MachineName} " +
$"OS: {Environment.OSVersion.VersionString}" };
}

部署项目,并获取到容器IP;

ocelot配置文件中负载均衡的设置:

1
2
3
4
5
6
7
8
"ReRoutes": [
{
.....
"LoadBalancerOptions": {
"Type": "RoundRobin"
},
.....
}]

负载均衡LoadBalance可选值:

1
2
3
RoundRobin - 轮询
LeastConnection - 最小连接数,谁的任务最少谁来
NoLoadBalance - 不要负载均衡

通过consul测试,需要新建一个consul client端:

在consul文件夹下,新建config1文件夹,client2.json文件:

client2.json配置如下:

1
2
3
4
5
6
7
8
9
10
11
12
13
14
15
16
17
{
"data_dir": "/data",
"datacenter": "consul-test",
"log_level": "INFO",
"node_name": "client2",
"server": false,
"ui": true,
"http_config": {
"response_headers": {
"Access-Control-Allow-Origin": "*"
}
},
"addresses": {
"http": "0.0.0.0"
},
"start_join": ["172.17.0.2", "172.17.0.3", "172.17.0.4"]
}

在config1文件夹下,新建config.json:

1
2
3
4
5
6
7
8
9
10
11
12
13
14
15
16
17
18
19
20
    "services":[
{
"id": "gatewaydemo_demo.clientservice_1",
"name" : "Demo.ClientService",
"tags": [
"urlprefix-/clientservice"
],
"address": "172.18.0.5",// 容器IP
"port": 5003,
"checks": [
{
"name": "clientservice_check",
"http": "http://172.18.0.5:5003/api/health",
"interval": "10s",
"timeout": "5s"
}
]
}
]
}

显示结果:

QQ截图20180803154641.png

QQ截图20180803154718.png

动态路由(Dynamic Routing)

参考代码:

https://github.com/syxdevcode/GateWayDemo.git

效果:

QQ截图20180803173238.png

QQ截图20180803173307.png

集成Swagger统一API文档入口

QQ截图20180806113303.png

QQ截图20180806113358.png

注:docker部署项目,需要在项目.csproj文件中添加如下属性:

1
2
3
4
<PropertyGroup>
<GenerateDocumentationFile>true</GenerateDocumentationFile>
<NoWarn>$(NoWarn);1591</NoWarn>
</PropertyGroup>

参考:

.NET Core微服务之基于Ocelot实现API网关服务

Ocelot + Consul实践

.NET Core微服务之基于Ocelot实现API网关服务(续)

谈谈微服务中的 API 网关(API Gateway)

root账户执行以下命令,或者使用sudo,否则提示权限不足。

1
vim /etc/sudoers

找到root用户:

1
2
3
## Allow root to run any commands anywhere
root ALL=(ALL) ALL
toor ALL=(ALL) ALL

:!wq
退出保存

sudoers的权限是0440,即只有root才能读。在你用root或sudo后强行保存(wq!)即可。

下载包

1
sudo curl -L https://github.com/docker/compose/releases/download/1.22.0/docker-compose-$(uname -s)-$(uname -m) -o /usr/local/bin/docker-compose

注意出现:curl: (35) Peer reports incompatible or unsupported protocol version.

需要更新nss,curl

1
sudo yum update nss curl

授权

1
sudo chmod +x /usr/local/bin/docker-compose

查看版本

1
docker-compose --version

参考:

https://docs.docker.com/compose/install/#install-compose

介绍

Polly是一个被.NET基金会认可的弹性和瞬态故障处理库,允许我们以非常顺畅和线程安全的方式来执诸如行重试

官网:http://www.thepollyproject.org/

源码:https://github.com/App-vNext/Polly

其主要功能如下:

  • 重试(Retry)
  • 断路器(Circuit-Breaker)
  • 超时检测(Timeout)
  • 隔板隔离 (Bulkhead Isolation)
  • 缓存(Cache)
  • 降级(Fallback)

在Polly中,对这些服务容错模式分为两类:

  • 错误处理(fault handling):重试、熔断、回退(降级)
  • 弹性应变(resilience):超时、舱壁、缓存

可以说错误处理是当错误已经发生时,防止由于该错误对整个系统造成更坏的影响而设置。而弹性应变,则在是错误发生前,针对有可能发生错误的地方进行预先处理,从而达到保护整个系统的目地。

错误处理(fault handling)

重试

1
2
3
4
5
6
7
8
9
10
11
12
13
14
15
16
17
18
19
20
21
22
static void Test1()
{
try
{
ISyncPolicy policy = Policy.Handle<ArgumentException>()
.Retry(2, (ex, retryCount, context) =>
{
Console.WriteLine($"Error occured,runing fallback,exception :{ex.Message},retryCount:{retryCount}");
});

policy.Execute(() =>
{
Console.WriteLine("Job Start");

throw new ArgumentException("Hello Polly!");
});
}
catch (Exception ex)
{
Console.WriteLine("There's one unhandled exception : " + ex.Message);
}
}
  • .Retry(3) :按次数重试
  • .RetryForever() :不断重试(直到成功)
  • .WaitAndRetry() :等待之后重试
  • .WaitAndRetryForever :等待并永远重试(直到成功

熔断 Circuit Breaker

1
2
3
4
5
6
7
8
9
10
11
12
13
14
15
16
17
18
19
20
21
22
23
24
25
26
27
28
29
30
31
32
33
34
35
36
37
38
39
40
41
42
43
44
45
46
47
48
49
50
51
static void CircuitBreaker()
{
Action<Exception, TimeSpan, Context> onBreak = (exception, timespan, context) =>
{
Console.WriteLine("onBreak Running : " + exception.Message);
};

Action<Context> onReset = context =>
{
Console.WriteLine("Job Back to normal");
};

CircuitBreakerPolicy breaker = Policy
.Handle<AggregateException>()
.CircuitBreaker(3, TimeSpan.FromSeconds(10), onBreak, onReset);

// Monitor the circuit state, for example for health reporting.
CircuitState state = breaker.CircuitState;

ISyncPolicy policy = Policy.Handle<ArgumentException>()
.Retry(3, (ex, retryCount, context) =>
{
Console.WriteLine($"Runing fallback,Exception :{ex.Message},RetryCount:{retryCount}");
});

while (true)
{
try
{
var policyWrap = Policy.Wrap(policy, breaker);

// (wraps the policies around any executed delegate: fallback outermost ... bulkhead innermost)
policyWrap.Execute(() =>
{
Console.WriteLine("Job Start");

if (DateTime.Now.Second % 3 == 0)
throw new ArgumentException("Hello Polly!");
});
}
catch (Exception ex)
{
// 手动打开熔断器,阻止执行
breaker.Isolate();
}
Thread.Sleep(1000);

// 恢复操作,启动执行
breaker.Reset();
}
}

降级 Fallback

1
2
3
4
5
6
7
8
9
10
11
12
13
14
15
static void FallbackTest()
{
ISyncPolicy policy = Policy.Handle<ArgumentException>()
.Fallback(() =>
{
Console.WriteLine("Error occured,runing fallback");
});

policy.Execute(() =>
{
Console.WriteLine("Job Start");

throw new ArgumentException("Hello Polly!");
});
}

弹性应变处理 (Resilience)

超时

Timeout则是指超时处理,但是超时策略一般不能直接使用,而是其其他策略封装到一起使用。
常用悲观超时。

乐观超时 (Optimistic timeout)

1
2
3
4
5
6
7
8
9
10
11
12
13
14
15
public void Should_be_able_to_cancel_with_user_cancellation_token_before_timeout__optimistic()
{
int timeout = 10;
var policy = Policy.TimeoutAsync(timeout, TimeoutStrategy.Optimistic);

using (CancellationTokenSource userTokenSource = new CancellationTokenSource())
{
policy.Awaiting(async p => await p.ExecuteAsync(
ct => {
userTokenSource.Cancel(); ct.ThrowIfCancellationRequested(); // Simulate cancel in the middle of execution
return TaskHelper.EmptyTask;
}, userTokenSource.Token) // ... with user token.
).ShouldThrow<OperationCanceledException>();
}
}

悲观超时

1
2
3
4
5
6
7
8
9
10
11
12
13
14
15
16
17
18
19
20
21
22
23
24
25
26
27
28
29
30
31
32
static void PessimisticTimeOutTest()
{
CancellationTokenSource userCancellationSource = new CancellationTokenSource();

ISyncPolicy fallback = Policy.Handle<Polly.Timeout.TimeoutRejectedException>()
.Or<ArgumentException>()
.Fallback(() =>
{
Console.WriteLine("Error occured,runing fallback");
},
(ex) => { Console.WriteLine($"Fallback exception:{ex.GetType().ToString()},Message:{ex.Message}"); });

ISyncPolicy policyTimeout = Policy.Timeout(3, Polly.Timeout.TimeoutStrategy.Pessimistic);

while (true)
{
var policyWrap = Policy.Wrap(fallback, policyTimeout);

// (wraps the policies around any executed delegate: fallback outermost ... bulkhead innermost)
policyWrap.Execute(() =>
{
Console.WriteLine("Job Start");

if (DateTime.Now.Second % 2 == 0)
{
Thread.Sleep(3000);
throw new ArgumentException("Hello Polly!");
}
});
Thread.Sleep(300);
}
}

舱壁 Bulkhead

参考:

https://github.com/App-vNext/Polly

介绍

Polly是一个被.NET基金会认可的弹性和瞬态故障处理库,允许我们以非常顺畅和线程安全的方式来执诸如行重试

官网:http://www.thepollyproject.org/

源码:https://github.com/App-vNext/Polly

其主要功能如下:

  • 重试(Retry)
  • 断路器(Circuit-Breaker)
  • 超时检测(Timeout)
  • 隔板隔离 (Bulkhead Isolation)
  • 缓存(Cache)
  • 降级(Fallback)

在Polly中,对这些服务容错模式分为两类:

  • 错误处理(fault handling):重试、熔断、回退(降级)
  • 弹性应变(resilience):超时、舱壁、缓存

可以说错误处理是当错误已经发生时,防止由于该错误对整个系统造成更坏的影响而设置。而弹性应变,则在是错误发生前,
针对有可能发生错误的地方进行预先处理,从而达到保护整个系统的目地。

Polly 错误处理使用三步曲

  • 定义条件: 定义你要处理的 错误异常/返回结果
  • 定义处理方式 : 重试,熔断,回退
  • 执行
1
2
3
4
5
6
var policy = Policy
.Handle<SomeExceptionType>() // 定义条件
.Retry(); // 定义处理方式

// 执行
policy.Execute(() => DoSomething());

错误处理(fault handling)

定义条件

定义异常策略

针对两种情况:错误异常和返回结果

1
2
3
4
5
6
7
8
9
10
11
12
13
14
15
16
17
18
19
20
21
22
// Single exception type
Policy
.Handle<HttpRequestException>()

// Single exception type with condition
Policy
.Handle<SqlException>(ex => ex.Number == 1205)

// Multiple exception types
Policy
.Handle<HttpRequestException>()
.Or<OperationCanceledException>()

// Multiple exception types with condition
Policy
.Handle<SqlException>(ex => ex.Number == 1205)
.Or<ArgumentException>(ex => ex.ParamName == "example")

// Inner exceptions of ordinary exceptions or AggregateException, with or without conditions
Policy
.HandleInner<HttpRequestException>()
.OrInner<OperationCanceledException>(ex => ex.CancellationToken != myToken)

定义返回结果策略

1
2
3
4
5
6
7
8
9
10
11
12
13
14
15
16
17
18
19
20
21
22
23
24
25
26
27
// Handle return value with condition 
Policy
.HandleResult<HttpResponseMessage>(r => r.StatusCode == HttpStatusCode.NotFound)

// Handle multiple return values
Policy
.HandleResult<HttpResponseMessage>(r => r.StatusCode == HttpStatusCode.InternalServerError)
.OrResult<HttpResponseMessage>(r => r.StatusCode == HttpStatusCode.BadGateway)

// Handle primitive return values (implied use of .Equals())
Policy
.HandleResult<HttpStatusCode>(HttpStatusCode.InternalServerError)
.OrResult<HttpStatusCode>(HttpStatusCode.BadGateway)

// Handle both exceptions and return values in one policy
HttpStatusCode[] httpStatusCodesWorthRetrying = {
HttpStatusCode.RequestTimeout, // 408
HttpStatusCode.InternalServerError, // 500
HttpStatusCode.BadGateway, // 502
HttpStatusCode.ServiceUnavailable, // 503
HttpStatusCode.GatewayTimeout // 504
};
HttpResponseMessage result = Policy
.Handle<HttpRequestException>()
.OrResult<HttpResponseMessage>(r => httpStatusCodesWorthRetrying.Contains(r.StatusCode))
.RetryAsync(...)
.ExecuteAsync( /* some Func<Task<HttpResponseMessage>> */ )

定义处理方式

重试 Retry

当发生某种错误或者返回某种结果的时候进行重试。
Polly里面提供了以下几种重试机制

  • 按次数重试
  • 不断重试(直到成功)
  • 等待之后按次数重试
  • 等待之后不断重试(直到成功)

按次数重试

1
2
3
4
5
6
7
8
9
10
11
12
13
14
15
16
17
18
19
20
21
22
23
24
25
26
27
28
// Retry once
Policy
.Handle<SomeExceptionType>()
.Retry()

// Retry multiple times
Policy
.Handle<SomeExceptionType>()
.Retry(3)

// Retry multiple times, calling an action on each retry
// with the current exception and retry count
Policy
.Handle<SomeExceptionType>()
.Retry(3, (exception, retryCount) =>
{
// do something
});

// Retry multiple times, calling an action on each retry
// with the current exception, retry count and context
// provided to Execute()
Policy
.Handle<SomeExceptionType>()
.Retry(3, (exception, retryCount, context) =>
{
// do something
});

不断重试(直到成功)

1
2
3
4
5
6
7
8
9
10
11
12
13
14
15
16
17
18
19
20
21
22
// Retry forever
Policy
.Handle<SomeExceptionType>()
.RetryForever()

// Retry forever, calling an action on each retry with the
// current exception
Policy
.Handle<SomeExceptionType>()
.RetryForever(exception =>
{
// do something
});

// Retry forever, calling an action on each retry with the
// current exception and context provided to Execute()
Policy
.Handle<SomeExceptionType>()
.RetryForever((exception, context) =>
{
// do something
});

等待之后重试

1
2
3
4
5
6
7
8
9
10
11
12
13
14
15
16
17
18
19
20
21
22
23
24
25
26
27
28
29
30
31
32
33
34
35
36
37
38
39
40
41
42
43
44
45
46
47
48
49
50
51
52
53
54
55
56
57
58
59
60
61
62
63
64
65
66
67
68
69
70
71
72
73
74
75
76
77
78
79
80
81
82
83
84
85
86
87
88
89
90
91
92
93
94
95
96
// Retry, waiting a specified duration between each retry
Policy
.Handle<SomeExceptionType>()
.WaitAndRetry(new[]
{
TimeSpan.FromSeconds(1),
TimeSpan.FromSeconds(2),
TimeSpan.FromSeconds(3)
});

// Retry, waiting a specified duration between each retry,
// calling an action on each retry with the current exception
// and duration
Policy
.Handle<SomeExceptionType>()
.WaitAndRetry(new[]
{
TimeSpan.FromSeconds(1),
TimeSpan.FromSeconds(2),
TimeSpan.FromSeconds(3)
}, (exception, timeSpan) => {
// do something
});

// Retry, waiting a specified duration between each retry,
// calling an action on each retry with the current exception,
// duration and context provided to Execute()
Policy
.Handle<SomeExceptionType>()
.WaitAndRetry(new[]
{
TimeSpan.FromSeconds(1),
TimeSpan.FromSeconds(2),
TimeSpan.FromSeconds(3)
}, (exception, timeSpan, context) => {
// do something
});

// Retry, waiting a specified duration between each retry,
// calling an action on each retry with the current exception,
// duration, retry count, and context provided to Execute()
Policy
.Handle<SomeExceptionType>()
.WaitAndRetry(new[]
{
TimeSpan.FromSeconds(1),
TimeSpan.FromSeconds(2),
TimeSpan.FromSeconds(3)
}, (exception, timeSpan, retryCount, context) => {
// do something
});

// Retry a specified number of times, using a function to
// calculate the duration to wait between retries based on
// the current retry attempt (allows for exponential backoff)
// In this case will wait for
// 2 ^ 1 = 2 seconds then
// 2 ^ 2 = 4 seconds then
// 2 ^ 3 = 8 seconds then
// 2 ^ 4 = 16 seconds then
// 2 ^ 5 = 32 seconds
Policy
.Handle<SomeExceptionType>()
.WaitAndRetry(5, retryAttempt =>
TimeSpan.FromSeconds(Math.Pow(2, retryAttempt))
);

// Retry a specified number of times, using a function to
// calculate the duration to wait between retries based on
// the current retry attempt, calling an action on each retry
// with the current exception, duration and context provided
// to Execute()
Policy
.Handle<SomeExceptionType>()
.WaitAndRetry(
5,
retryAttempt => TimeSpan.FromSeconds(Math.Pow(2, retryAttempt)),
(exception, timeSpan, context) => {
// do something
}
);

// Retry a specified number of times, using a function to
// calculate the duration to wait between retries based on
// the current retry attempt, calling an action on each retry
// with the current exception, duration, retry count, and context
// provided to Execute()
Policy
.Handle<SomeExceptionType>()
.WaitAndRetry(
5,
retryAttempt => TimeSpan.FromSeconds(Math.Pow(2, retryAttempt)),
(exception, timeSpan, retryCount, context) => {
// do something
}
);

等待并永远重试(直到成功)

1
2
3
4
5
6
7
8
9
10
11
12
13
14
15
16
17
18
19
20
21
22
23
24
25
26
27
28
// Wait and retry forever
Policy
.Handle<SomeExceptionType>()
.WaitAndRetryForever(retryAttempt =>
TimeSpan.FromSeconds(Math.Pow(2, retryAttempt))
);

// Wait and retry forever, calling an action on each retry with the
// current exception and the time to wait
Policy
.Handle<SomeExceptionType>()
.WaitAndRetryForever(
retryAttempt => TimeSpan.FromSeconds(Math.Pow(2, retryAttempt)),
(exception, timespan) =>
{
// do something
});

// Wait and retry forever, calling an action on each retry with the
// current exception, time to wait, and context provided to Execute()
Policy
.Handle<SomeExceptionType>()
.WaitAndRetryForever(
retryAttempt => TimeSpan.FromSeconds(Math.Pow(2, retryAttempt)),
(exception, timespan, context) =>
{
// do something
});

如果所有重试都失败,则重试策略会将最终异常重新返回到调用代码。

熔断 Circuit Breaker

1
2
3
4
5
6
7
8
9
10
11
12
13
14
15
16
17
18
19
20
21
22
23
24
25
26
27
28
29
30
31
32
33
34
35
36
37
38
39
// 当发生2次SomeExceptionType的异常的时候则会熔断1分钟,
// 该操作后续如果继续尝试执行则会直接返回错误 。
Policy
.Handle<SomeExceptionType>()
.CircuitBreaker(2, TimeSpan.FromMinutes(1));

// 可以在熔断和恢复的时候定义委托来做一些额外的处理。
// onBreak会在被熔断时执行,而onReset则会在恢复时执行。
Action<Exception, TimeSpan> onBreak = (exception, timespan) => { ... };
Action onReset = () => { ... };
CircuitBreakerPolicy breaker = Policy
.Handle<SomeExceptionType>()
.CircuitBreaker(2, TimeSpan.FromMinutes(1), onBreak, onReset);

// Break the circuit after the specified number of consecutive exceptions
// and keep circuit broken for the specified duration,
// calling an action on change of circuit state,
// passing a context provided to Execute().
Action<Exception, TimeSpan, Context> onBreak = (exception, timespan, context) => { ... };
Action<Context> onReset = context => { ... };
CircuitBreakerPolicy breaker = Policy
.Handle<SomeExceptionType>()
.CircuitBreaker(2, TimeSpan.FromMinutes(1), onBreak, onReset);

// Monitor the circuit state, for example for health reporting.
CircuitState state = breaker.CircuitState;

/*
Closed 关闭状态,允许执行
Open 自动打开,执行会被阻断
Isolate 手动打开,执行会被阻断
HalfOpen 从自动打开状态恢复中,在熔断时间到了之后从Open状态切换到Closed
*/

// 手动打开熔断器,阻止执行
breaker.Isolate();

// 恢复操作,启动执行
breaker.Reset();

请注意,断路器策略会重新抛出所有异常,甚至是已处理的异常。断路器用于测量故障并在发生太多故障时断开电路,
但不会重新编排重试。根据需要将断路器与重试策略相结合。

回退(Fallback)

1
2
3
4
5
6
7
8
9
10
11
12
13
14
15
16
17
18
// 如果执行失败则返回UserAvatar.Blank
Policy
.Handle<Whatever>()
.Fallback<UserAvatar>(UserAvatar.Blank)

// 发起另外一个请求去获取值
Policy
.Handle<Whatever>()
.Fallback<UserAvatar>(() => UserAvatar.GetRandomAvatar())
// where: public UserAvatar GetRandomAvatar() { ... }

// 返回一个指定的值,添加额外的处理操作。onFallback
Policy
.Handle<Whatever>()
.Fallback<UserAvatar>(UserAvatar.Blank, onFallback: (exception, context) =>
{
// do something
});

执行(Execute the policy)

1
2
3
4
5
6
7
8
9
10
11
12
13
14
15
16
17
18
19
20
21
22
23
24
25
26
27
28
29
30
31
32
33
34
35
36
37
38
39
40
41
42
43
44
45
46
47
48
// Execute an action
var policy = Policy
.Handle<SomeExceptionType>()
.Retry();

policy.Execute(() => DoSomething());

// Execute an action passing arbitrary context data
var policy = Policy
.Handle<SomeExceptionType>()
.Retry(3, (exception, retryCount, context) =>
{
var methodThatRaisedException = context["methodName"];
Log(exception, methodThatRaisedException);
});

policy.Execute(
(o) => DoSomething(),
new Dictionary<string, object>() {{ "methodName", "some method" }}
);

// Execute a function returning a result
var policy = Policy
.Handle<SomeExceptionType>()
.Retry();

var result = policy.Execute(() => DoSomething());

// Execute a function returning a result passing arbitrary context data
var policy = Policy
.Handle<SomeExceptionType>()
.Retry(3, (exception, retryCount, context) =>
{
object methodThatRaisedException = context["methodName"];
Log(exception, methodThatRaisedException)
});

var result = policy.Execute(
() => DoSomething(),
new Dictionary<string, object>() {{ "methodName", "some method" }}
);

// 我们也可以将Handle,Retry, Execute 这三个阶段都串起来写。
Policy
.Handle<SqlException>(ex => ex.Number == 1205)
.Or<ArgumentException>(ex => ex.ParamName == "example")
.Retry()
.Execute(() => DoSomething());

Polly 弹性应变处理 (Resilience)

一般弹性策略添加了弹性策略,这些策略没有明确地以处理委托可能抛出或返回的故障为中心。

超时

乐观超时 (Optimistic timeout)

超时分为乐观超时与悲观超时,乐观超时依赖于CancellationToken ,它假设我们的具体执行的任务都支持CancellationToken。
那么在进行timeout的时候,它会通知执行线程取消并终止执行线程,避免额外的开销。下面的乐观超时的具体用法 。

1
2
3
4
5
6
7
8
9
10
11
12
13
14
15
16
17
18
19
20
21
22
23
24
25
26
27
28
29
30
31
32
33
34
35
36
37
38
39
40
41
42
43
44
45
46
47
48
49
50
51
52
53
54
55
56
57
58
// Timeout and return to the caller after 30 seconds, if the executed delegate has not completed.  
// Optimistic timeout: Delegates should take and honour a CancellationToken.
Policy
.Timeout(30)

// Configure timeout as timespan.
Policy
.Timeout(TimeSpan.FromMilliseconds(2500))

// Configure variable timeout via a func provider.
Policy
.Timeout(() => myTimeoutProvider)) // Func<TimeSpan> myTimeoutProvider

// Timeout, calling an action if the action times out
Policy
.Timeout(30, onTimeout: (context, timespan, task) =>
{
// do something
});

// Eg timeout, logging that the execution timed out:
Policy
.Timeout(30, onTimeout: (context, timespan, task) =>
{
logger.Warn($"{context.PolicyKey} at {context.ExecutionKey}: execution timed out after {timespan.TotalSeconds} seconds.");
});

// Eg timeout, capturing any exception from the timed-out task when it completes:
Policy
.Timeout(30, onTimeout: (context, timespan, task) =>
{
task.ContinueWith(t => {
if (t.IsFaulted)
logger.Error($"{context.PolicyKey} at {context.ExecutionKey}: execution timed out after {timespan.TotalSeconds} seconds, with: {t.Exception}.");
});
});

Policy timeoutPolicy = Policy.TimeoutAsync(30);
HttpResponseMessage httpResponse = await timeoutPolicy
.ExecuteAsync(
async ct => await httpClient.GetAsync(endpoint, ct), // Execute a delegate which responds to a CancellationToken input parameter.
CancellationToken.None
// In this case, CancellationToken.None is passed into the execution, indicating you have no independent cancellation
// control you wish to add to the cancellation provided by TimeoutPolicy. Your own indepdent CancellationToken can also
// be passed - see wiki for examples.
);


CancellationTokenSource userCancellationSource = new CancellationTokenSource();
// userCancellationSource perhaps hooked up to the user clicking a 'cancel' button, or other independent cancellation

Policy timeoutPolicy = Policy.TimeoutAsync(30, TimeoutStrategy.Optimistic);

HttpResponseMessage httpResponse = await _timeoutPolicy
.ExecuteAsync(
async ct => await httpClient.GetAsync(requestEndpoint, ct),
userCancellationSource.Token
); // GetAsync(...) will be cancelled when either the timeout occurs, or userCancellationSource is signalled.

悲观超时

悲观超时与乐观超时的区别在于,如果执行的代码不支持取消CancellationToken,它还会继续执行,这会是一个比较大的开销。

1
2
3
4
5
Policy timeoutPolicy = Policy.TimeoutAsync(30, TimeoutStrategy.Pessimistic);
var response = await timeoutPolicy
.ExecuteAsync(
async () => await FooNotHonoringCancellationAsync(),
);// 在这里我们没有 任何与CancllationToken相关的处理

舱壁 Bulkhead

1
2
3
4
5
6
7
8
9
10
11
12
13
14
15
16
17
18
19
20
// 它用来限制某一个操作的最大并发执行数量 。比如限制为12
Policy
.Bulkhead(12)

// 控制一个等待处理的队列长度
Policy
.Bulkhead(12, 2)

// 当请求执行操作被拒绝的时候,执行回调
Policy
.Bulkhead(12, context =>
{
// do something
});

// Monitor the bulkhead available capacity, for example for health/load reporting.
var bulkhead = Policy.Bulkhead(12, 2);
// ...
int freeExecutionSlots = bulkhead.BulkheadAvailableCount;
int freeQueueSlots = bulkhead.QueueAvailableCount;

缓存 Cache

1
2
3
4
5
6
7
Microsoft.Extensions.Caching.Memory.IMemoryCache memoryCache
= new Microsoft.Extensions.Caching.Memory.MemoryCache(new Microsoft.Extensions.Caching.Memory.MemoryCacheOptions());
Polly.Caching.Memory.MemoryCacheProvider memoryCacheProvider
= new Polly.Caching.Memory.MemoryCacheProvider(memoryCache);

// (2) Create a Polly cache policy using that Polly.Caching.Memory.MemoryCacheProvider instance.
var cachePolicy = Policy.Cache(memoryCacheProvider, TimeSpan.FromMinutes(5));

参考代码:

https://github.com/App-vNext/Polly.Caching.MemoryCache
https://github.com/App-vNext/Polly.Caching.IDistributedCache

组合Policy

1
2
3
4
5
6
7
8
9
10
11
12
13
14
15
16
17
18
19
20
21
22
// Define a combined policy strategy, built of previously-defined policies.
var policyWrap = Policy
.Wrap(fallback, cache, retry, breaker, timeout, bulkhead);
// (wraps the policies around any executed delegate: fallback outermost ... bulkhead innermost)
policyWrap.Execute(...)

// Define a standard resilience strategy ...
PolicyWrap commonResilience = Policy.Wrap(retry, breaker, timeout);

// ... then wrap in extra policies specific to a call site, at that call site:
Avatar avatar = Policy
.Handle<Whatever>()
.Fallback<Avatar>(Avatar.Blank)
.Wrap(commonResilience)
.Execute(() => { /* get avatar */ });

// Share commonResilience, but wrap different policies in at another call site:
Reputation reps = Policy
.Handle<Whatever>()
.Fallback<Reputation>(Reputation.NotAvailable)
.Wrap(commonResilience)
.Execute(() => { /* get reputation */ });

参考代码:https://github.com/App-vNext/Polly/wiki/PolicyWrap

执行后:捕获结果或任何最终异常

1
2
3
4
5
6
7
8
9
10
11
var policyResult = Policy
.Handle<HttpRequestException>()
.RetryAsync()
.ExecuteAndCaptureAsync(() => DoSomethingAsync());
/*
policyResult.Outcome - whether the call succeeded or failed
policyResult.FinalException - the final exception captured, will be null if the call succeeded
policyResult.ExceptionType - was the final exception an exception the policy was defined to handle
(like HttpRequestException above) or an unhandled one (say Exception). Will be null if the call succeeded.
policyResult.Result - if executing a func, the result if the call succeeded or the type's default value
*/

参考:

https://github.com/App-vNext/Polly

ASP VNext 开源服务容错处理库Polly使用文档

已被.NET基金会认可的弹性和瞬态故障处理库Polly介绍

.NET Core微服务之基于Polly+AspectCore实现熔断与降级机制

IAsyncResult 异步设计模式通过名为 BeginOperationName 和 EndOperationName 的两个方法来实现原同步方法的异步调用,如 FileStream 类提供了 BeginRead 和 EndRead 方法来从文件异步读取字节,它们是 Read 方法的异步版本。

Begin方法包含同步方法签名中的任何参数,此外还包含另外两个参数
一个AsyncCallback 委托
一个用户定义的状态对象

委托用来调用回调方法,状态对象是用来向回调方法传递状态信息。该方法返回一个实现 IAsyncResult 接口的对象。

End 方法用于结束异步操作并返回结果,因此包含同步方法签名中的 ref 和 out 参数,返回值类型也与同步方法相同。该方法还包括一个IAsyncResult 参数,用于获取异步操作是否完成的信息,当然在使用时就必须传入对应的 Begin 方法返回的对象实例。

开始异步操作后如果要阻止应用程序,可以直接调用 End 方法,这会阻止应用程序直到异步操作完成后再继续执行。也可以使用 IAsyncResultAsyncWaitHandle 属性,调用其中的WaitOne等方法来阻塞线程。
这两种方法的区别不大,只是前者必须一直等待而后者可以设置等待超时。

如果不阻止应用程序,则可以通过轮循 IAsyncResultIsCompleted 状态来判断操作是否完成,或使用 AsyncCallback 委托来结束异步操作。
AsyncCallback 委托包含一个 IAsyncResult 的签名,回调方法内部再调用 End 方法来获取操作执行结果。

代码:

1
2
3
4
5
6
7
8
9
10
11
12
13
14
15
16
17
18
19
20
21
22
23
24
25
26
27
28
29
30
31
32
33
34
35
36
37
38
39
40
41
42
43
44
45
46
47
48
49
50
51
52
53
54
55
56
57
58
59
60
61
62
63
64
65
66
67
68
69
70
71
72
73
74
75
76
77
78
79
80
81
82
83
84
85
86
87
88
89
90
91
92
93
94
95
96
namespace ConsoleApplication1
{
class Program
{
static AsyncDemo demo = new AsyncDemo();

static void Main(string[] args)
{
//bool state = false;

//IAsyncResult ar = demo.BeginRun("zhangshan", new AsyncCallback(outPut), state);

//ar.AsyncWaitHandle.WaitOne(1000, false);

IAsyncResult ar = demo.BeginRun("zhangshan", null, null);

if (ar.IsCompleted)
{
string demoName = demo.EndRun(ar);
Console.WriteLine(demoName);
}
else
{
Console.WriteLine("Sorry,can't get demoName, the time is over");
}

System.Threading.Thread.Sleep(1000);

Console.ReadKey();
}

static void outPut(IAsyncResult ar)
{
bool state = (bool)ar.AsyncState;
string demoName = demo.EndRun(ar);

if (state)
{
Console.WriteLine(demoName);
}
else
{
Console.WriteLine(demoName);
}
}
}

public class AsyncDemo
{
private delegate string runDelegate(string name);

private runDelegate m_Delegate;

public AsyncDemo()
{
m_Delegate = new runDelegate(Run);
}

/// ﹤summary﹥
/// Synchronous method
/// ﹤/summary﹥
/// ﹤returns﹥﹤/returns﹥
public string Run(string name)
{
return "My name is " + name;
}

public IAsyncResult BeginRun(string name, AsyncCallback callBack, Object stateObject)
{
try
{
return m_Delegate.BeginInvoke(name, callBack, stateObject);
}
catch (Exception e)
{
throw e;
}
}

public string EndRun(IAsyncResult ar)
{
if (ar == null)
throw new NullReferenceException("Arggument ar can't be null");

try
{
return m_Delegate.EndInvoke(ar);
}
catch (Exception e)
{
throw e;
}
}
}

}

参考:

C#异步编程模式IAsyncResult浅析

使用 IAsyncResult 进行 .NET 异步编程

异步编程(AsyncCallback委托,IAsyncResult接口,BeginInvoke方法,EndInvoke方法的使用小总结)

RabbitMQ学习

RabbitMQ 简介

RabbitMQ——Rabbit Message Queue的简写,是一个由erlang开发,基于AMQP(Advanced Message Queue Protocol)协议的开源实现。RabbitMQ提供了可靠的消息机制、跟踪机制和灵活的消息路由,支持消息集群和分布式部署,适用于排队算法、秒杀活动、消息分发、异步处理、数据同步、处理耗时任务、CQRS等应用场景。是当前最主流的消息中间件之一。

RabbitMQ的官网:http://www.rabbitmq.com

435188-20180605151314266-1010797270.png

RabbitMQ 投递过程:

  • 1.客户端连接到消息队列服务器,打开一个 channel。
  • 2.客户端声明一个 exchange,并设置相关属性。
  • 3.客户端声明一个 queue,并设置相关属性。
  • 4.客户端使用 routing key,在 exchange 和 queue 之间建立好绑定关系。
  • 5.客户端Producer投递消息到 exchange。
  • 6.客户端Consumer从指定的 queue 中消费信息。

AMQP 简介

AMQP,是应用层协议的一个开放标准,为面向消息的中间件设计。消息中间件主要用于组件之间的解耦,消息的发送者无需知道消息使用者的存在,同样,消息使用者也不用知道发送者的存在。AMQP的主要特征是面向消息、队列、路由(包括点对点和发布/订阅)、可靠性、安全。

RabbitMQ 概念

  • Exchange : 消息交换机,它指定消息按什么规则,路由到哪个队列
  • Queue : 消息队列,每个消息都会被投入到一个或多个队列
  • Routing Key : 路由关键字,exchange根据这个关键字进行消息投递。
  • Binding Key : 绑定,它的作用就是把 exchange 和 queue 按照路由规则绑定起来
  • Vhost : 虚拟主机,可以开设多个 vhost,用作不同用户的权限分离
  • Producer : 消息生产者,投递消息的程序,简写 :P
  • Consumer : 消息消费者,接受消息的程序,简写 : C
  • Broker :消息队列的服务器实体。
  • Channel : 消息通道,在客户端的每个连接里,可建立多个 channel,每个 channel 代表一个会话任务

消息发送原理

应用程序和Rabbit Server之间会创建一个TCP连接,一旦TCP打开,并通过了认证,认证就是你试图连接Rabbit之前发送的Rabbit服务器连接信息和用户名和密码,有点像程序连接数据库,一旦认证通过你的应用程序和Rabbit就创建了一条AMQP信道(Channel)。

信道是创建在“真实”TCP上的虚拟连接,AMQP命令都是通过信道发送出去的,每个信道都会有一个唯一的ID,不论是发布消息,订阅队列或者介绍消息都是通过信道完成的。

为什么不通过TCP直接发送命令?对于操作系统来说创建和销毁TCP会话是非常昂贵的开销,假设高峰期每秒有成千上万条连接,每个连接都要创建一条TCP会话,这就造成了TCP连接的巨大浪费,而且操作系统每秒能创建的TCP也是有限的,因此很快就会遇到系统瓶颈。

如果我们每个请求都使用一条TCP连接,既满足了性能的需要,又能确保每个连接的私密性,这就是引入信道概念的原因。

使用 RabbitMQ

在.NET中使用RabbitMQ需要下载RabbitMQ的客户端程序集.

1
Install-Package RabbitMQ.Client -Version 5.1.0

https://www.nuget.org/packages/RabbitMQ.Client/

工作队列

工作队列(work queues, 又称任务队列Task Queues)的主要思想是为了避免立即执行并等待一些占用大量资源、时间的操作完成。而是把任务(Task)当作消息发送到队列中,稍后处理。一个运行在后台的工作者(worker)进程就会取出任务然后处理。当运行多个工作者(workers)时,任务会在它们之间共享。

这个在网络应用中非常有用,它可以在短暂的HTTP请求中处理一些复杂的任务。在一些实时性要求不太高的地方,我们可以处理完主要操作之后,以消息的方式来处理其他的不紧要的操作,比如写日志等等。

发送/接收消息

分别创建两个控制台项目Send、Receive。

安装 RabbitMQ.Client

注意:消息接收端和发送端的队列名称(queue)必须保持一致

2799767-a5e45f97bec36c8a.png

源代码:https://github.com/syxdevcode/RabbitMqDemo

Send逻辑代码:

1
2
3
4
5
6
7
8
9
10
11
12
13
14
15
16
17
18
19
20
21
22
23
24
25
26
27
28
29
30
31
32
33
34
35
36
37
38
39
40
41
42
43
44
45
46
47
48
49
namespace RabbitMqDemo.Send
{
class Program
{
static void Main(string[] args)
{
//ServicePointManager.ServerCertificateValidationCallback += (sender, cert, chain, sslPolicyErrors) => true;
ConnectionFactory factory = new ConnectionFactory()
{
UserName = "admin",
Password = "admin",
AutomaticRecoveryEnabled = true,
Ssl = new SslOption()
{
CertPath = @"E:\git\RabbitMqDemo\RabbitMqDemo.Send\server.pfx",
CertPassphrase = "123123",
AcceptablePolicyErrors = SslPolicyErrors.RemoteCertificateNameMismatch |
SslPolicyErrors.RemoteCertificateChainErrors,
Enabled = true
},
//AuthMechanisms = new AuthMechanismFactory[] { new ExternalMechanismFactory() },
RequestedHeartbeat = 60,
Port = 5673,
TopologyRecoveryEnabled = true
};

//第一步:创建connection
using (var connection = factory.CreateConnection(new string[1] { "192.168.0.115" }))
{
//第二步:创建一个channel信道
using (var channel = connection.CreateModel())
{
//第三步:申明队列 durable:是否持久化
var result = channel.QueueDeclare(queue: "test1", durable: true, exclusive: false, autoDelete: false, arguments: null);

for (int i = 0; i < int.MaxValue; i++)
{
//构建byte消息数据包
var body = Encoding.UTF8.GetBytes(i.ToString() + "test");
channel.BasicPublish(exchange: "", routingKey: "test1", basicProperties: null, body: body);
Console.WriteLine("{0} 推送成功", i);
Thread.Sleep(500);
}
}
}
Console.Read();
}
}
}

Receive逻辑代码:

1
2
3
4
5
6
7
8
9
10
11
12
13
14
15
16
17
18
19
20
21
22
23
24
25
26
27
28
29
30
31
32
33
34
35
36
37
38
39
40
41
42
43
44
45
46
47
static void Main(string[] args)
{
//1.实例化连接工厂
ConnectionFactory factory = new ConnectionFactory()
{
UserName = "admin",
Password = "admin",
AutomaticRecoveryEnabled = true,
Ssl = new SslOption()
{
CertPath = @"E:\git\RabbitMqDemo\RabbitMqDemo.Receive\server.pfx",
CertPassphrase = "123123",
AcceptablePolicyErrors = SslPolicyErrors.RemoteCertificateNameMismatch |
SslPolicyErrors.RemoteCertificateChainErrors,
Enabled = true
},
//AuthMechanisms = new AuthMechanismFactory[] { new ExternalMechanismFactory() },
RequestedHeartbeat = 60,
Port = 5673,
TopologyRecoveryEnabled = true
};

//2. 建立连接
using (var connection = factory.CreateConnection(new string[1] { "192.168.0.115" }))
{
//3. 创建信道
using (var channel = connection.CreateModel())
{
//4. 申明队列
channel.QueueDeclare(queue: "test1", durable: true, exclusive: false, autoDelete: false, arguments: null);
//5. 构造消费者实例
var consumer = new EventingBasicConsumer(channel);
//6. 绑定消息接收后的事件委托
consumer.Received += (model, ea) =>
{
var message = Encoding.UTF8.GetString(ea.Body);
Console.WriteLine(" [x] Received {0}", message);
Thread.Sleep(500);//模拟耗时
Console.WriteLine(" [x] Done");
};
//7. 启动消费者
channel.BasicConsume(queue: "test1", autoAck: true, consumer: consumer);
Console.WriteLine(" Press [enter] to exit.");
Console.ReadLine();
}
}
}

轮询分发

2799767-283ced13913a0aac.png

我们先启动两个接收端,等待消息接收,再启动一个发送端进行消息发送。

QQ截图20180712135714.png

从图中可知,发送的信息,被两个消息接收端按顺序循环分配。
默认情况下,RabbitMQ将按顺序将每条消息发送给下一个消费者。平均每个消费者将获得相同数量的消息。这种分发消息的方式叫做循环(round-robin)

消息确认

当处理一个比较耗时得任务的时候,也许想知道消费者(consumers)是否运行到一半就挂掉。在当前的代码中,当RabbitMQ将消息发送给消费者(consumers)之后,马上就会将该消息从队列中移除。此时,如果把处理这个消息的工作者(worker)停掉,正在处理的这条消息就会丢失。同时,所有发送到这个工作者的还没有处理的消息都会丢失。

我们不想丢失任何任务消息。如果一个工作者(worker)挂掉了,我们希望该消息会重新发送给其他的工作者(worker)。

为了防止消息丢失,RabbitMQ提供了** 消息响应(message acknowledgments)**机制。消费者会通过一个ack(响应),告诉RabbitMQ已经收到并处理了某条消息,然后RabbitMQ才会释放并删除这条消息。

如果消费者(consumer)挂掉了,没有发送响应,RabbitMQ就会认为消息没有被完全处理,然后重新发送给其他消费者(consumer)。这样,即使工作者(workers)偶尔的挂掉,也不会丢失消息。

消息是没有超时这个概念的;当工作者与它断开连的时候,RabbitMQ会重新发送消息。这样在处理一个耗时非常长的消息任务的时候就不会出问题了。

1
2
3
4
5
6
7
8
9
10
11
12
13
14
15
16
17
18
19
20
21
22
23
24
25
26
27
28
29
30
31
32
33
34
35
36
37
38
39
40
41
42
43
44
45
46
47
48
49
50
51
52
53
54
55
56
57
58
59
60
61
62
63
64
65
66
67
68
69
70
71
72
namespace RabbitMqDemo.Receive
{
class Program
{
static void Main(string[] args)
{
//1.实例化连接工厂
// 加证书
//ConnectionFactory factory = new ConnectionFactory()
//{
// UserName = "admin",
// Password = "admin",
// Ssl = new SslOption()
// {
// CertPath = @"E:\git\RabbitMqDemo\RabbitMqDemo.Receive\server.pfx",
// CertPassphrase = "123123",

// AcceptablePolicyErrors = SslPolicyErrors.RemoteCertificateNameMismatch |
// SslPolicyErrors.RemoteCertificateChainErrors,
// Enabled = true
// },
// //AuthMechanisms = new AuthMechanismFactory[] { new ExternalMechanismFactory() },
// RequestedHeartbeat = 60,
// Port = 5673
//};

ConnectionFactory factory = new ConnectionFactory()
{
UserName = "admin",
Password = "admin",
AutomaticRecoveryEnabled = true,
Port = 5672,
TopologyRecoveryEnabled = true
};

//2. 建立连接
using (var connection = factory.CreateConnection(new string[1] { "192.168.0.115" }))
{
//3. 创建信道
using (var channel = connection.CreateModel())
{
//4. 申明队列
channel.QueueDeclare(queue: "test1", durable: true, exclusive: false, autoDelete: false, arguments: null);
channel.BasicQos(prefetchSize: 0, prefetchCount: 1, global: false);
//5. 构造消费者实例
var consumer = new EventingBasicConsumer(channel);
//6. 绑定消息接收后的事件委托
consumer.Received += (model, ea) =>
{
var message = Encoding.UTF8.GetString(ea.Body);
Console.WriteLine(" [x] Received {0}", message);
// TODO 注:耗时过长(测试使用5000),,使用证书模式手动确认会报错,原因不明
Thread.Sleep(2000);//模拟耗时
Console.WriteLine(" [x] Done {0}", message);

// 发送消息确认信号(手动消息确认)
channel.BasicAck(deliveryTag: ea.DeliveryTag, multiple: false);
};
//7. 启动消费者
/*
autoAck:true;自动进行消息确认
autoAck:false;关闭自动消息确认,通过调用BasicAck方法手动进行消息确认
*/
//channel.BasicConsume(queue: "test1", autoAck: true, consumer: consumer);
channel.BasicConsume(queue: "test1", autoAck: false, consumer: consumer);
Console.WriteLine(" Press [enter] to exit.");
Console.ReadLine();
}
}
}
}
}

消息持久化

消息确认确保了即使消费端异常,消息也不会丢失能够被重新分发处理。但是如果RabbitMQ服务端异常,消息依然会丢失。除非我们指定durable:true,否则当RabbitMQ退出或奔溃时,消息将依然会丢失。通过指定durable:true,并指定Persistent=true,来告知RabbitMQ将消息持久化。

1
2
3
4
5
6
7
8
9
10
11
12
13
14
15
16
17
18
19
20
21
22
23
24
25
26
27
28
29
30
31
32
33
34
35
36
37
38
39
40
41
42
43
44
45
46
47
48
49
50
51
52
53
namespace RabbitMqDemo.Send
{
class Program
{
static void Main(string[] args)
{
ServicePointManager.ServerCertificateValidationCallback += (sender, cert, chain, sslPolicyErrors) => true;
ConnectionFactory factory = new ConnectionFactory()
{
UserName = "admin",
Password = "admin",
AutomaticRecoveryEnabled = true,
Ssl = new SslOption()
{
CertPath = @"E:\git\RabbitMqDemo\RabbitMqDemo.Send\server.pfx",
CertPassphrase = "123123",
AcceptablePolicyErrors = SslPolicyErrors.RemoteCertificateNameMismatch |
SslPolicyErrors.RemoteCertificateChainErrors,
Enabled = true
},
//AuthMechanisms = new AuthMechanismFactory[] { new ExternalMechanismFactory() },
RequestedHeartbeat = 60,
Port = 5673,
TopologyRecoveryEnabled = true
};

// 创建connection
using (var connection = factory.CreateConnection(new string[1] { "192.168.0.115" }))
{
// 创建一个channel信道
using (var channel = connection.CreateModel())
{
//将消息标记为持久性 - 将IBasicProperties.SetPersistent设置为true
var properties = channel.CreateBasicProperties();
properties.Persistent = true;

// 申明队列 durable:是否持久化
var result = channel.QueueDeclare(queue: "test1", durable: true, exclusive: false, autoDelete: false, arguments: null);

for (int i = 0; i <21; i++)
{
//构建byte消息数据包
var body = Encoding.UTF8.GetBytes(i.ToString() + "test");
channel.BasicPublish(exchange: "", routingKey: "test1", basicProperties: properties, body: body);
Console.WriteLine("{0} 推送成功", i);
Thread.Sleep(2000);
}
}
}
Console.Read();
}
}
}

需要注意的是,将消息设置为持久化并不能完全保证消息不丢失。虽然他告诉RabbitMQ将消息保存到磁盘上,但是在RabbitMQ接收到消息和将其保存到磁盘上这之间仍然有一个小的时间窗口。 RabbitMQ 可能只是将消息保存到了缓存中,并没有将其写入到磁盘上。持久化是不能够一定保证的,但是对于一个简单任务队列来说已经足够。如果需要消息队列持久化的强保证,可以使用publisher confirms

公平分发

RabbitMQ的消息分发默认按照消费端的数量,按顺序循环分发。这样仅是确保了消费端被平均分发消息的数量,但却忽略了消费端的闲忙情况。这就可能出现某个消费端一直处理耗时任务处于阻塞状态,某个消费端一直处理一般任务处于空置状态,而只是它们分配的任务数量一样。

2799767-d2bb1f2ac63fdb15.png

但我们可以通过channel.BasicQos(prefetchSize: 0, prefetchCount: 1, global: false);
设置prefetchCount : 1来告知RabbitMQ,在未收到消费端的消息确认时,不再分发消息,也就确保了当消费端处于忙碌状态时,不再分配任务。

消费者Receive代码:

1
2
3
4
// 申明队列
channel.QueueDeclare(queue: "test1", durable: true, exclusive: false, autoDelete: false, arguments: null);
//设置prefetchCount : 1来告知RabbitMQ,在未收到消费端的消息确认时,不再分发消息,也就确保了当消费端处于忙碌状态时
channel.BasicQos(prefetchSize: 0, prefetchCount: 1, global: false);

这时你需要注意的是如果所有的消费端都处于忙碌状态,你的队列可能会被塞满。你需要注意这一点,要么添加更多的消费端,要么采取其他策略。

几种 Exchange 模式

AMQP协议中的核心思想就是生产者和消费者隔离,生产者从不直接将消息发送给队列。生产者通常不知道是否一个消息会被发送到队列中,只是将消息发送到一个交换机。先由Exchange来接收,然后Exchange按照特定的策略转发到Queue进行存储。同理,消费者也是如此。Exchange 就类似于一个交换机,转发各个消息分发到相应的队列中。

RabbitMQ提供了Exchange,它类似于路由器的功能,它用于对消息进行路由,将消息发送到多个队列上。Exchange一方面从生产者接收消息,另一方面将消息推送到队列。但exchange必须知道如何处理接收到的消息,是将其附加到特定队列还是附加到多个队列,还是直接忽略。而这些规则由exchange type定义,exchange的原理如下图所示。

2799767-0b4fba202e525745.png

Exchange分类

RabbitMQ的Exchange(交换器)分为四类:

  • direct:默认;明确的路由规则:消费端绑定的队列名称必须和消息发布时指定的路由名称一致
  • fanout: 消息广播,将消息分发到exchange上绑定的所有队列上
  • topic:模式匹配的路由规则:支持通配符
  • headers:不常用,允许你匹配AMQP消息的header而非路由键,除此之外headers交换器和direct交换器完全一致,但性能却很差,几乎用不到

注意: fanout、topic交换器是没有历史数据的,也就是说对于中途创建的队列,获取不到之前的消息。

1,direct

路由机制如下图,即队列名称和消息发送时指定的路由完全匹配时,消息才会发送到指定队列上。

routingKey => direct exchange => queue

2799767-6c78ab57fe06c6ce.png

生产者Send代码:

1
2
3
4
5
6
7
8
9
10
11
12
13
14
15
16
17
18
19
20
21
22
23
24
25
26
27
28
29
30
31
32
33
34
35
36
37
38
39
40
41
ConnectionFactory factory = new ConnectionFactory()
{
UserName = "admin",
Password = "admin",
AutomaticRecoveryEnabled = true,
Ssl = new SslOption()
{
CertPath = @"E:\git\RabbitMqDemo\RabbitMqDemo.Send\server.pfx",
CertPassphrase = "123123",
AcceptablePolicyErrors = SslPolicyErrors.RemoteCertificateNameMismatch |
SslPolicyErrors.RemoteCertificateChainErrors,
Enabled = true
},
//AuthMechanisms = new AuthMechanismFactory[] { new ExternalMechanismFactory() },
RequestedHeartbeat = 60,
Port = 5673,
TopologyRecoveryEnabled = true
};

// 创建connection
using (var connection = factory.CreateConnection(new string[1] { "192.168.0.115" }))
{
// 创建一个channel信道
using (var channel = connection.CreateModel())
{
channel.ExchangeDeclare(exchange: "directEC", type: "direct");

//将消息标记为持久性 - 将IBasicProperties.SetPersistent设置为true
var properties = channel.CreateBasicProperties();
properties.Persistent = true;

for (int i = 0; i < 21; i++)
{
//构建byte消息数据包
var body = Encoding.UTF8.GetBytes(i.ToString() + "test");
channel.BasicPublish(exchange: "directEC", routingKey: "direct-key", basicProperties: null, body: body);
Console.WriteLine("{0} 推送成功", i);
//Thread.Sleep(2000);
}
}
}

消费者Receive代码:

1
2
3
4
5
6
7
8
9
10
11
12
13
14
15
16
17
18
19
20
21
22
23
24
25
26
27
28
29
30
31
32
33
34
35
36
37
38
39
40
41
42
ConnectionFactory factory = new ConnectionFactory()
{
UserName = "admin",
Password = "admin",
AutomaticRecoveryEnabled = true,
Port = 5672,
TopologyRecoveryEnabled = true
};

// 建立连接
using (var connection = factory.CreateConnection(new string[1] { "192.168.0.115" }))
{
// 创建信道
using (var channel = connection.CreateModel())
{
//申明direct类型exchange
channel.ExchangeDeclare(exchange: "directEC", type: "direct");

var queueName = channel.QueueDeclare().QueueName;
channel.QueueBind(queue: queueName, exchange: "directEC", routingKey: "direct-key");

var consumer = new EventingBasicConsumer(channel);

// 绑定消息接收后的事件委托
consumer.Received += (model, ea) =>
{
// var body = ea.Body;涉及到闭包,必须赋予变量
var body = ea.Body;
var message = Encoding.UTF8.GetString(body);
Console.WriteLine(" [x] Received {0}", message);
Console.WriteLine(" [x] Done1 {0}", message);
};

channel.BasicConsume(queue: queueName,
autoAck: true,
consumer: consumer);
//channel.BasicConsume(queue: queueName, autoAck: true, consumer: consumer);
Console.WriteLine(" Press [enter] to exit.");

Console.ReadLine(); // 必须存在
}
}

2,fanout

发布/订阅模式

fanout的路由机制如下图,即发送到 fanout 类型exchange的消息都会分发到所有绑定该exchange的队列上去。

2799767-3afd7b874221a9a2.png

生产者Send代码:

1
2
3
4
5
6
7
8
9
10
11
12
13
14
15
16
17
18
19
20
21
22
23
24
// 创建connection 
using (var connection = factory.CreateConnection(new string[1] { "192.168.0.115" }))
{
// 创建一个channel信道
using (var channel = connection.CreateModel())
{
channel.ExchangeDeclare(exchange: "fanoutEC", type: "fanout");

//将消息标记为持久性 - 将IBasicProperties.SetPersistent设置为true
var properties = channel.CreateBasicProperties();
properties.Persistent = true;

for (int i = 0; i < 21; i++)
{
//构建byte消息数据包
var body = Encoding.UTF8.GetBytes(i.ToString() + "test");

//发布到指定exchange,fanout类型无需指定routingKey
channel.BasicPublish(exchange: "fanoutEC", routingKey: "", basicProperties: properties, body: body);
Console.WriteLine("{0} 推送成功", i);
//Thread.Sleep(2000);
}
}
}

消费者Receive代码:

1
2
3
4
5
6
7
8
9
10
11
12
13
14
15
16
17
18
19
20
21
22
23
24
25
26
27
28
29
30
31
32
33
34
35
//  建立连接
using (var connection = factory.CreateConnection(new string[1] { "192.168.0.115" }))
{
// 创建信道
using (var channel = connection.CreateModel())
{
//申明direct类型exchange
channel.ExchangeDeclare(exchange: "fanoutEC", type: "fanout");

var queueName = channel.QueueDeclare().QueueName;

// 绑定队列到指定fanout类型exchange,无需指定路由键
channel.QueueBind(queue: queueName, exchange: "fanoutEC", routingKey: "");

var consumer = new EventingBasicConsumer(channel);

// 绑定消息接收后的事件委托
consumer.Received += (model, ea) =>
{
// var body = ea.Body;涉及到闭包,必须赋予变量
var body = ea.Body;
var message = Encoding.UTF8.GetString(body);
Console.WriteLine(" [x] Received {0}", message);
Console.WriteLine(" [x] Done1 {0}", message);
};

channel.BasicConsume(queue: queueName,
autoAck: true,
consumer: consumer);
//channel.BasicConsume(queue: queueName, autoAck: true, consumer: consumer);
Console.WriteLine(" Press [enter] to exit.");

Console.ReadLine(); // 必须存在
}
}

3,topic

匹配订阅模式

topic是direct的升级版,是一种模式匹配的路由机制。它支持使用两种通配符来进行模式匹配:符号#和符号*。其中*匹配一个单词, #则表示匹配0个或多个单词,单词之间用.分割。如下图所示。

2799767-3196a1c3880b3466.png

生产者Send代码:

1
2
3
4
5
6
7
8
// 生成随机队列名称
var queueName = channel.QueueDeclare().QueueName;
//使用topic exchange type,指定exchange名称
channel.ExchangeDeclare(exchange: "topicEC", type: "topic");
var message = "Hello Rabbit!";
var body = Encoding.UTF8.GetBytes(message);
//发布到topic类型exchange,必须指定routingKey
channel.BasicPublish(exchange: "topicEC", routingKey: "first.green.fast", basicProperties: null, body: body);

消费者Receive代码:

1
2
3
4
5
6
//申明topic类型exchange
channel.ExchangeDeclare (exchange: "topicEC", type: "topic");
//申明随机队列名称
var queuename = channel.QueueDeclare ().QueueName;
//绑定队列到topic类型exchange,需指定路由键routingKey
channel.QueueBind (queue : queuename, exchange: "topicEC", routingKey: "#.*.fast");

RPC

RPC是指远程过程调用,也就是说两台服务器A,B,一个应用部署在A服务器上,想要调用B服务器上应用提供的函数/方法,由于不在一个内存空间,不能直接调用,需要通过网络来表达调用的语义和传达调用的数据。

python-six.png

45366c44f775abfd0ac3b43bccc1abc3_hd.jpg

项目:https://github.com/syxdevcode/RabbitMqDemo.git

参考官网:

http://www.rabbitmq.com/tutorials/tutorial-six-dotnet.html

死信队列

为了保证订单业务的消息数据不丢失,需要使用到RabbitMQ的死信队列机制,当消息消费发生异常时,将消息投入死信队列中。

死信,在官网中对应的单词为 Dead Letter,死信 是RabbitMQ中的一种消息机制,当你在消费消息时,如果队列里的消息出现以下情况,该消息将成为死信:

  • 消息被否定确认,使用 channel.basicNackchannel.basicReject ,并且此时requeue 属性被设置为false
  • 消息在队列的存活时间超过设置的TTL时间。
  • 消息队列的消息数量已经超过最大队列长度。

死信消息会被RabbitMQ进行特殊处理,如果配置了死信队列信息,那么该消息将会被丢进死信队列中,如果没有配置,则该消息将会被丢弃。

配置死信队列

步骤:

  • 1,配置业务队列,绑定到业务交换机上
  • 2,为业务队列配置死信交换机和路由key
  • 3,为死信交换机配置死信队列

注意,并不是直接声明一个公共的死信队列,然后所以死信消息就自己跑到死信队列里去了。而是为每个需要使用死信的业务队列配置一个死信交换机,这里同一个项目的死信交换机可以共用一个,然后为每个业务队列分配一个单独的路由key。

有了死信交换机和路由key后,接下来,就像配置业务队列一样,配置死信队列,然后绑定在死信交换机上。也就是说,死信队列并不是什么特殊的队列,只不过是绑定在死信交换机上的队列。

死信交换机也不是什么特殊的交换机,只不过是用来接受死信的交换机,所以可以为任何类型【Direct、Fanout、Topic】。

一般来说,会为每个业务队列分配一个独有的路由key,并对应的配置一个死信队列进行监听,也就是说,一般会为每个重要的业务队列配置一个死信队列。

死信消息的变化

那么死信被丢到死信队列中后,会发生什么变化呢?

如果队列配置了参数 x-dead-letter-routing-key 的话,死信的路由key将会被替换成该参数对应的值。如果没有设置,则保留该消息原有的路由key。

举个栗子:

如果原有消息的路由key是testA,被发送到业务Exchage中,然后被投递到业务队列QueueA中,如果该队列没有配置参数x-dead-letter-routing-key,则该消息成为死信后,将保留原有的路由keytestA,如果配置了该参数,并且值设置为testB,那么该消息成为死信后,路由key将会被替换为testB,然后被抛到死信交换机中。

另外,由于被抛到了死信交换机,所以消息的Exchange Name也会被替换为死信交换机的名称。

总结

死信队列其实并没有什么神秘的地方,不过是绑定在死信交换机上的普通队列,而死信交换机也只是一个普通的交换机,不过是用来专门处理死信的交换机。

总结一下死信消息的生命周期:

  • 业务消息被投入业务队列
  • 消费者消费业务队列的消息,由于处理过程中发生异常,于是进行了nck或者reject操作
  • 被nck或reject的消息由RabbitMQ投递到死信交换机中
  • 死信交换机将消息投入相应的死信队列
  • 死信队列的消费者消费死信消息

死信消息是RabbitMQ为我们做的一层保证,其实我们也可以不使用死信队列,而是在消息消费异常时,将消息主动投递到另一个交换机中,当你明白了这些之后,这些Exchange和Queue想怎样配合就能怎么配合。比如从死信队列拉取消息,然后发送邮件、短信、钉钉通知来通知开发人员关注。或者将消息重新投递到一个队列然后设置过期时间,来进行延时消费。

参考:

RabbitMQ Tutorials

RabbitMQ学习系列(一): 介绍

RabbitMQ学习系列(四): 几种Exchange 模式

RabbitMQ知多少

深入解读RabbitMQ工作原理及简单使用

RabbitMQ交换器Exchange介绍与实践

【RabbitMQ】一文带你搞定RabbitMQ死信队列

SSL/TLS协议

查看系统支持的SSL/TLS版本:

需要安装openssl.

1
openssl ciphers -v | awk '{print $2}' | sort | uniq

HTTPS

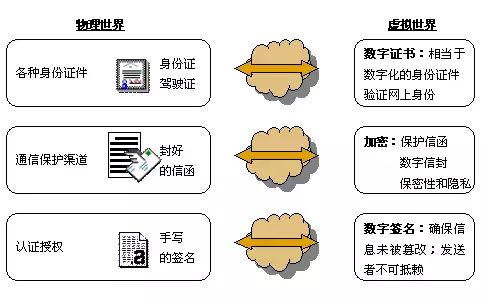
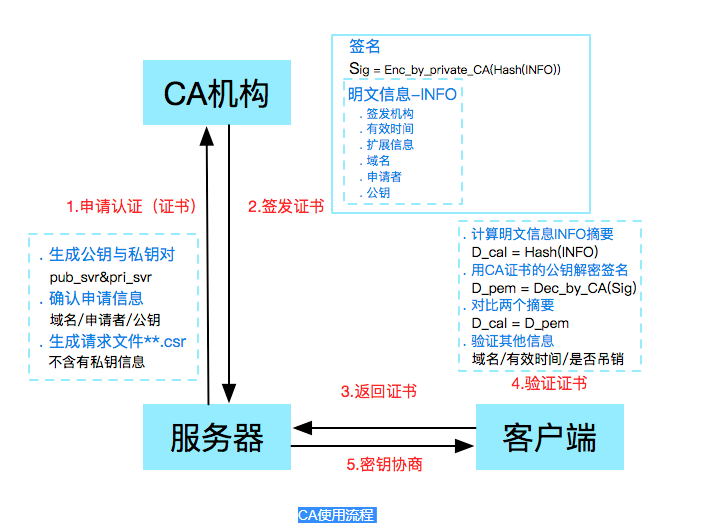
HTTPS(Hyper Text Transfer Protocol Secure),即超文本传输安全协议,也称为http over tls等,是一种网络安全传输协议,其也相当于工作在七层的http,只不过是在会话层和表示层利用ssl/tls来加密了数据包,访问时以https://开头,默认443端口,同时需要证书,学习https的原理其实就是在学习ssl/tls的原理。

SSL

SSL:(Secure Socket Layer,安全套接字层),位于可靠的面向连接的网络层协议和应用层协议之间的一种协议层。目的是为互联网通信提供安全及数据完整性保障,使用X.509认证,网景公司(Netscape)在1994年推出HTTPS协议,以SSL进行加密,这是SSL的起源。IETF将SSL进行标准化,1999年公布第一版TLS标准文件。SSL通过互相认证、使用数字签名确保完整性、使用加密确保私密性,以实现客户端和服务器之间的安全通讯。该协议由两层组成:SSL记录协议和SSL握手协议。SSL目前有三个版本,SSL1.0、SSL2.0、SSL3.0,因其存在严重的安全问题,大多数公司目前均已不在使用了。

参考:

传输层安全性协议

TLS

TLS:(Transport Layer Security,传输层安全协议),用于两个应用程序之间提供保密性和数据完整性。该协议由两层组成:TLS记录协议和TLS握手协议。TLS建立在SSL 3.0协议规范之上,是SSL 3.0的后续版本。两者差别极小,可以理解为SSL 3.1,它是写入了RFC的。TLS 1.0包括可以降级到SSL 3.0的实现,这削弱了连接的安全性。

版本:TLS 1.0,TLS 1.1,TLS 1.2,TLS 1.3(2018.3.21)。

参考:

SSL与TLS的区别以及介绍

数字证书

数字证书就是互联网通讯中标志通讯各方身份信息的一串数字,提供了一种在互联网上验证通信实体身份的方式。

数字证书不是数字身份证,而是身份认证机构盖在数字身份证上的一个章或印(或者说加在数字身份证上的一个签名)。其作用类似于现实生活中司机的驾驶执照或日常生活中的身份证。

v2-4d300bf691c9046b815c1d97fb1ee74d_hd.jpg

CA

数字证书就是CA发行的,CA是Certificate Authority的缩写,也叫“证书授权中心”。它是负责管理和签发证书(即服务器证书,由域名、公司信息、序列号和签名信息组成)的第三方机构,作用是检查证书持有者身份的合法性,并签发证书,以防证书被伪造或篡改。任何个体/组织都可以扮演 CA 的角色,只不过难以得到客户端的信任,能够受浏览器默认信任的 CA 大厂商有很多,其中 TOP5 是 Symantec、Comodo、Godaddy、GolbalSign 和 Digicert。

所以,CA实际上是一个机构,负责“证件”印制核发。就像负责颁发身份证的公安局、负责发放行驶证、驾驶证的车管所。

CA证书

CA 证书就是CA颁发的证书。 CA证书也就我们常说的数字证书,包含证书拥有者的身份信息,CA机构的签名,公钥和私钥。身份信息用于证明证书持有者的身份;CA签名用于保证身份的真实性;公钥和私钥用于通信过程中加解密,从而保证通讯信息的安全性。

CA是权威可信的第三方机构,是“发证机关”。CA证书是CA发的“证件”,用于证明自身身份,就像身份证和驾驶证。

QQ截图20180706093157.png

流程介绍:

  • a、服务方S向第三方机构CA提交公钥、组织信息、个人信息(域名)等信息并申请认证;
  • b、CA通过线上、线下等多种手段验证申请者提供信息的真实性,如组织是否存在、企业是否合法,是否拥有域名的所有权等;
  • c、如信息审核通过,CA会向申请者签发认证文件-证书。证书包含以下信息:申请者公钥、申请者的组织信息和个人信息、签发机构 CA的信息、有效时间、证书序列号等信息的明文,同时包含一个签名; 签名的产生算法:首先,使用散列函数计算公开的明文信息的信息摘要,然后,采用 CA 的私钥对信息摘要进行加密,密文即签名;
  • d、客户端 C 向服务器 S 发出请求时,S 返回证书文件;
  • e、客户端 C读取证书中的相关的明文信息,采用相同的散列函数计算得到信息摘要,然后,利用对应 CA的公钥解密签名数据,对比证书的信息摘要,如果一致,则可以确认证书的合法性,即公钥合法;
  • f、客户端然后验证证书相关的域名信息、有效时间等信息;
  • g、客户端会内置信任CA的证书信息(包含公钥),如果CA不被信任,则找不到对应 CA的证书,证书也会被判定非法。

辅助理解:

1,后来,苏珊感觉不对劲,发现自己无法确定公钥是否真的属于鲍勃。她想到了一个办法,要求鲍勃去找”证书中心”(certificate authority,简称CA),为公钥做认证。证书中心用自己的私钥,对鲍勃的公钥和一些相关信息一起加密,生成”数字证书”(Digital Certificate)。
2,鲍勃拿到数字证书以后,就可以放心了。以后再给苏珊写信,只要在签名的同时,再附上数字证书就行了。
3,苏珊收信后,用CA的公钥解开数字证书,就可以拿到鲍勃真实的公钥了,然后就能证明”数字签名”是否真的是鲍勃签的。

注意:

1、申请证书不需要提供私钥,确保私钥永远只能服务器掌握;
2、证书的合法性仍然依赖于非对称加密算法,证书主要是增加了服务器信息以及签名;
3、内置 CA 对应的证书称为根证书,颁发者和使用者相同,自己为自己签名,即自签名证书
4、证书=公钥+申请者与颁发者信息+签名;

服务器证书分类:

可以通过两个维度来分类,一个是商业角度,一个是业务角度。

QQ截图20180706091807.png

需要强调的是,不论是 DV、OV 还是 EV 证书,其加密效果都是一样的! 它们的区别在于:

  • DV(Domain Validation),面向个体用户,安全体系相对较弱,验证方式就是向 whois 信息中的邮箱发送邮件,按照邮件内容进行验证即可通过;
  • OV(Organization Validation),面向企业用户,证书在 DV 证书验证的基础上,还需要公司的授权,CA 通过拨打信息库中公司的电话来确认;
  • EV(Extended Validation),打开 Github 的网页,你会看到 URL 地址栏展示了注册公司的信息,这会让用户产生更大的信任,这类证书的申请除了以上两个确认外,还需要公司提供金融机构的开户许可证,要求十分严格。

RSA密钥交换算法

客户端使用服务器端RSA公钥加密 Pre Master 发给服务器。服务器使用自己的RSA私钥尝试解密,解密成功即得到 Pre Master。于是客户端、服务器端分享了一个秘密,这个秘密就是 Pre Master

这个秘密只有双方知道,任何第三方都无法知道。所以双方可以以此秘密推导出加密/解密的Key,用于保证http的安全。

客户端为何要相信对方扔过来RSA公钥就是服务器的:

客户端使用CA的公钥就可以将数字签名解密,得到摘要。看看得到的摘要与自己计算证书的摘要是不是相同,相同就说明一个事实,证书确实是CA颁发的。

证书链

CA根证书和服务器证书中间增加一级证书机构,即中间证书,证书的产生和验证原理不变,只是增加一层验证,只要最后能够被任何信任的CA根证书验证合法即可。

  • a.服务器证书 server.pem 的签发者为中间证书机构 inter,inter 根据证书 inter.pem 验证 server.pem 确实为自己签发的有效证书;
  • b.中间证书 inter.pem 的签发 CA 为 root,root 根据证书 root.pem 验证 inter.pem 为自己签发的合法证书;
  • c.客户端内置信任 CA 的 root.pem 证书,因此服务器证书 server.pem 的被信任。

二级证书结构存在的优势:

  • a.减少根证书结构的管理工作量,可以更高效的进行证书的审核与签发;
  • b.根证书一般内置在客户端中,私钥一般离线存储,一旦私钥泄露,则吊销过程非常困难,无法及时补救;
  • c.中间证书结构的私钥泄露,则可以快速在线吊销,并重新为用户签发新的证书;
  • d.证书链四级以内一般不会对 HTTPS 的性能造成明显影响。

证书链有以下特点:

  • a.同一本服务器证书可能存在多条合法的证书链。因为证书的生成和验证基础是公钥和私钥对,如果采用相同的公钥和私钥生成不同的中间证书,针对被签发者而言,该签发机构都是合法的 CA,不同的是中间证书的签发机构不同;
  • b.不同证书链的层级不一定相同,可能二级、三级或四级证书链。中间证书的签发机构可能是根证书机构也可能是另一个中间证书机构,所以证书链层级不一定相同。

参考:

数字签名是什么?

数字证书、CA、CA证书,傻傻分不清楚?这一篇看懂!

CA证书介绍

细说 CA 和证书

官网:https://www.openssl.org/

github:https://github.com/openssl/openssl

文档:https://www.openssl.org/docs/manmaster/man1/

证书相关概念

CA根证书

首先要有一个CA根证书,然后用CA根证书来签发用户证书。
用户进行证书申请:一般先生成一个私钥,然后用私钥生成证书请求(证书请求里应含有公钥信息),再利用证书服务器的CA根证书来签发证书。

特别说明:

  • (1)自签名证书(一般用于顶级证书、根证书): 证书的名称和认证机构的名称相同.
  • (2)根证书:根证书是CA认证中心给自己颁发的证书,是信任链的起始点。任何安装CA根证书的服务器都意味着对这个CA认证中心是信任的。

数字证书则是由证书认证机构(CA)对证书申请者真实身份验证之后,用CA的根证书对申请人的一些基本信息以及申请人的公钥进行签名(相当于加盖发证书机构的公章)后形成的一个数字文件。数字证书包含证书中所标识的实体的公钥(就是说你的证书里有你的公钥),由于证书将公钥与特定的个人匹配,并且该证书的真实性由颁发机构保证(就是说可以让大家相信你的证书是真的),因此,数字证书为如何找到用户的公钥并知道它是否有效这一问题提供了解决方案。

PKCS的15个标准

PKCS 全称是 Public-Key Cryptography Standards ,是由 RSA 实验室与其它安全系统开发商为促进公钥密码的发展而制订的一系列标准。

  • PKCS#1:RSA加密标准。PKCS#1定义了RSA公钥函数的基本格式标准,特别是数字签名。它定义了数字签名如何计算,包括待签名数据和签名本身的格式;它也定义了PSA公/私钥的语法。

  • PKCS#2:涉及了RSA的消息摘要加密,这已被并入PKCS#1中。

  • PKCS#3:Diffie-Hellman密钥协议标准。PKCS#3描述了一种实现Diffie- Hellman密钥协议的方法。

  • PKCS#4:最初是规定RSA密钥语法的,现已经被包含进PKCS#1中。

  • PKCS#5:基于口令的加密标准。PKCS#5描述了使用由口令生成的密钥来加密8位位组串并产生一个加密的8位位组串的方法。PKCS#5可以用于加密私钥,以便于密钥的安全传输(这在PKCS#8中描述)。

  • PKCS#6:扩展证书语法标准。PKCS#6定义了提供附加实体信息的X.509证书属性扩展的语法(当PKCS#6第一次发布时,X.509还不支持扩展。这些扩展因此被包括在X.509中)。

  • PKCS#7:密码消息语法标准。PKCS#7为使用密码算法的数据规定了通用语法,比如数字签名和数字信封。PKCS#7提供了许多格式选项,包括未加密或签名的格式化消息、已封装(加密)消息、已签名消息和既经过签名又经过加密的消息。

  • PKCS#8:私钥信息语法标准。PKCS#8定义了私钥信息语法和加密私钥语法,其中私钥加密使用了PKCS#5标准。

  • PKCS#9:可选属性类型。PKCS#9定义了PKCS#6扩展证书、PKCS#7数字签名消息、PKCS#8私钥信息和PKCS#10证书签名请求中要用到的可选属性类型。已定义的证书属性包括E-mail地址、无格式姓名、内容类型、消息摘要、签名时间、签名副本(counter signature)、质询口令字和扩展证书属性。

  • PKCS#10:证书请求语法标准。PKCS#10定义了证书请求的语法。证书请求包含了一个唯一识别名、公钥和可选的一组属性,它们一起被请求证书的实体签名(证书管理协议中的PKIX证书请求消息就是一个PKCS#10)。

  • PKCS#11:密码令牌接口标准。PKCS#11或“Cryptoki”为拥有密码信息(如加密密钥和证书)和执行密码学函数的单用户设备定义了一个应用程序接口(API)。智能卡就是实现Cryptoki的典型设备。注意:Cryptoki定义了密码函数接口,但并未指明设备具体如何实现这些函数。而且Cryptoki只说明了密码接口,并未定义对设备来说可能有用的其他接口,如访问设备的文件系统接口。

  • PKCS#12:个人信息交换语法标准。PKCS#12定义了个人身份信息(包括私钥、证书、各种秘密和扩展字段)的格式。PKCS#12有助于传输证书及对应的私钥,于是用户可以在不同设备间移动他们的个人身份信息。

  • PDCS#13:椭圆曲线密码标准。PKCS#13标准当前正在完善之中。它包括椭圆曲线参数的生成和验证、密钥生成和验证、数字签名和公钥加密,还有密钥协定,以及参数、密钥和方案标识的ASN.1语法。

  • PKCS#14:伪随机数产生标准。PKCS#14标准当前正在完善之中。为什么随机数生成也需要建立自己的标准呢?PKI中用到的许多基本的密码学函数,如密钥生成和Diffie-Hellman共享密钥协商,都需要使用随机数。然而,如果“随机数”不是随机的,而是取自一个可预测的取值集合,那么密码学函数就不再是绝对安全了,因为它的取值被限于一个缩小了的值域中。因此,安全伪随机数的生成对于PKI的安全极为关键。

  • PKCS#15:密码令牌信息语法标准。PKCS#15通过定义令牌上存储的密码对象的通用格式来增进密码令牌的互操作性。在实现PKCS#15的设备上存储的数据对于使用该设备的所有应用程序来说都是一样的,尽管实际上在内部实现时可能所用的格式不同。PKCS#15的实现扮演了翻译家的角色,它在卡的内部格式与应用程序支持的数据格式间进行转换。

注意 net,ios中rsa加解密使用的是pkcs1,而java使用的是pkcs8

以上参考:PKCS 发布的15 个标准

x509证书

介绍

X.509 是密码学里公钥证书的格式标准。 X.509 证书己应用在包括TLS/SSL(WWW万维网安全浏览的基石)在内的众多 Intenet协议里.同时它也用在很多非在线应用场景里,比如电子签名服务。X.509证书里含有公钥、身份信息(比如网络主机名,组织的名称或个体名称等)和签名信息(可以是证书签发机构CA的签名,也可以是自签名)。对于一份经由可信的证书签发机构签名或者可以通过其它方式验证的证书,证书的拥有者就可以用证书及相应的私钥来创建安全的通信,对文档进行数字签名.X.509还附带了证书吊销列表和用于从最终对证书进行签名的证书签发机构直到最终可信点为止的证书合法性验证算法。

当前使用的版本是X.509 V3,它加入了扩展字段支持,这极大地增进了证书的灵活性。X.509 V3证书包括一组按预定义顺序排列的强制字段,还有可选扩展字段,即使在强制字段中,X.509证书也允许很大的灵活性,因为它为大多数字段提供了多种编码方案.

x509证书一般会用到三类文件,key,csr,crt。
Key是私用密钥,openssl格式,通常是rsa算法。
csr是证书请求文件,用于申请证书。在制作csr文件的时候,必须使用自己的私钥来签署申请,还可以设定一个密钥。
crt是CA认证后的证书文件(windows下面的csr,其实是crt),签署人用自己的key给你签署的凭证。

编码格式(也用作扩展)

  • .PEM- PEM扩展名用于不同类型的X.509v3文件,全称Privacy Enhanced Mail,打开看文本格式,以”—–BEGIN…”开头, “—–END…”结尾,内容是ASCII(BASE64)编码.
    查看PEM格式证书的信息: openssl x509 -in certificate.pem -text -noout
    Apache和Nginx服务器偏向于使用这种编码格式.

  • .DER - DER扩展用于二进制DER编码证书,全称Distinguished Encoding Rules,打开看是二进制格式,不可读,这些文件也可能带有CER或CRT扩展名.
    查看DER格式证书的信息: openssl x509 -in certificate.der -inform der -text -noout
    Java和Windows服务器偏向于使用这种编码格式.

例如:

密钥pem格式:

1
2
-----BEGIN RSA PRIVATE KEY-----
-----END RSA PRIVATE KEY-----

证书pem格式:

1
2
-----BEGIN CERTIFICATE-----
-----END CERTIFICATE-----

文件扩展名

  • .key格式:通常用来存放一个公钥或者私钥,默认PKCS#1,并非X.509证书,可能是PEM,也可能是DER

  • .csr/.p10格式:证书签名请求(证书请求文件),含有公钥信息,certificate signing request的缩写,PKCS#10标准定义

  • .crt格式:证书文件,certificate的缩写,CRT扩展名用于证书,只有公钥没有私钥。证书可以编码为二进制DER或ASCII PEM。CER和CRT扩展几乎是同义词

  • .cert .cer .crt:文件通常包含单个证书,单独且没有任何包装(没有私钥,没有密码保护,只有证书)

  • .cer格式:证书文件,常见于Windows系统,certificate缩写,只有公钥没有私钥,可能是PEM编码,也可能是DER编码,大多数应该是DER编码,crt文件和cer文件只有在使用相同编码的时候才可以安全地相互替代。

  • .crl格式:证书吊销列表,Certificate Revocation List的缩写

  • .pem格式:用于导出,导入证书时候的证书的格式,用于不同类型的X.509v3文件,有证书开头,结尾的格式

  • .p7b/.p7r格式: 以树状展示证书链(certificate chain),同时也支持单个证书,不含私钥,PKCS#7标准定义

  • .p7c/.p7m/.p7s格式:PKCS#7证书格式,仅仅包含证书和CRL列表信息,没有私钥。

  • .pfx/p12格式:由Public Key Cryptography Standards #12,PKCS#12标准定义,包含了公钥和私钥的二进制格式的证书形式,以pfx作为证书文件后缀名。PFX(也称为PKCS#12)支持证书,私钥和证书路径中的所有证书的安全存储。PKCS#12格式是唯一可用于导出证书及其私钥的文件格式。

证书生成

openssl基本命令

公钥负责加密,私钥负责解密

私钥负责签名,公钥负责验证

修改openssl.cnf配置文件

首先需要定位openssl.cnf文件:

1
locate openssl.cnf

结果:

1
2
/etc/pki/tls/openssl.cnf
/usr/share/man/man5/openssl.cnf.5ssl.gz

修改配置文件,修改其中的dir变量,重新设置SSL的工作目录

1
vim /etc/pki/tls/openssl.cnf

生成私钥

命令:openssl genrsa

查看帮助:openssl genrsa -h

1
2
3
4
5
6
-des           生成的私钥采用DES算法加密
-des3 生成的私钥采用DES3算法加密 (168 bit key)
-seed encrypt PEM output with cbc seed
-aes128, -aes192, -aes256
-out file 私钥输出位置
-passout arg 输出文件的密码,如果我们指定了对称加密算法,也可以不带此参数,会有命令行提示你输入密码

生成一个私钥:
默认长度512,PKCS1格式

1
2
3
openssl genrsa -out ca.key 2048
## 或者
openssl genrsa -des3 -passout pass:123456 -out RSA.pem

查看:

1
2
3
4
cat ca.key
-----BEGIN RSA PRIVATE KEY-----
MIIEpAIBAAKCAQE..................
-----END RSA PRIVATE KEY-----

生成公钥

命令:openssl rsa

查看帮助:openssl rsa -h

1
2
3
4
5
6
7
8
9
10
11
12
13
14
15
16
17
18
19
20
21
22
-inform arg     输入文件编码格式,只有pem和der两种
-outform arg 输出文件编码格式,只有pem和der两种
-in arg input file 输入文件
-sgckey Use IIS SGC key format
-passin arg 如果输入文件被对称加密过,需要指定输入文件的密码
-out arg 输出文件位置
-passout arg 如果输出文件也需要被对称加密,需要指定输出文件的密码

-des 对输出结果采用对称加密 des算法
-des3 对输出结果采用对称加密 des3算法
-seed
-aes128, -aes192, -aes256

以上几个都是对称加密算法的指定,生成私钥的时候一般会用到,我们不让私钥明文保存

-text 以明文形式输出各个参数值
-noout 不输出密钥到任何文件
-modulus 输出模数值
-check 检查输入密钥的正确性和一致性
-pubin 指定输入文件是公钥
-pubout 指定输出文件是公钥
-engine e 指定三方加密库或者硬件

使用刚刚生成的私钥,以生成公钥:

1
openssl rsa -in ca.key -pubout -out ca_pub.key
1
2
3
4
5
6
7
8
9
10
11
12
13
14
15
16
17
18
19
20
21
22
23
24
25
26
27
28
29
## 为RSA密钥增加口令保护
openssl rsa -in RSA.pem -des3 -passout pass:123456 -out E_RSA.pem

##为RSA密钥去除口令保护
openssl rsa -in E_RSA.pem -passin pass:123456 -out P_RSA.pem

## 比较
diff RSA.pem P_RSA.pem

##修改加密算法为aes128,口令是123456
openssl rsa -in RSA.pem -passin pass:123456 -aes128 -passout pass:123456 -out E_RSA.pem

## 查看密钥对中的各个参数
openssl rsa -in RSA.pem -des -passin pass:123456 -text -noout

## 提取密钥中的公钥并打印模数值
## 提取公钥,用pubout参数指定输出为公钥
openssl rsa -in RSA.pem -passin pass:123456 -pubout -out pub.pem

##打印公钥中模数值
$ openssl rsa -in pub.pem -pubin -modulus -noout

Modulus=C2B..........3ED

##把pem格式转化成der格式,使用outform指定der格式
openssl rsa -in RSA.pem -passin pass:123456 -des -passout pass:123456 -outform der -out rsa.der

##把der格式转化成pem格式,使用inform指定der格式
openssl rsa -in rsa.der -inform der -passin pass:123456 -out rsa.pem

加解密/签名验证

命令:openssl rsautl

注意:无论是使用公钥加密还是私钥加密,RSA每次能够加密的数据长度不能超过RSA密钥长度,并且根据具体的补齐方式不同输入的加密数据最大长度也不一样,而输出长度则总是跟RSA密钥长度相等。

QQ截图20180706152021.png

1
2
3
4
5
6
7
8
9
10
11
12
13
14
15
16
17
18
19
openssl rsautl -h
Usage: rsautl [options]
-in file input file //输入文件
-out file output file //输出文件
-inkey file input key //输入的密钥
-keyform arg private key format - default PEM //指定密钥格式
-pubin input is an RSA public //指定输入的是RSA公钥
-certin input is a certificate carrying an RSA public key //指定输入的是证书文件
-ssl use SSL v2 padding //使用SSLv23的填充方式
-raw use no padding //不进行填充
-pkcs use PKCS#1 v1.5 padding (default) //使用V1.5的填充方式
-oaep use PKCS#1 OAEP //使用OAEP的填充方式
-sign sign with private key //使用私钥做签名
-verify verify with public key //使用公钥认证签名
-encrypt encrypt with public key //使用公钥加密
-decrypt decrypt with private key //使用私钥解密
-hexdump hex dump output //以16进制dump输出
-engine e use engine e, possibly a hardware device. //指定三方库或者硬件设备
-passin arg pass phrase source //指定输入的密码
加密和解密
1
2
3
4
5
6
7
8
9
10
11
12
13
14
15
16
17
18
19
20
21
22
23
##生成RSA密钥
openssl genrsa -des3 -passout pass:123456 -out RSA.pem

##提取公钥
openssl rsa -in RSA.pem -passin pass:123456 -pubout -out pub.pem

##使用RSA作为密钥进行加密,实际上使用其中的公钥进行加密
openssl rsautl -encrypt -in plain.txt -inkey RSA.pem -passin pass:123456 -out enc.txt

##使用RSA作为密钥进行解密,实际上使用其中的私钥进行解密
openssl rsautl -decrypt -in enc.txt -inkey RSA.pem -passin pass:123456 -out replain.txt

##比较原始文件和解密后文件
diff plain.txt replain.txt

##使用公钥进行加密
openssl rsautl -encrypt -in plain.txt -inkey pub.pem -pubin -out enc1.txt

##私钥进行解密
openssl rsautl -decrypt -in enc1.txt -inkey RSA.pem -passin pass:123456 -out replain1.txt

##比较原始文件和解密后文件
diff plain.txt replain1.txt
签名与验证
1
2
3
4
5
6
7
8
9
10
11
12
13
14
15
16
17
18
19
20
21
##使用RSA密钥进行签名,实际上使用私钥进行签名
openssl rsautl -sign -in plain.txt -inkey RSA.pem -passin pass:123456 -out sign.txt

##使使用RSA密钥进行验证,实际上使用公钥进行验证
openssl rsautl -verify -in sign.txt -inkey RSA.pem -passin pass:123456 -out replain.txt

##对比原始文件和签名解密后的文件
diff plain.txt replain.txt


##提取PCKS8格式的私钥
openssl pkcs8 -topk8 -in RSA.pem -passin pass:123456 -out pri.pem -nocrypt

##使用私钥进行签名
openssl rsautl -sign -in plain.txt -inkey pri.pem -out sign1.txt

##使用公钥进行验证
openssl rsautl -verify -in sign1.txt -inkey pub.pem -pubin -out replain1.txt

##对比原始文件和签名解密后的文件
diff plain.txt replain1.txt

CA证书生成

生成CA私钥(.key)–>生成CA证书请求(.csr)–>自签名得到根证书(.crt)(CA给自已颁发的证书)。

1
2
3
4
5
6
7
8
9
10
11
12
# Generate CA private key
openssl genrsa -out ca.key 2048
# Generate CSR
openssl req -new -key ca.key -out ca.csr ## 需要手动输入回车
# Generate Self Signed certificate(CA 根证书)
openssl x509 -req -days 365 -in ca.csr -signkey ca.key -out ca.crt

##或者
# Generate CA private key
openssl genrsa -out ca.key 2048

openssl req -passin pass:1111 -new -x509 -days 365 -key ca.key -out ca.crt -subj "/C=CN/ST=JS/L=ZJ/O=zx/OU=test/CN=root"

数字证书主题含义:

1
2
3
4
5
6
7
8
9
10
11
12
13
14
15
16
17
18
19
20
21
22
23
DC=domainComponent         # 域名 
CN=CommonName # 通用名
OU=OrganizationUnitName # 组织部门名
O=OrganizationName # 组织名
L=localityName # 地址
S=stateName # 州名/省份
C=country # 国家字母缩写

CN:公用名称 (Common Name) ,对于 SSL 证书,一般为网站域名或IP地址;而对于代码签名证书则为申请单位名称;而对于客户端证书则为证书申请者的姓名;
O:单位名称 (Organization Name) ,对于 SSL 证书,一般为网站域名;而对于代码签名证书则为申请单位名称;而对于客户端单位证书则为证书申请者所在单位名称;

证书申请单位所在地:
L:所在城市 (Locality) 简称:L 字段
S:所在省份/州名 (State/Provice) 简称:S 字段
C:所在国家 (Country) ,是国家字母缩写,如中国:CN

其他一些字段:
E:电子邮件 (Email)
G:多个姓名字段
Description:介绍
Phone:电话号码,格式要求 + 国家区号 城市区号 电话号码,如: +86 732 88888888
STREET:街道
PostalCode:邮政编码

用户证书

生成私钥(.key)–>生成证书请求(.csr)–>用CA根证书签名得到证书(.crt)

服务器端证书

1
2
3
4
5
6
openssl genrsa -passout pass:1111 -des3 -out server.key 2048
openssl req -passin pass:1111 -new -key server.key -out server.csr -subj "/C=CN/ST=JS/L=ZJ/O=zx/OU=test/CN=www.shiyx.top:5673"
openssl x509 -req -passin pass:1111 -days 365 -in server.csr -CA ca.crt -CAkey ca.key -set_serial 01 -out server.crt
openssl rsa -passin pass:1111 -in server.key -out server.key ## 移除密码
## 生成pfx格式证书,需要输入密码,或使用 -passin pass:1111
openssl pkcs12 -export -out server.pfx -inkey server.key -in server.crt -certfile ca.crt

客户端证书

如果需要做双向验证的,也就是服务端要验证客户端证书的情况。那么需要在同一个根证书下再生成一个客户端证书。

需要在客户端设置根证书,并信任根证书。因为服务端的证书是自签的证书,公共的CA是无法认证自签的证书的。所以需要在客户端添加并信任自己的根证书后才能通过https访问服务端。如果服务器上部署的是公共CA签发的证书,则不需要设置,因为系统中已经内置了大部分公共CA的证书

1
2
3
4
openssl genrsa -passout pass:1111 -des3 -out client.key 2048
openssl req -passin pass:1111 -new -key client.key -out client.csr -subj "/C=CN/ST=JS/L=ZJ/O=zx/OU=test/CN=www.shiyx.top:5673"
openssl x509 -passin pass:1111 -req -days 365 -in client.csr -CA ca.crt -CAkey ca.key -set_serial 01 -out client.crt
openssl rsa -passin pass:1111 -in client.key -out client.key ## 移除密码

PKCS#12(.pfx .p12)证书生成

1
2
3
##将PEM证书文件和私钥转换为PKCS#12(.pfx .p12)
## 需要输入密码
openssl pkcs12 -export -out server.pfx -inkey server.key -in server.crt -certfile ca.crt

生成pem格式证书

有时需要用到pem格式的证书,可以用以下方式合并证书文件(crt)和私钥文件(key)来生成

1
2
3
$cat client.crt client.key> client.pem
$cat server.crt server.key > server.pem
$ cat server.crt server.key|tee server.pem # 将私钥和证书合并到一个文件中

tee:定向输出到server.pem

证书转换

可以使用以下命令:

1
2
3
openssl x509 ## 必须为证书文件, .key文件非证书文件

openssl rsa ## 必须为密钥文件。

依赖命令中参数:

1
2
-inform pem|der : 输入文件格式
-outform der|pem: 输出文件格式

例如:

1
2
3
4
5
6
7
8
9
10
11
12
13
14
15
16
17
18
19
20
21
22
23
24
25
26
27
## crt转换为pem
openssl x509 -in server.crt -out server.pem ## -outform der :从pem格式转成der格式

## pem转换为crt
openssl x509 -in server.pem -out server1.crt ## -outform der :从der格式转成pem格式

## 比较
diff server.crt server1.crt

## der格式转成pem格式
openssl x509 -in ca.crt -outform der -out ca.der
openssl rsa -in ca.key -outform der -out ca1.der

## pem格式转成crt格式 需要指定 -inform der
openssl x509 -in ca.der -inform der -outform pem -out ca.pem
diff ca.pem ca.crt

##将PEM证书文件和私钥转换为PKCS#12(.pfx .p12)
## 需要输入密码
openssl pkcs12 -export -out server.pfx -inkey server.key -in server.crt -certfile ca.crt

##将包含私钥和证书的PKCS#12文件(.pfx .p12)转换为PEM
## 需要输入密码
openssl pkcs12 -in server.pfx -out server1.pem -nodes
diff server.pem server.crt

openssl pkcs12 -in server.pfx -out server.cer -nodes

pkcs1与pkcs8格式RSA私钥互相转换

1
2
3
4
openssl pkcs8 -topk8 -inform PEM -in server.key -outform pem -nocrypt -out pkcs8.pem
## openssl pkcs8 -in pkcs8.pem -nocrypt -out server2.key ## 失效
openssl rsa -in pkcs8.pem -out pkcs1.pem
diff server.key pkcs1.pem

参考:

openssl生成SSL证书的流程

X.509

那些证书相关的玩意儿(SSL,X.509,PEM,DER,CRT,CER,KEY,CSR,P12等)

OpenSSL加解密使用

openssl ca(签署和自建CA)

pkcs1与pkcs8格式RSA私钥互相转换

http://www.cnblogs.com/yaozhenfa/p/gRpc_with_ssl.html

https://vimsky.com/article/3608.html

https://stackoverflow.com/questions/13732826/convert-pem-to-crt-and-key?answertab=votes

Docker搭建RabbitMQ高可用群集

官方镜像:

https://hub.docker.com/_/rabbitmq/
Dockerfile

Docker搭建RabbitMQ单机容器

目录结构:

1
2
3
rabbitmq
|--rabbitmq-a
|--data

获取镜像:

1
docker pull rabbitmq:3.7.6-management

使用以下命令运行容器:

1
2
3
4
5
6
7
8
9
10
11
12
docker run -d --name rabbitmq-a \
-p 4369:4369 \
-p 5671:5671 \
-p 5672:5672 \
-p 25672:25672 \
-p 15672:15672 \
-h rabbitmq-node1 \
-e RABBITMQ_NODENAME=rabbit \
-e RABBITMQ_DEFAULT_USER=admin \
-e RABBITMQ_DEFAULT_PASS=admin \
-v $PWD/rabbitmq-a/data:/var/lib/rabbitmq \
rabbitmq:3.7.6-management

进入容器:

1
docker exec -it rabbitmq-a /bin/bash

查看群集:

1
rabbitmqctl cluster_status

结果:

1
2
3
4
5
6
7
root@rabbitmq-node1:/# rabbitmqctl cluster_status
Cluster status of node rabbit@rabbitmq-node1 ...
[{nodes,[{disc,['rabbit@rabbitmq-node1']}]},
{running_nodes,['rabbit@rabbitmq-node1']},
{cluster_name,<<"rabbit@rabbitmq-node1">>},
{partitions,[]},
{alarms,[{'rabbit@rabbitmq-node1',[]}]}]

查找cookie:

1
2
find / -name ".erlang.cookie"
cat /var/lib/rabbitmq/.erlang.cookie

结果:

1
2
3
4
5
root@rabbitmq-node1:/# find / -name ".erlang.cookie"
/root/.erlang.cookie
/var/lib/rabbitmq/.erlang.cookie
root@rabbitmq-node1:/# cat /var/lib/rabbitmq/.erlang.cookie
BYCWRWRQGDLYZZDXDBSB

RabbitMQ Server 高可用集群相关概念

设计集群的目的

  • 允许消费者和生产者在 RabbitMQ 节点崩溃的情况下继续运行。
  • 通过增加更多的节点来扩展消息通信的吞吐量。

集群配置方式

  • cluster:不支持跨网段,用于同一个网段内的局域网;可以随意的动态增加或者减少;节点之间需要运行相同版本的 RabbitMQ 和 Erlang。
  • federation:应用于广域网,允许单台服务器上的交换机或队列接收发布到另一台服务器上交换机或队列的消息,可以是单独机器或集群。federation 队列类似于单向点对点连接,消息会在联盟队列之间转发任意次,直到被消费者接受。通常使用 federation 来连接 internet 上的中间服务器,用作订阅分发消息或工作队列。
  • shovel:连接方式与 federation 的连接方式类似,但它工作在更低层次。可以应用于广域网。

节点类型

  • RAM node:内存节点将所有的队列、交换机、绑定、用户、权限和 vhost 的元数据定义存储在内存中,好处是可以使得像交换机和队列声明等操作更加的快速。
  • Disk node:将元数据存储在磁盘中,单节点系统只允许磁盘类型的节点,防止重启 RabbitMQ 的时候,丢失系统的配置信息。

** 问题说明:**

RabbitMQ 要求在集群中至少有一个磁盘节点,所有其他节点可以是内存节点,当节点加入或者离开集群时,必须要将该变更通知到至少一个磁盘节点。如果集群中唯一的一个磁盘节点崩溃的话,集群仍然可以保持运行,但是无法进行其他操作(增删改查),直到节点恢复。

** 解决方案:**

设置两个磁盘节点,至少有一个是可用的,可以保存元数据的更改。

镜像队列

RabbitMQ 的 Cluster 集群模式一般分为两种,普通模式和镜像模式。

  • ** 普通模式**:默认的集群模式,以两个节点(rabbit01、rabbit02)为例来进行说明。对于 Queue 来说,消息实体只存在于其中一个节点 rabbit01(或者 rabbit02),rabbit01 和 rabbit02 两个节点仅有相同的元数据,即队列的结构。当消息进入 rabbit01 节点的 Queue 后,consumer 从 rabbit02 节点消费时,RabbitMQ 会临时在 rabbit01、rabbit02 间进行消息传输,把 A 中的消息实体取出并经过 B 发送给 consumer。所以 consumer 应尽量连接每一个节点,从中取消息。即对于同一个逻辑队列,要在多个节点建立物理 Queue。否则无论 consumer 连 rabbit01 或 rabbit02,出口总在 rabbit01,会产生瓶颈。当 rabbit01 节点故障后,rabbit02 节点无法取到 rabbit01 节点中还未消费的消息实体。如果做了消息持久化,那么得等 rabbit01 节点恢复,然后才可被消费;如果没有持久化的话,就会产生消息丢失的现象。
  • ** 镜像模式**:将需要消费的队列变为镜像队列,存在于多个节点,这样就可以实现 RabbitMQ 的 HA 高可用性。作用就是消息实体会主动在镜像节点之间实现同步,而不是像普通模式那样,在 consumer 消费数据时临时读取。缺点就是,集群内部的同步通讯会占用大量的网络带宽。

镜像队列实现了 RabbitMQ 的高可用性(HA),具体的实现策略如下所示:

QQ截图20180705085605.png

实例列举:

1
2
queue_args("x-ha-policy":"all") //定义字典来设置额外的队列声明参数
channel.queue_declare(queue="hello-queue",argument=queue_args)

如果需要设定特定的节点(以rabbit@localhost为例),再添加一个参数

1
2
3
queue_args("x-ha-policy":"nodes",
"x-ha-policy-params":["rabbit@localhost"])
channel.queue_declare(queue="hello-queue",argument=queue_args)

可以通过命令行查看那个主节点进行了同步

1
rabbitmqctl list_queue name slave_pids synchronised_slave_pids

以上内容主要参考:RabbitMQ分布式集群架构

Docker-Compose搭建RabbitMQ高可用集群

架构图:

435188-20180427122219477-216329665.png

这个编排主要实现一个磁盘节点、两个内存节点的RabbitMQ集群和一个HAProxy代理。

目录结构:

1
2
3
4
5
rabbitmq
|--cluster_entrypoint.sh
|--docker-compose.yml
|--haproxy.cfg
|--parameters.env

cluster_entrypoint.sh

1
2
touch cluster_entrypoint.sh ##新建
chmod +x cluster_entrypoint.sh ##执行权限
1
2
3
4
5
6
7
8
9
10
11
12
13
14
#!/bin/bash
set -e
if [ -e "/root/is_not_first_time" ]; then
exec "$@"
else
/usr/local/bin/docker-entrypoint.sh rabbitmq-server -detached # 先按官方入口文件启动且是后台运行
rabbitmqctl -n "$RABBITMQ_NODENAME@$RABBITMQ_HOSTNAME" stop_app # 停止应用
rabbitmqctl -n "$RABBITMQ_NODENAME@$RABBITMQ_HOSTNAME" join_cluster ${RMQHA_RAM_NODE:+--ram} "$RMQHA_MASTER_NODE@$RMQHA_MASTER_HOST" # 加入rabbitmq_node0集群
rabbitmqctl -n "$RABBITMQ_NODENAME@$RABBITMQ_HOSTNAME" start_app # 启动应用
rabbitmqctl stop # 停止所有服务
touch /root/is_not_first_time
sleep 2s
exec "$@"
fi

注意:
rabbitmqctl join_cluster rabbit@node1
//默认是磁盘节点,如果是内存节点的话,需要加–ram参数

parameters.env

即公共环境变量

1
touch parameters.env
1
2
3
4
5
6
RMQHA_MASTER_NODE=rabbit
RMQHA_MASTER_HOST=rabbitmq_node0
RABBITMQ_DEFAULT_USER=admin
RABBITMQ_DEFAULT_PASS=admin
RABBITMQ_NODENAME=rabbit
RABBITMQ_ERLANG_COOKIE=FQSCWUREIVFXVRTAOIFI

haproxy.cfg

1
2
3
4
5
6
7
8
9
10
11
12
13
14
15
16
17
18
19
20
21
22
23
24
25
26
27
28
29
30
31
32
33
34
35
36
37
38
39
40
41
42
43
44
45
46
47
48
49
50
51
global
log 127.0.0.1 local0 info
log 127.0.0.1 local1 notice
daemon
maxconn 4096

defaults
log global
mode tcp
option tcplog
option dontlognull
retries 3
option abortonclose
maxconn 4096
timeout connect 5000ms
timeout client 3000ms
timeout server 3000ms
balance roundrobin

listen private_monitoring
bind 0.0.0.0:8100 # haproxy容器8100端口显示代理统计页面
mode http
option httplog
stats enable
stats refresh 5s
stats hide-version
stats uri /stats
stats realm Haproxy
stats auth admin:admin

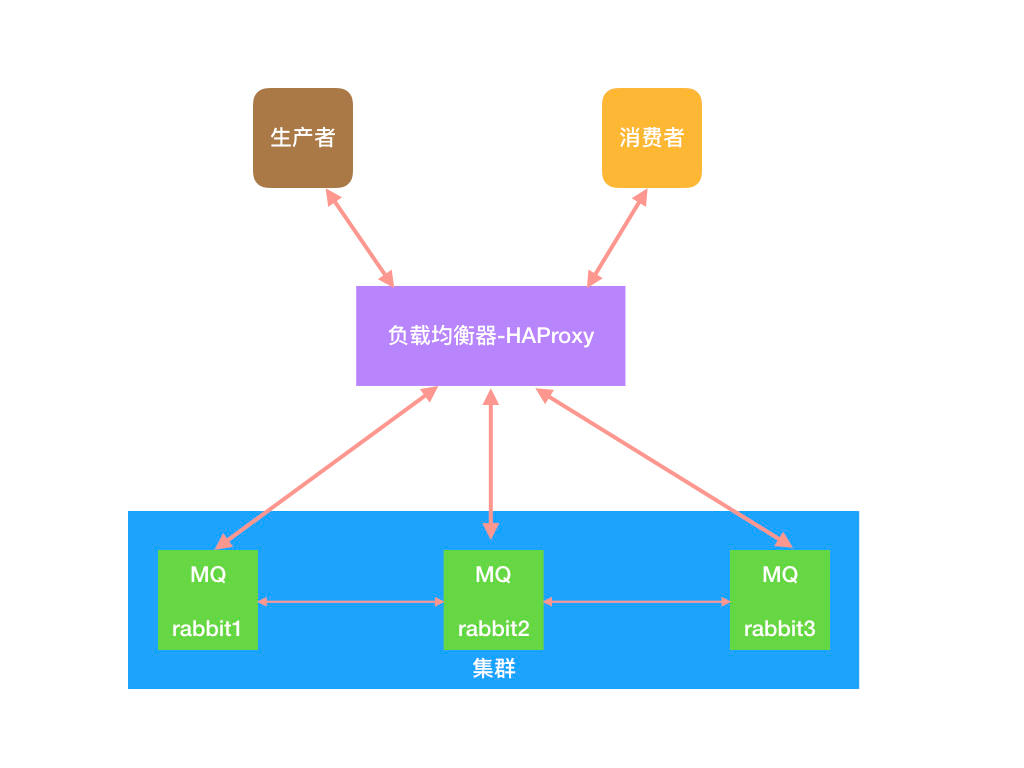
listen rabbitmq_admin
bind 0.0.0.0:15672
server rabbitmq_node0 rabbitmq_node0:15672
server rabbitmq_node1 rabbitmq_node1:15672
server rabbitmq_node2 rabbitmq_node2:15672

listen rabbitmq_cluster
bind 0.0.0.0:5672
mode tcp
option tcplog
balance roundrobin
timeout client 3h
timeout server 3h
server rabbitmq_node0 rabbitmq_node0:5672 check inter 5s rise 2 fall 3
server rabbitmq_node1 rabbitmq_node1:5672 check inter 5s rise 2 fall 3
server rabbitmq_node2 rabbitmq_node2:5672 check inter 5s rise 2 fall 3
# ssl for rabbitmq
frontend ssl_rabbitmq
bind *:5673 ssl crt /usr/local/etc/rmqha.pem
mode tcp
default_backend rabbitmq_cluster

docker-compose.yml

注意三个rabbitmq服务,并没有映射主机端口,而是开放容器端口。

1
2
3
4
5
6
7
8
9
10
11
12
13
14
15
16
17
18
19
20
21
22
23
24
25
26
27
28
29
30
31
32
33
34
35
36
37
38
39
40
41
42
43
44
45
46
47
48
49
50
51
52
53
54
55
56
57
58
59
60
61
62
63
64
65
66
67
68
69
70
71
72
73
74
75
76
77
78
79
80
81
82
83
84
85
86
version: "3"
services:
diskmq:
image: rabbitmq:3.7.6-management
container_name: rabbitmq_node0
restart: always
hostname: rabbitmq_node0
ports:
- "15672"
- "5672"
volumes:
- "./rabbitmq.config:/etc/rabbitmq/conf/rabbitmq.config"
- "/root/CA:/etc/rabbitmq/conf"
env_file:
- ./parameters.env
environment:
- CONTAINER_NAME=rabbitmq_node0
- RABBITMQ_HOSTNAME=rabbitmq_node0
- RABBITMQ_NODENAME=rabbit
- RABBITMQ_CONFIG_FILE=/etc/rabbitmq/rabbitmq.config
rammq1:
image: rabbitmq:3.7.6-management
container_name: rabbitmq_node1
restart: always
depends_on:
- diskmq
hostname: rabbitmq_node1
ports:
- "15672"
- "5672"
volumes:
- "./cluster_entrypoint.sh:/usr/local/bin/cluster_entrypoint.sh"
- "./rabbitmq.config:/etc/rabbitmq/conf/rabbitmq.config"
- "/root/CA:/etc/rabbitmq/conf"
entrypoint: "/usr/local/bin/cluster_entrypoint.sh"
command: "rabbitmq-server"
env_file:
- ./parameters.env
environment:
- CONTAINER_NAME=rabbitmq_node1
- RABBITMQ_HOSTNAME=rabbitmq_node1
- RABBITMQ_NODENAME=rabbit
- RMQHA_RAM_NODE=true
- RABBITMQ_CONFIG_FILE=/etc/rabbitmq/rabbitmq.config
rammq2:
image: rabbitmq:3.7.6-management
container_name: rabbitmq_node2
restart: always
depends_on:
- diskmq
hostname: rabbitmq_node2
ports:
- "15672"
- "5672"
volumes:
- "./cluster_entrypoint.sh:/usr/local/bin/cluster_entrypoint.sh"
- "./rabbitmq.config:/etc/rabbitmq/conf/rabbitmq.config"
- "/root/CA:/etc/rabbitmq/conf"
entrypoint: "/usr/local/bin/cluster_entrypoint.sh"
command: "rabbitmq-server"
env_file:
- ./parameters.env
environment:
- CONTAINER_NAME=rabbitmq_node2
- RABBITMQ_HOSTNAME=rabbitmq_node2
- RABBITMQ_NODENAME=rabbit
- RMQHA_RAM_NODE=true
- RABBITMQ_CONFIG_FILE=/etc/rabbitmq/rabbitmq.config
haproxy:
image: haproxy:1.8-alpine
container_name: rabbitmq_proxy
restart: always
depends_on:
- diskmq
- rammq1
- rammq2
hostname: rabbitmq_proxy
ports:
- "5672:5672"
- "5673:5673"
- "15672:15672"
- "8100:8100"
volumes:
- "./haproxy.cfg:/usr/local/etc/haproxy/haproxy.cfg"
environment:
- CONTAINER_NAME=rabbitmq_proxy

** 执行docker-compose**

运行:

1
docker-compose up -d

停止:

1
docker-compose down

rabbitmq SSL设置

证书生成:

1
2
3
4
5
6
7
8
9
10
11
12
## 生成CA证书
openssl genrsa -out ca.key 2048
openssl req -passin pass:1111 -new -x509 -days 365 -key ca.key -out ca.crt -subj "/C=CN/ST=JS/L=ZJ/O=zx/OU=test/CN=root"

## 生成服务器端pfx证书
openssl genrsa -passout pass:1111 -des3 -out server.key 2048
openssl req -passin pass:1111 -new -key server.key -out server.csr -subj "/C=CN/ST=JS/L=ZJ/O=zx/OU=test/CN=www.shiyx.top"
openssl x509 -req -passin pass:1111 -days 365 -in server.csr -CA ca.crt -CAkey ca.key -set_serial 01 -out server.crt
openssl pkcs12 -export -out server.pfx -inkey server.key -in server.crt -certfile ca.crt

## haproxy使用ssl证书
cat server.crt server.key|tee rmqha.pem # 将私钥和证书合并到一个文件中

参考:

https://www.rabbitmq.com/ssl.html

https://www.rabbitmq.com/configure.html#customise-environment

https://github.com/rabbitmq/rabbitmq-server/blob/master/docs/rabbitmq.conf.example

rabbitmq镜像队列

mirror queue:镜像队列,queue能在多台机器中同步。

通过webui设置

QQ截图20180705161425.png

或者通过命令行:

1
2
3
4
## 表示当前如果是test开头的队列都是“镜像队列”。
rabbitmqctl set_policy ha-all "^test" '{"ha-mode":"all","ha-sync-mode":"automatic"}'
# 或者
rabbitmqctl set_policy ha-all "^" '{"ha-mode":"all"}'

防火墙开放端口

命令:

1
2
3
4
firewall-cmd --zone=public --add-port=8100/tcp --permanent
firewall-cmd --zone=public --add-port=15672/tcp --permanent
firewall-cmd --zone=public --add-port=5672/tcp --permanent
firewall-cmd --reload

HAProxy 配置了三个地址:

注:IP地址需要根据实际情况修改

  • http://192.168.7.201:8100/stats :HAProxy 负载均衡信息地址,账号密码:admin/admin。
  • http://192.168.7.201:15672:RabbitMQ Server Web 管理界面(基于负载均衡),账号密码:admin/admin。
  • http://192.168.7.201:5672:RabbitMQ Server 服务地址(基于负载均衡),账号密码:admin/admin。

DotNet客户端测试

安装RabbitMQ.Client

1
Install-Package RabbitMQ.Client -Version 5.1.0
1
2
3
4
5
6
7
8
9
10
11
12
13
14
15
16
17
18
19
20
21
22
23
24
25
26
27
28
29
30
31
class Program
{
static void Main(string[] args)
{
ConnectionFactory factory = new ConnectionFactory()
{
UserName = "admin",
Password = "admin",
AutomaticRecoveryEnabled = true,
TopologyRecoveryEnabled = true
};

//第一步:创建connection
var connection = factory.CreateConnection(new string[1] { "192.168.7.201" });

//第二步:创建一个channel
var channel = connection.CreateModel();

var result = channel.QueueDeclare("test1", true, false, false, null);

for (int i = 0; i < 100; i++)
{
channel.BasicPublish(string.Empty, "test1", null, new byte[10]);

Console.WriteLine("{0} 推送成功", i);
Thread.Sleep(1000);
}

Console.Read();
}
}

支持ssl安全连接:

1
2
3
4
5
6
7
8
9
10
11
12
13
14
15
16
17
18
19
20
21
22
23
24
25
26
27
28
29
30
31
32
33
34
35
36
37
38
39
40
41
42
43
44
45
namespace RabbitMqDemo
{
class Program
{
static void Main(string[] args)
{
ServicePointManager.ServerCertificateValidationCallback += (sender, cert, chain, sslPolicyErrors) => true;
ConnectionFactory factory = new ConnectionFactory()
{
UserName = "admin",
Password = "admin",
AutomaticRecoveryEnabled = true,
Ssl = new SslOption()
{
CertPath = @"E:\git\RabbitMqDemo\RabbitMqDemo\server.pfx",
CertPassphrase = "123123",
AcceptablePolicyErrors = SslPolicyErrors.RemoteCertificateNameMismatch |
SslPolicyErrors.RemoteCertificateChainErrors,
Enabled = true
},
//AuthMechanisms = new AuthMechanismFactory[] { new ExternalMechanismFactory() },
RequestedHeartbeat = 60,
Port = 5673,
TopologyRecoveryEnabled = true
};
//第一步:创建connection
var connection = factory.CreateConnection(new string[1] { "192.168.0.115" });

//第二步:创建一个channel
var channel = connection.CreateModel();

var result = channel.QueueDeclare("test1", true, false, false, null);

for (int i = 0; i < int.MaxValue; i++)
{
channel.BasicPublish(string.Empty, "test1", null, new byte[10]);

Console.WriteLine("{0} 推送成功", i);
//Thread.Sleep(1000);
}

Console.Read();
}
}
}

参考:

搭建 RabbitMQ Server 高可用集群

搭建高可用的rabbitmq集群 + Mirror Queue + 使用C#驱动连接

RabbitMQ 高可用集群

RabbitMQ分布式集群架构

docker搭建rabbitmq集群

用Docker搭建RabbitMQ高可用集群

docker-compose配置rabbitmq集群服务器