CentOS7 提示 lsof: 未找到命令
1 | # 安装 |
参考:
1 | # 安装 |
参考:
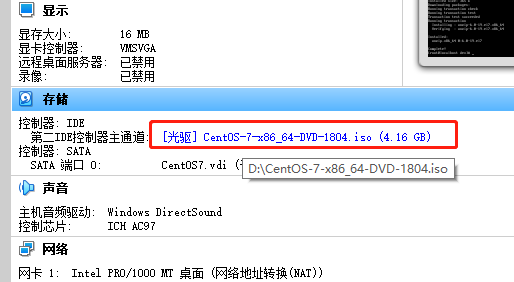
如果虚机没有联网,需要挂载系统镜像安装。
1 | yum install gcc kernel-devel kernel-headers dkms make bzip2 |
在安装目录下:C:\Program Files\Oracle\VirtualBox,找到 VBoxGuestAdditons.iso 镜像,并挂载。
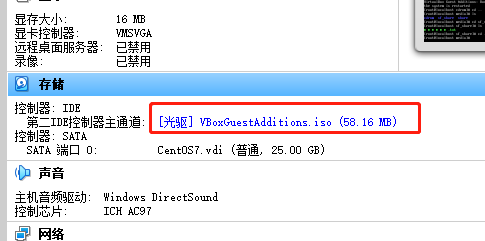
启动虚机,执行 lsscsi 查看 IDE , /dev/sr0 就是 VBoxGuestAdditons 镜像挂载之后的路径。

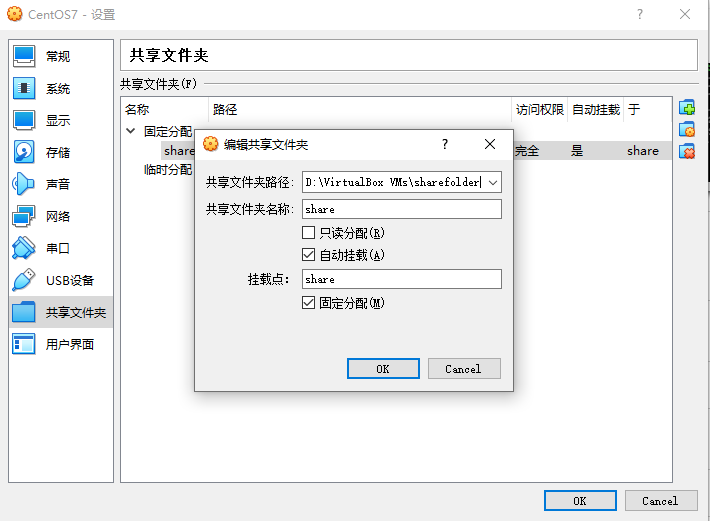
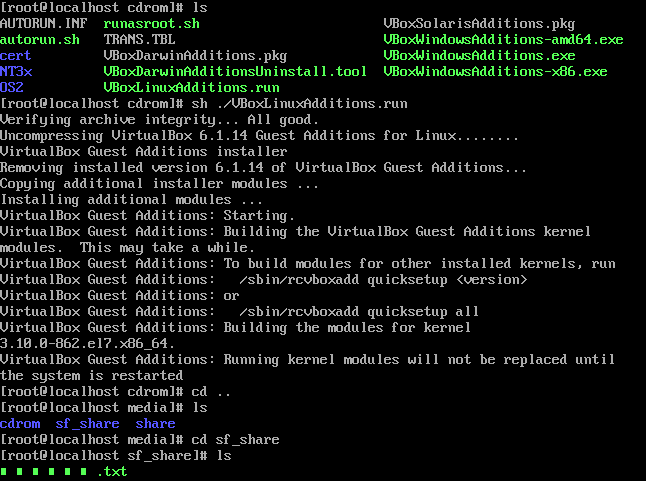
1 | # 创建文件夹 |
进入 /media 目录出现 sf_share,前面出现的 sf 代表成功。
还可以通过 mount 命令把 Centos7 的目录下文件夹变成共享文件夹。
1 | mount -t vboxsf share /home/share |
参考:
Redis Eval 命令使用 Lua 解释器执行脚本。
1 | redis 127.0.0.1:6379> EVAL script numkeys key [key ...] arg [arg ...] |
注意:numkeys无论什么情况下都是必须的命令参数。
1 | 127.0.0.1:6379> set hello world |
区别:
call 执行命令错误时会向调用者直接返回一个错误;
pcall 则会将错误包装为一个我们上面讲的 table 表。
1 | 127.0.0.1:6379> EVAL "return redis.call('no_command')" 0 |
Lua 脚本向 Redis 返回小数,那么会损失小数精度,转换为字符串则是安全的。
1 | 127.0.0.1:6379> EVAL "return 3.14" 0 |
Lua 脚本在 Redis 中是以原子方式执行的,在 Redis 服务器执行EVAL命令时,在命令执行完毕并向调用者返回结果之前,只会执行当前命令指定的 Lua 脚本包含的所有逻辑,其它客户端发送的命令将被阻塞,直到EVAL命令执行完毕为止。因此 LUA 脚本不宜编写一些过于复杂了逻辑,必须尽量保证 Lua 脚本的效率,否则会影响其它客户端。
加载脚本到缓存以达到重复使用,避免多次加载浪费带宽,每一个脚本都会通过 SHA 校验返回唯一字符串标识。需要配合 EVALSHA 命令来执行缓存后的脚本。
1 | 127.0.0.1:6379> SCRIPT LOAD "return 'hello'" |
清除所有的脚本缓存。Redis并没有根据 SHA 来删除脚本缓存,所以在生产中一般不会再生产过程中使用该命令。
以 SHA 标识为参数检查一个或者多个缓存是否存在。
1 | 127.0.0.1:6379> SCRIPT EXISTS 1b936e3fe509bcbc9cd0664897bbe8fd0cac101b |
终止正在执行的脚本。但是为了数据的完整性此命令并不能保证一定能终止成功。如果当一个脚本执行了一部分写的逻辑而需要被终止时,该命令是不凑效的。需要执行SHUTDOWN nosave在不对数据执行持久化的情况下终止服务器来完成终止脚本。
参考:
Lua 是一种轻量小巧的脚本语言,用标准C语言编写并以源代码形式开放, 其设计目的是为了嵌入应用程序中,从而为应用程序提供灵活的扩展和定制功能。
参考:
1 | # 启用 |
将 Lua 程序代码保存到一个以 lua 结尾的文件,并执行,该模式称为脚本式编程
hello.lua
1 | print("Hello World!") |
执行:
1 | $ lua hello.lua |
也可以将代码修改为如下形式来执行脚本(在开头添加:#!/usr/local/bin/lua),指定了 Lua 的解释器 /usr/local/bin directory。加上 # 号标记解释器会忽略它。接下来我们为脚本添加可执行权限,并执行:
1 |
|
执行:
1 | ./hello.lua |
单行注释:
两个减号是单行注释: –
多行注释:
1 | --[[ |
多行注释推荐使用 –[=[注释内容]=],这样可以避免遇到 table[table[idx]] 时就将多行注释结束了。
注意:多行注释加 - 取消注释中间代码可以继续运行,单行注释没有此功能。
标示符以一个字母 A 到 Z 或 a 到 z 或下划线 _ 开头后加上 0 个或多个字母,下划线,数字(0 到 9)。
最好不要使用下划线加大写字母的标示符,因为Lua的保留字也是这样的。
Lua 不允许使用特殊字符如 @, $, 和 % 来定义标示符。 Lua 是一个区分大小写的编程语言。
1 | and break do else |
一般约定,以下划线开头连接一串大写字母的名字(比如 _VERSION)被保留用于 Lua 内部全局变量。
在默认情况下,变量总是认为是全局的。
全局变量不需要声明,给一个变量赋值后即创建了这个全局变量,访问一个没有初始化的全局变量也不会出错,只不过得到的结果是:nil。
如果你想删除一个全局变量,只需要将变量赋值为nil。当且仅当一个变量不等于nil时,这个变量即存在。
1 | print(b) |
Lua 是动态类型语言,变量不要类型定义,只需要为变量赋值。 值可以存储在变量中,作为参数传递或结果返回。
Lua 中有 8 个基本类型分别为:nil、boolean、number、string、userdata、function、thread 和 table。

1 | print(type("Hello world")) --> string |
1 | > print(type(a)) |
nil 作比较时应该加上双引号 “:
1 | > type(X) |
type(X)==nil 结果为 false 的原因是因为 type(type(X))==string。
boolean 类型只有两个可选值:true(真) 和 false(假),Lua 把 false 和 nil 看作是 false,其他的都为 true,数字 0 也是 true:
Lua 默认只有一种 number 类型 – double(双精度)类型(默认类型可以修改 luaconf.h 里的定义),以下几种写法都被看作是 number 类型:
1 | print(type(2)) |
字符串由一对双引号或单引号来表示。
1 | string1 = "this is string1" |
也可以用 2 个方括号 “[[]]” 来表示”一块”字符串。
1 | html = [[ |
对一个数字字符串上进行算术操作时,Lua 会尝试将这个数字字符串转成一个数字:
1 | > print("2" + 6) |
使用 # 来计算字符串的长度,放在字符串前面,如下实例:
1 | > len = "www.runoob.com" |
运行时,Lua会自动在string和numbers之间自动进行类型转换,当一个字符串使用算术操作符时, string 就会被转成数字。反过来,当 Lua 期望一个 string 而碰到数字时,会将数字转成 string。
在 Lua 里,table 的创建是通过”构造表达式”来完成,最简单构造表达式是{},用来创建一个空表。也可以在表里添加一些数据,直接初始化表:
1 | -- 创建一个空的 table |
Lua 中的表(table)其实是一个”关联数组”(associative arrays),数组的索引可以是数字或者是字符串。
1 | -- table_test.lua 脚本文件 |
脚本执行结果为:
1 | $ lua table_test.lua |
不同于其他语言的数组把 0 作为数组的初始索引,在 Lua 里表的默认初始索引一般以 1 开始。
1 | -- table_test2.lua 脚本文件 |
脚本执行结果为:
1 | $ lua table_test2.lua |
table 不会固定长度大小,有新数据添加时 table 长度会自动增长,没初始的 table 都是 nil。
1 | -- table_test3.lua 脚本文件 |
脚本执行结果为:
1 | $ lua table_test3.lua |
在 Lua 中,函数是被看作是”第一类值(First-Class Value)”,函数可以存在变量里:
1 | -- function_test.lua 脚本文件 |
脚本执行结果为:
1 | $ lua function_test.lua |
function 可以以匿名函数(anonymous function)的方式通过参数传递:
1 | -- function_test2.lua 脚本文件 |
脚本执行结果为:
1 | $ lua function_test2.lua |
在 Lua 里,最主要的线程是协同程序(coroutine)。它跟线程(thread)差不多,拥有自己独立的栈、局部变量和指令指针,可以跟其他协同程序共享全局变量和其他大部分东西。
线程跟协程的区别:线程可以同时多个运行,而协程任意时刻只能运行一个,并且处于运行状态的协程只有被挂起(suspend)时才会暂停。
userdata 是一种用户自定义数据,用于表示一种由应用程序或 C/C++ 语言库所创建的类型,可以将任意 C/C++ 的任意数据类型的数据(通常是 struct 和 指针)存储到 Lua 变量中调用。
变量在使用前,需要在代码中进行声明,即创建该变量。
编译程序执行代码之前编译器需要知道如何给语句变量开辟存储区,用于存储变量的值。
Lua 变量有三种类型:全局变量、局部变量、表中的域。
Lua 中的变量全是全局变量,那怕是语句块或是函数里,除非用 local 显式声明为局部变量。
局部变量的作用域为从声明位置开始到所在语句块结束。
变量的默认值均为 nil。
尽可能的使用局部变量,有两个好处:
1 | -- test.lua 文件脚本 |
1 | a = "hello" .. "world" |
Lua 可以对多个变量同时赋值,变量列表和值列表的各个元素用逗号分开,赋值语句右边的值会依次赋给左边的变量。
1 | a, b = 10, 2*x <--> a=10; b=2*x |
遇到赋值语句Lua会先计算右边所有的值然后再执行赋值操作,所以我们可以这样进行交换变量的值:
1 | x, y = y, x -- swap 'x' for 'y' |
当变量个数和值的个数不一致时,Lua会一直以变量个数为基础采取以下策略:
1 | a. 变量个数 > 值的个数 按变量个数补足nil |
1 | a, b, c = 0, 1 |
Lua 对多个变量同时赋值,不会进行变量传递,仅做值传递:
1 | a, b = 0, 1 |
对 table 的索引使用方括号 []。Lua 也提供了 . 操作。
1 | t[i] |
1 | > site = {} |
while 循环语法:
1 | while(condition) |
for语句有两大类::
数值for循环
泛型for循环
1 | for var=exp1,exp2,exp3 do |
var 从 exp1 变化到 exp2,每次变化以 exp3 为步长递增 var,并执行一次 “执行体”。exp3 是可选的,如果不指定,默认为1。
for的三个表达式在循环开始前一次性求值,以后不再进行求值。比如上面的f(x)只会在循环开始前执行一次,其结果用在后面的循环中。
1 | #!/usr/local/bin/lua |
输出:
1 | function |
泛型 for 循环通过一个迭代器函数来遍历所有值,类似 java 中的 foreach 语句。迭代的下标是从1开始。
Lua 编程语言中泛型 for 循环语法格式:
1 | --打印数组a的所有值 |
i是数组索引值,v是对应索引的数组元素值。ipairs是Lua提供的一个迭代器函数,用来迭代数组。
for 循环中,循环的索引 i 为外部索引,修改循环语句中的内部索引 i,不会影响循环次数:
1 | for i=1,10 do |
仍然循环 10 次,只是 i 的值被修改了。
在 lua 中 pairs 与 ipairs 两个迭代器的用法相近,但有一点是不一样的:
pairs 能迭代所有键值对。
ipairs 可以想象成 int+pairs,只会迭代键为数字的键值对,只能遍历所有数组下标的值。
如果 ipairs 在迭代过程中是会直接跳过所有手动设定key值的变量。
pairs 可以遍历表中所有的 key,并且除了迭代器本身以及遍历表本身还可以返回 nil;
但是 ipairs 则不能返回nil,只能返回数字0,如果遇到nil则退出。它只能遍历到表中出现的第一个不是整数的key。
例如:
1 | tab = {1,2,a= nil,"d"} |
输出结果为:
1 | 1 1 |
这里是直接跳过了 a=nil 这个变量
第二,ipairs 在迭代过程中如果遇到nil时会直接停止。
1 | tab = {1,2,a= nil,nil,"d"} |
输出结果为:
1 | 1 1 |
这里会在遇到 nil 的时候直接跳出循环。
repeat…until 循环的条件语句在当前循环结束后判断。
1 | repeat |
1 | --[ 变量定义 --] |
输出:
1 | a的值为: 10 |
1 | --[ 定义变量 --] |
Lua 语言中的 goto 语句允许将控制流程无条件地转到被标记的语句处。
语法格式如下所示:
1 | goto Label |
Label 的格式为:
1 | :: Label :: |
以下实例在判断语句中使用 goto:
1 | local a = 1 |
输出结果为:
1 | --- goto label --- |
从输出结果可以看出,多输出了一次 — goto label —。
以下实例演示了可以在 lable 中设置多个语句:
1 | i = 0 |
输出结果为:
1 | 0 |
1 | for i=1, 3 do |
输出:
1 | 1 yes continue |
1 | --[ 定义变量 --] |
1 | --[ 定义变量 --] |
1 | --[ 定义变量 --] |
在Lua中,函数是对语句和表达式进行抽象的主要方法。既可以用来处理一些特殊的工作,也可以用来计算一些值。
Lua 提供了许多的内建函数,你可以很方便的在程序中调用它们,如 print() 函数可以将传入的参数打印在控制台上。
Lua 函数主要有两种用途:
1 | optional_function_scope function function_name( argument1, argument2, argument3..., argumentn) |
解析:
optional_function_scope: 该参数是可选的制定函数是全局函数还是局部函数,未设置该参数默认为全局函数,如果你需要设置函数为局部函数需要使用关键字 local。
function_name: 指定函数名称。
argument1, argument2, argument3…, argumentn: 函数参数,多个参数以逗号隔开,函数也可以不带参数。
function_body: 函数体,函数中需要执行的代码语句块。
result_params_comma_separated: 函数返回值,Lua语言函数可以返回多个值,每个值以逗号隔开。
将函数作为参数传递给函数,如下实例:
1 | myprint = function(param) |
以上代码执行结果为:
1 | 这是打印函数 - ## 10 ## |
Lua函数可以返回多个结果值,比如string.find,其返回匹配串”开始和结束的下标”(如果不存在匹配串返回nil)。
1 | > s, e = string.find("www.runoob.com", "runoob") |
Lua函数中,在return后列出要返回的值的列表即可返回多值,如:
1 | function maximum (a) |
以上代码执行结果为:
1 | 23 3 |
Lua 函数可以接受可变数目的参数,和 C 语言类似,在函数参数列表中使用三点 … 表示函数有可变的参数。
1 | function add(...) |
通过 select("#",...) 来获取可变参数的数量:
1 | function average(...) |
以上代码执行结果为:
1 | 总共传入 6 个数 |
如果是几个固定参数加上可变参数,固定参数必须放在变长参数之前
1 | function fwrite(fmt, ...) ---> 固定的参数fmt |
通常在遍历变长参数的时候只需要使用 {…},然而变长参数可能会包含一些 nil,那么就可以用 select 函数来访问变长参数了:select(‘#’, …) 或者 select(n, …)
调用 select 时,必须传入一个固定实参 selector(选择开关)和一系列变长参数。如果selector 为数字n,那么 select 返回它的第n个可变实参,否则只能为字符串”#”,这样 select 会返回变长参数的总数。例子代码:
1 | do |
输出结果为:
1 | arg 1 |
1 | select(n,...) --> 返回的是多个参数,而不是一个table |
注意:多返回值的函数在赋值时的情况,仅仅只有放在所有逗号之后的那个函数会把返回值展开。
这里列举一个典型情况:
1 | function add() |

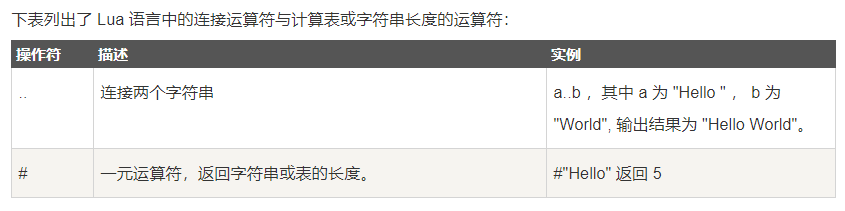
1 | a = "Hello " |
输出:
1 | 连接字符串 a 和 b Hello World |
# 获取表的最大索引的值。
1 | tab1 = {"1","2"} |
输出:
1 | tab1长度2 |
下标越过 1 位以上,长度还是为 2:
1 | tab3={} |
输出:
1 | tab3的长度 2 |
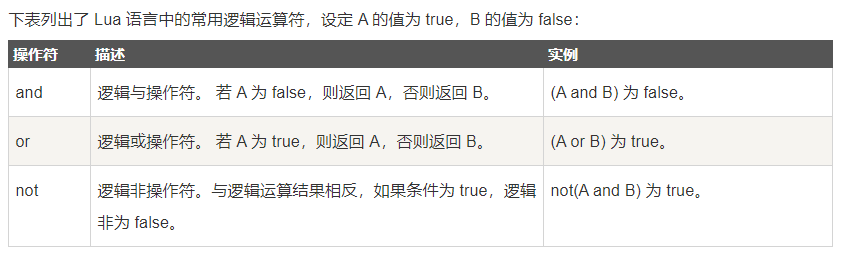
利用 and 和 or 的特性,若(A and B) A 为 false 返回 A,(A or B)A 为 false 返回 B,以及除 nil 外其他数据类型被当做 true。
可以非常简单的完成:
1 | local isAppel = false |
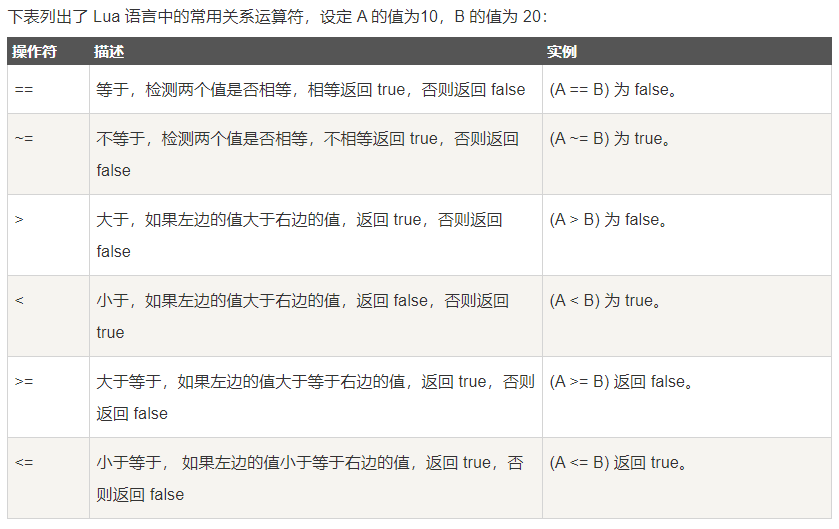
从高到低的顺序:
1 | ^ |
除了 ^ 和 .. 外所有的二元运算符都是左连接的。
1 | a+i < b/2+1 <--> (a+i) < ((b/2)+1) |
1 | a = 20 |
输出:
1 | (a + b) * c / d 运算值为 : 90.0 |
字符串或串(String)是由数字、字母、下划线组成的一串字符。
Lua 语言中字符串可以使用以下三种方式来表示:
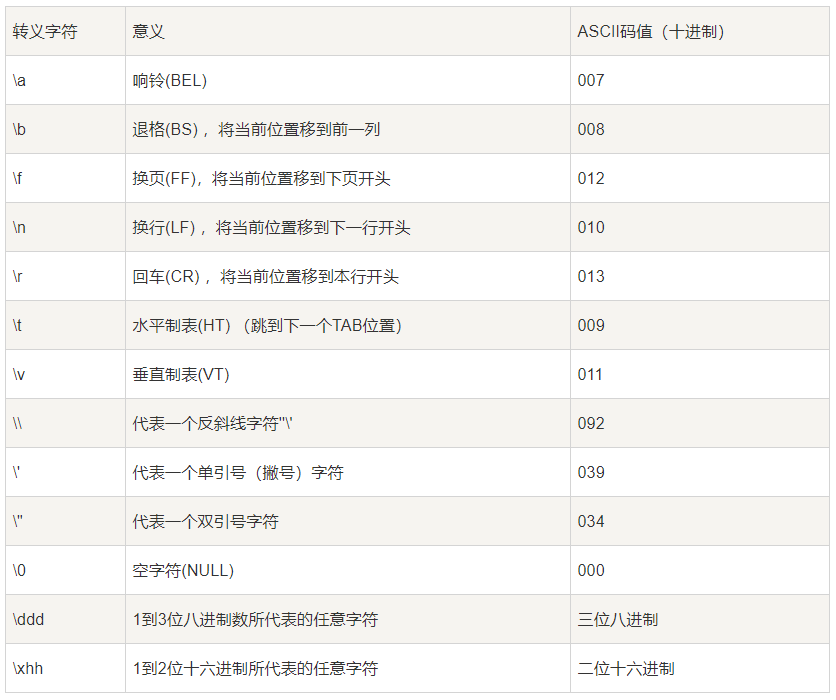
转义字符用于表示不能直接显示的字符,比如后退键,回车键,等。如在字符串转换双引号可以使用 “"“。
1 | string.upper(argument) -- 字符串全部转为大写字母。 |
字符串截取使用 sub() 方法。
1 | string.sub() 用于截取字符串,原型为: |
参数说明:
1 | string1 = "Lua"; |
1 | string = "Lua Tutorial" |
string.format() 函数来生成具有特定格式的字符串
1 | -- 字符转换 |
输出:
1 | 76 |
1 | - 字符串长度 |
Lua 中的匹配模式直接用常规的字符串来描述。 它用于模式匹配函数 string.find, string.gmatch, string.gsub, string.match。
1 | -- 初始化表 |
参考:
1 | vimtutor // vim 教程 |
1 | # hjkl |
1 | # <esc> 进入正常模式 |
1 | # x 删除当前字符 |
1 | # i 插入文本 |
1 | # u 撤销 |
1 | #<ctrl>+g 显示当前行以及文件信息 |
1 | # :s/old/new 替换该行第一个匹配串 |
1 | # zc 折叠 |
1 | # :!shell 执行外部命令 |
.vimrc 是 Vim 的配置文件,需要我们自己创建:
1 | cd Home // 进入 Home 目录 |
https://github.com/junegunn/vim-plug
https://github.com/FengShangWuQi/to-vim/blob/master/.vimrc
1 | set nobackup |
1 | setencoding=utf-8 |
setnumber
setnowrap
setruler
1 | set cindent |
setcursorline
1 | set ic |
setshowmode
1 | #启动 vim 时关闭折叠代码 |
1 | syntax enable |
https://github.com/altercation/vim-colors-solarized
https://github.com/Anthony25/gnome-terminal-colors-solarized
1 | Plug 'scrooloose/nerdtree' |
https://github.com/scrooloose/nerdtree
https://github.com/jistr/vim-nerdtree-tabs
https://github.com/Xuyuanp/nerdtree-git-plugin
1 | Plug 'Valloric/YouCompleteMe' |
https://github.com/Valloric/YouCompleteMe
https://github.com/Raimondi/delimitMate
https://github.com/Shougo/deoplete.nvim
1 | Plug 'sheerun/vim-polyglot' |
https://github.com/w0rp/ale
https://github.com/sheerun/vim-polyglot
1 | Plug 'rking/ag.vim' |
https://github.com/kien/ctrlp.vim
https://github.com/ggreer/the_silver_searcher
https://github.com/rking/ag.vim
1 | Plug 'vim-airline/vim-airline' |
https://github.com/vim-airline/vim-airline
https://github.com/vim-airline/vim-airline-themes
1 | Plug 'scrooloose/nerdcommenter' |
https://github.com/scrooloose/nerdcommenter
1 | Plug 'airblade/vim-gitgutter' |
https://github.com/airblade/vim-gitgutter
https://github.com/tpope/vim-fugitive
1 | Plug 'suan/vim-instant-markdown' |
https://github.com/suan/vim-instant-markdown
1 | Plug 'mattn/emmet-vim' |
https://github.com/mattn/emmet-vim
1 | Plug'othree/html5.vim' |
https://github.com/othree/html5.vim
1 | Plug 'hail2u/vim-css3-syntax' |
https://github.com/hail2u/vim-css3-syntax
https://github.com/ap/vim-css-color
1 | Plug 'pangloss/vim-javascript' |
https://github.com/pangloss/vim-javascript
(注:上述脚本中存在特殊字符,有的情况下显示不正确,请直接用上述链接的内容。)
1 | Plug 'mxw/vim-jsx' |
https://github.com/mxw/vim-jsx
1 | Plug 'prettier/vim-prettier', { |
https://github.com/prettier/vim-prettier
转载:
“.NET Core 3.x”和“.NET Standard 2.1”支持 C# 8.0 。有关详细信息,请参阅C# 语言版本控制
可将 readonly 修饰符应用于结构的成员。 它指示该成员不会修改状态。 这比将 readonly 修饰符应用于 struct 声明更精细。
1 | public struct Point |
readonly 修饰符对于只读属性是必需的。 编译器会假设 get 访问器可以修改状态;必须显式声明 readonly。 自动实现的属性是一个例外;编译器会将所有自动实现的 Getter 视为 readonly,因此,此处无需向 X 和 Y 属性添加 readonly 修饰符。
现在可以将成员添加到接口,并为这些成员提供实现。 借助此语言功能,API 作者可以将方法添加到以后版本的接口中,而不会破坏与该接口当前实现的源或二进制文件兼容性。 现有的实现继承默认实现。
参考:
[教程:在 C# 8.0 中使用默认接口方法更新接口](https://docs.microsoft.com/zh-cn/dotnet/csharp/tutorials/default-interface-methods-versions
1 | public static RGBColor FromRainbow(Rainbow colorBand) => |
1 | public static decimal ComputeSalesTax(Address location, decimal salePrice) => |
1 | public static string RockPaperScissors(string first, string second) |
1 | public class Point |
using 声明是前面带 using 关键字的变量声明。它指示编译器声明的变量应在封闭范围的末尾进行处理。
1 | static int WriteLinesToFile(IEnumerable<string> lines) |
1 | int M() |
用 ref 修饰符声明的 struct 可能无法实现任何接口,因此无法实现 IDisposable。 因此,要能够处理 ref struct,它必须有一个可访问的 void Dispose() 方法。 此功能同样适用于 readonly ref struct 声明。
从 C# 8.0 开始,可以创建并以异步方式使用流。 返回异步流的方法有三个属性:
使用异步流需要在枚举流元素时在 foreach 关键字前面添加 await 关键字。 添加 await 关键字需要枚举异步流的方法,以使用 async 修饰符进行声明并返回 async 方法允许的类型。 通常这意味着返回 Task 或 Task
1 | await foreach (var number in GenerateSequence()) |
从 C# 8.0 开始,语言支持实现 System.IAsyncDisposable 接口的异步可释放类型。 可使用 await using 语句来处理异步可释放对象。
索引和范围为访问序列中的单个元素或范围提供了简洁的语法。
此语言支持依赖于两个新类型和两个新运算符:
0 索引与 sequence[0] 相同。 ^0 索引与 sequence[sequence.Length] 相同。 请注意,sequence[^0] 不会引发异常,就像 sequence[sequence.Length] 一样。 对于任何数字 n,索引 ^n 与 sequence.Length - n 相同。
范围指定范围的开始和末尾 。 包括此范围的开始,但不包括此范围的末尾,这表示此范围包含开始但不包含末尾 。 范围 [0..^0] 表示整个范围,就像 [0..sequence.Length] 表示整个范围。
1 | var words = new string[] |
C# 8.0 引入了 null 合并赋值运算符 ??=。 仅当左操作数计算为 null 时,才能使用运算符 ??= 将其右操作数的值分配给左操作数。
1 | List<int> numbers = null; |
在 C# 7.3 及更低版本中,构造类型(包含至少一个类型参数的类型)不能为非托管类型。 从 C# 8.0 开始,如果构造的值类型仅包含非托管类型的字段,则该类型不受管理。
1 | public struct Coords<T> |
Coords
1 | Span<Coords<int>> coordinates = stackalloc[] |
stackalloc 表达式在堆栈上分配内存块。该方法返回时,将自动丢弃在方法执行期间创建的堆栈中分配的内存块。 不能显式释放使用 stackalloc 分配的内存。 堆栈中分配的内存块不受垃圾回收的影响,也不必通过 fixed 语句固定。
1 | Span<int> numbers = stackalloc[] { 1, 2, 3, 4, 5, 6 }; |
内插逐字字符串中 $ 和 @ 标记的顺序可以任意安排:$@”…” 和 @$”…” 均为有效的内插逐字字符串。 在早期 C# 版本中,$ 标记必须出现在 @ 标记之前。
参考:
可以将 out 值内联作为参数声明到使用这些参数的方法中。
无需分配初始值
1 | if (int.TryParse(input, out var answer)) |
低于 C# 7.0 的版本中也提供元组,但它们效率低下且不具有语言支持。 这意味着元组元素只能作为 Item1 和 Item2 等引用。 C# 7.0 引入了对元组的语言支持,可利用更有效的新元组类型向元组字段赋予语义名称。这些名称仅存在于编译时且不保留,例如在运行时使用反射来检查元组时。
1 | // 第一种写法 |
从 C# 7.3 开始,元组类型支持 == 和 != 运算符。这些运算符按照元组元素的顺序将左侧操作数的成员与相应的右侧操作数的成员进行比较。
参考:
弃元是一个名为 _(下划线字符)的只写变量,可向单个变量赋予要放弃的所有值。 弃元类似于未赋值的变量;不可在代码中使用弃元(赋值语句除外)。
在以下方案中支持弃元:
1 | using System; |
模式匹配支持 is 表达式和 switch 表达式。 每个表达式都允许检查对象及其属性以确定该对象是否满足所寻求的模式。 使用 when 关键字来指定模式的其他规则。
1 | if (input is int count) |
更新后的 switch 语句有几个新构造:
1 | public static int SumPositiveNumbers(IEnumerable<object> sequence) |
此功能允许使用并返回对变量的引用的算法,这些变量在其他位置定义。
1 | public static ref int Find(int[,] matrix, Func<int, bool> predicate) |
C# 语言还有多个规则,可保护你免于误用 ref 局部变量和返回结果:
添加 ref 局部变量和 ref 返回结果可通过避免复制值或多次执行取消引用的操作,允许更为高效的算法。
方法套方法。
1 | public Task<string> PerformLongRunningWork(string address, int index, string name) |
C# 7.0 扩展了可作为表达式实现的允许的成员。 在 C# 7.0 中,你可以在属性和索引器上实现构造函数、终结器以及 get 和 set 访问器。 以下代码演示了每种情况的示例:
1 | // Expression-bodied constructor |
本示例不需要终结器,但显示它是为了演示语法。 不应在类中实现终结器,除非有必要发布非托管资源。 还应考虑使用 SafeHandle 类,而不是直接管理非托管资源。
1 | private static void DisplayFirstNumber(string[] args) |
1 | public string Name |
1 | DateTime ToDateTime(IFormatProvider provider) => |
添加 NuGet 包 System.Threading.Tasks.Extensions 才能使用 ValueTask
新语言功能意味着异步方法返回类型不限于 Task、Task
1 | public async ValueTask<int> Func() |
C# 7.0 包括两项新功能,可用于以最可读的方式写入数字来用于预期用途:二进制文本和数字分隔符 。
在创建位掩码时,或每当数字的二进制表示形式使代码最具可读性时,以二进制形式写入该数字:
1 | public const int Sixteen = 0b0001_0000; |
常量开头的 0b 表示该数字以二进制数形式写入。 二进制数可能会很长,因此通过引入 _ 作为数字分隔符通常更易于查看位模式,如上面二进制常量所示。
数字分隔符可以出现在常量的任何位置。 对于十进制数字,通常将其用作千位分隔符:
1 | public const long BillionsAndBillions = 100_000_000_000; |
综观来说,你可以声明可读性更强的数值常量。
参考:
只读自动属性 提供了更简洁的语法来创建不可变类型。
1 | public string FirstName { get; } |
FirstName 和 LastName 属性只能在同一个类的构造函数的主体中设置:
1 | public Student(string firstName, string lastName) |
尝试在另一种方法中设置 LastName 会生成 CS0200 编译错误:
1 | public class Student |
自动属性初始值设定项 可让你在属性声明中声明自动属性的初始值。
1 | public ICollection<double> Grades { get; } = new List<double>(); |
Grades 成员在声明它的位置处被初始化。 这样,就能更容易地仅执行一次初始化。 初始化是属性声明的一部分,可更轻松地将存储分配等同于 Student 对象的公用接口。
编写的许多成员是可以作为单个表达式的单个语句。 改为编写 expression-bodied 成员。 这适用于方法和只读属性。
1 | // 方法 |
using static 增强功能可用于导入单个类的静态方法。 指定要使用的类:
1 | using static System.Math; |
备注:在 static using 语句中必须使用完全限定的类名 System.String。 而不能使用 string 关键字。
在 LINQ 查询中会经常看到这种情况。 可以通过导入 Enumerable 或 Queryable 来导入 LINQ 模式。
using static 语法导入一个类型,然后就可以在其全局作用域范围内(当前文件内)使用它可以访问(遵循访问修饰符的限定)类型的静态成员了,需要注意的几点是:
1 | // 如果 Person 对象是 null,则将变量 first 赋值为 null。 否则,将 FirstName 属性的值分配给该变量。 |
关键符号:${}
1 | public string FullName => $"{FirstName} {LastName}"; |
1 | public static async Task<string> MakeRequest() |
nameof 表达式的计算结果为符号的名称。
1 | if (IsNullOrWhiteSpace(lastName)) |
C# 5 对于可放置 await 表达式的位置有若干限制。 使用 C# 6,现在可以在 catch 或 finally 表达式中使用 await。
鉴于此行为,建议仔细编写 catch 和 finally 子句,避免引入新的异常。
1 | public static async Task<string> MakeRequestAndLogFailures() |
1 | // 原来语法 |
此功能意味着,可以使用与多个版本中已有的序列容器语法类似的语法初始化关联容器。
参考:
1 | using MongoDB.Bson; |
做通用查询的时候,可以使用。
1 | /// <summary> |
作为一个数据库,基本的操作就是 CRUD。MongoDB 的 CRUD,不使用 SQL 来写,而是提供了更简单的方式。
BsonDocument方式
BsonDocument 方式,适合能熟练使用 MongoDB Shell 的开发者。MongoDB Driver 提供了完全覆盖 Shell 命令的各种方式,来处理用户的 CRUD 操作。
这种方法自由度很高,可以在不需要知道完整数据集结构的情况下,完成数据库的CRUD操作。
数据映射方式
数据映射是最常用的一种方式。准备好需要处理的数据类,直接把数据类映射到 MongoDB,并对数据集进行 CRUD 操作。
MongoDB 数据集中存放的数据,称之为文档(Document)。每个文档在存放时,都需要有一个ID,而这个 ID 的名称,固定叫 _id,类型是 MongoDB.Bson.ObjectId。
当建立映射时,如果给出 _id 字段,则 MongoDB 会采用这个 ID 做为这个文档的 ID ,如果不给出,MongoDB 会自动添加一个 _id 字段。在使用上是完全一样的。唯一的区别是,如果映射类中不写 _id,则 MongoDB 自动添加 _id 时,会用 ObjectId 作为这个字段的数据类型。
ObjectId 是一个全局唯一的数据。
MongoDB 允许使用其它类型的数据作为 ID,例如:string,int,long,GUID 等,但这就需要你自己去保证这些数据不超限并且唯一。
可以在类中修改 _id 名称为别的名称,但需要加一个描述属性 BsonId,BsonId 属性会告诉映射,topic_id 就是这个文档数据的ID 。MongoDB在保存时,会将这个 topic_id 转成 _id 保存到数据集中。
1 | public class CollectionModel |
注:在 MongoDB 数据集中,ID 字段的名称固定叫 _id。为了代码的阅读方便,可以在类中改为别的名称,但这不会影响 MongoDB 中存放的 ID 名称。
MongoDB 在早期,是不支持 Decimal 的。直到 MongoDB v3.4 开始,数据库才正式支持 Decimal。
所以,如果使用的是 v3.4 以后的版本,可以直接使用,而如果是以前的版本,需要用以下的方式:
1 | [] |
其实就是把 Decimal 通过映射,转为 Double 存储。
添加两个类 Contact 和 Author:
1 | public class Contact |
文档结构:
1 | { |
创建一个枚举 TagEnumeration:
1 | public enum TagEnumeration |
加到 CollectionModel 中:
1 | public class CollectionModel |
Demo代码:
1 | private static async Task Demo() |
保存后的文档:注意,tag 保存了枚举的值。
1 | { |
可以保存枚举的字符串。只要在 CollectionModel 中,tag 声明上加个属性:
1 | [] |
数据会变成:
1 | { |
CollectionModel 中增加一个时间字段:
1 | public DateTime post_time { get; set; } |
MongoDB 的 datetime 存储的是 unixtimestamp ,所以默认只能是 utc0 时区的,它问题出在 C# 的 DateTime 对时区的处理上遗留的问题,可以换成 DateTimeOffset。
如果只是保存(像上边这样),或者查询时使用时间作为条件(例如查询 post_time < DateTime.Now 的数据)时,是可以使用的,不会出现问题。
但是,如果是查询结果中有时间字段,那这个字段,会被 DateTime 默认设置为 DateTimeKind.Unspecified 类型。而这个类型,是无时区信息的,输出显示时,会造成混乱。
为了避免这种情况,在进行时间字段的映射时,需要加上属性:
1 | [] |
这样做,会强制 DateTime 类型的字段为 DateTimeKind.Local 类型。这时候,从显示到使用就正确了。
数据集中存放的是 UTC 时间,跟我们正常的时间有8小时时差,如果我们需要按日统计,比方每天的销售额/点击量。
按年月日时分秒拆开存放
1 | class Post_Time |
MyDateTimeSerializer
1 | public class MyDateTimeSerializer : DateTimeSerializer |
注意:使用这个方法,一定不要添加时间的属性 [BsonDateTimeOptions(Kind = DateTimeKind.Local)]
对某个特定映射的特定字段使用,比方只对 CollectionModel 的 post_time 字段来使用,可以这么写:
1 | [] |
数据声明很简单:
public Dictionary<string, int> extra_info { get; set; }
MongoDB 定义了三种保存属性:Document、ArrayOfDocuments、ArrayOfArrays,默认是 Document。
属性写法是这样的:
1 | [] |
这三种属性下,保存在数据集中的数据结构有区别。多数情况用 DictionaryRepresentation.ArrayOfDocuments。
1 | // DictionaryRepresentation.Document: |
这三种方式,从数据保存上并没有什么区别,但从查询来讲,如果这个字段需要进行查询,那三种方式区别很大。
如果采用 BsonDocument 方式查询,DictionaryRepresentation.Document 无疑是写着最方便的。
如果用 Builder 方式查询,DictionaryRepresentation.ArrayOfDocuments 是最容易写的。
DictionaryRepresentation.ArrayOfArrays 就算了。数组套数组,查询条件写死人。
用来改数据集中的字段名称。
1 | [] |
在不加 BsonElement 的情况下,通过数据映射写到数据集中的文档,字段名就是变量名,上面这个例子,字段名就是 post_time 。
加上 BsonElement 后,数据集中的字段名会变为 pt。
设置字段的默认值。
当写入的时候,如果映射中不传入值,则数据库会把这个默认值存到数据集中。
1 | [] |
用来在映射类中的数据类型和数据集中的数据类型做转换。
1 | [] |
表示,在映射类中,favor 字段是 int 类型的,而存到数据集中,会保存为 string 类型。
前边 Decimal 转换和枚举转换,就是用的这个属性。
用来忽略某些字段。
忽略的意思是:映射类中某些字段,不希望被保存到数据集中。
1 | [] |
这样,在保存数据时,字段 ignore_string 就不会被保存到数据集中。
参考:
默认是没有 categories 和 tags 的:
1 | hexo new page "tags" |
编辑 /tags/index.md
添加:
1 | type: tags |
/categories/index.md
添加:
1 | type: categories |
linux系统文件通常在 /var/log
1 | # 系统启动后的信息和错误日志 |
1 | # 查看重启的命令 |
1 | # 查看所有重启日志信息 |
参考: