Python3-Word操作

Python 提供了 python-docx 库操作 Word 文档。

安装 pip install python-docx

导入模块

1
2
3
4
5
6
7
8
9
from docx import Document
from docx.enum.text import WD_ALIGN_PARAGRAPH, WD_PARAGRAPH_ALIGNMENT # 设置对象居中、对齐等。
from docx.enum.text import WD_TAB_ALIGNMENT, WD_TAB_LEADER # 设置制表符等
from docx.enum.text import WD_LINE_SPACING # 设置行间距
from docx.shared import Inches # 设置图像大小
from docx.shared import Pt # 设置像素、缩进等
from docx.shared import RGBColor # 设置字体颜色
from docx.shared import Length # 设置宽度
from docx.oxml.ns import qn

页眉

1
2
3
4
5
6
7
8
# 创建文档
document = Document()

section = document.sections[0]
header = section.header
bt1 = header.paragraphs[0]
bt1.text = "Left Text\tCenter Text\tRight Text"
bt1.style = document.styles["Header"]

添加标题 可设置标题级别1-9

1
2
3
h1=document.add_heading('此处默认标题1')
h2=document.add_heading('此处添加标题2',level=2)
h3=document.add_heading('此处添加标题3',level=3)

段落

1
2
3
4
5
6
7
8
9
10
11
document=docx.Document()   # 创建一个空白文档
document.styles['Normal'].font.name = '宋体' # 设置西文字体
document.styles['Normal']._element.rPr.rFonts.set(qn('w:eastAsia'), '宋体') # 设置中文字体
p = document.add_paragraph() # 添加一个段落
p.paragraph_format.alignment = WD_ALIGN_PARAGRAPH.JUSTIFY # 设置对齐方式
p.paragraph_format.line_spacing_rule = WD_LINE_SPACING.ONE_POINT_FIVE # 设置行间距
p.paragraph_format.space_after = Pt(0) # 设置段后间距
run = p.add_run('content') # 延长段落
run.font.color.rgb = RGBColor(255, 0, 0) # 设置字体颜色
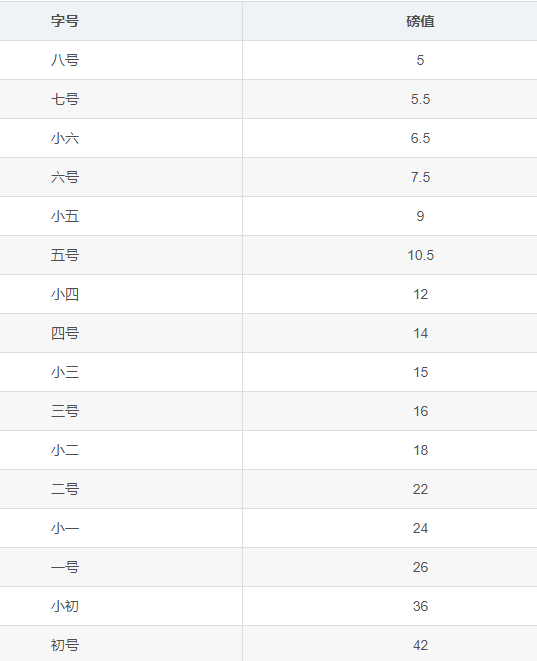
run.font.size = Pt(22) # 设置字号
run.font.bold = True # 设置下划线

字号与磅值关系

微信截图_20210429150623.png

新增头信息

1
t1=document.add_paragraph('此处Tetle信息','Title')

新增段落及向前插入段落

1
2
p1=document.add_paragraph('新增段落P1')
pin1=p1.insert_paragraph_before('在p1前插入段落pin1')

段落里设置参数样式 或 指定.style来设置参数

1
2
3
p2=document.add_paragraph('新增段落p2并设置style类型',style='List Bullet')
p3=document.add_paragraph('新增段落p3并指定style类型')
p3.style='List Bullet'

设置字体

1
2
3
4
5
6
7
8
9
paragraph=document.add_paragraph()
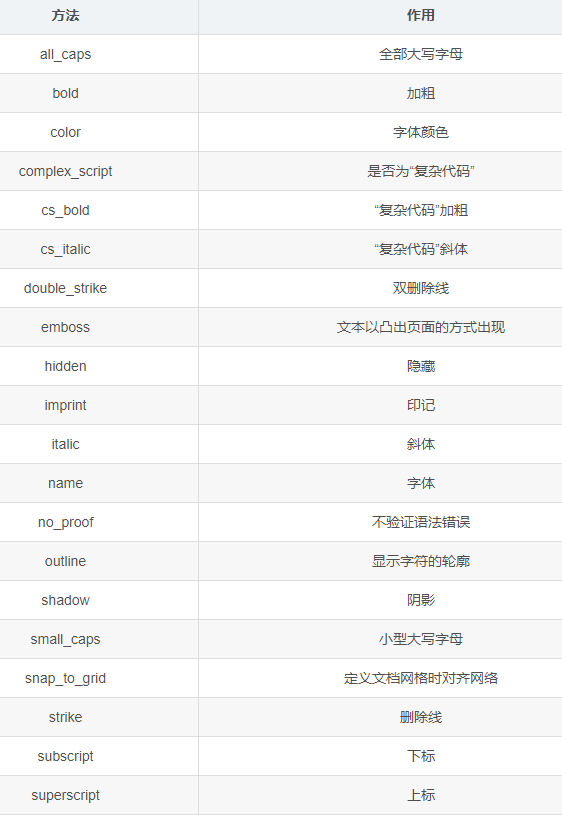
r1=paragraph.add_run('通过.bold=True来设置粗体')
r1.bold=True
r1.style='Emphasis'
r2=paragraph.add_run('也可以')
r3=paragraph.add_run('\n通过.italic=True来设置斜体,\n通过.font.size来设置字体大小,\n通过.font.color.rgb=RGBColor来设置字体颜色')
r3.italic=True
r3.font.size=Pt(20)
r3.font.color.rgb=RGBColor(200,77,150)

微信截图_20210429150714.png

设置居中、左右对齐、缩进、制表符

WD_ALIGN_PARAGRAPH,比较偏短小,在pytharm中使用不能准确的表达,因此使用WD_PARAGRAPH_ALIGNMENT

1
2
3
p4 = document.add_paragraph('准备开始设置居中、左右对齐、缩进等')
p4.paragraph_format.alignment=WD_PARAGRAPH_ALIGNMENT.CENTER
# p4.paragraph_format.alignment=WD_ALIGN_PARAGRAPH.CENTER

设置缩进

默认Inches(0.5)等于四个空格

1
2
p5=document.add_paragraph('content')
p5.paragraph_format.left_indent=Inches(0.5)

设置首行缩进

1
p5.paragraph_format.first_line_indent=Inches(0.5)

设置段落间距 分为段落前 和 段落后

1
2
p5.paragraph_format.space_before=Pt(30)
p5.paragraph_format.space_after=Pt(12)

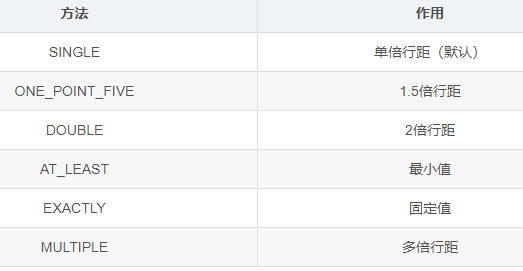
设置段落行距当行距为最小值和固定值时,设置值单位是磅,用Pt;当行间距为多倍行距时,设置值为数值。

1
p5.paragraph_format.line_spacing=Pt(30)

微信截图_20210429150903.png

1
2
3
4
p5.line_spacing_rule = WD_LINE_SPACING.EXACTLY  # 固定值
p5.paragraph_format.line_spacing = Pt(18) # 固定值18磅
p5.line_spacing_rule = WD_LINE_SPACING.MULTIPLE # 多倍行距
p5.paragraph_format.line_spacing = 1.75 # 1.75倍行间距

分页属性

1
p5.paragraph_format.keep_with_next = True

微信截图_20210429150955.png

添加分页符

1
2
document.add_page_break()
p5=document.add_paragraph('.add_page_break()硬分页,即使文本未满')

添加表格、设置表格样式

1
2
3
4
5
6
7
8
9
10
11
12
13
14
15
16
table=document.add_table(rows=2,cols=2) 
table.style='Light Shading Accent 1'

# 表格
table = document.add_table(rows=3, cols=2, style='Table Grid')
# 表头
hc = table.rows[0].cells
hc[0].text = '姓名'
hc[1].text = '年龄'
# 表体
bc1 = table.rows[1].cells
bc1[0].text = '张三'
bc1[1].text = '22'
bc2 = table.rows[2].cells
bc2[0].text = '李四'
bc2[1].text = '33'

选择表格内单元格、单元格赋值添加和改变内容

1
2
cell=table.cell(0,1)
cell.text='通过cell.text()来添加内容'

选择表格的行,通过索引,然后索引单元格

1
2
3
row=table.rows[1]
row.cells[0].text='通过.add_table(,)来添加表格'
row.cells[1].text='通过for row in table.rows内嵌套 for cell in row.cells来循环输出表格内容'

for循环逐行输出表格内容

1
2
3
for row in table.rows:  
for cell in row.cells:
print(cell.text)

len表格内行列数

1
2
3
4
5
row_count=len(table.rows)
col_count=len(table.columns)
print(row_count,col_count,'现表格行列数')
row=table.add_row() #逐步添加行
print(len(table.rows),len(table.columns),'添加后表格行列数')

添加另一个表格 及 指定表格样式

1
2
table1=document.add_table(1,3)
table1.style='Light Shading Accent 2' #设置表格样式

填充 标题行

1
2
3
4
heading_cells=table1.rows[0].cells  #获取 行列标
heading_cells[0].text='Qtx' #为行列表内的cell单元格 赋值
heading_cells[1].text='Sku'
heading_cells[2].text='Des'

表格数据

1
2
3
4
5
items=(
(7,'1024','plush kitens'),
(3,'2042','furbees'),
(1,'1288','french poodle collars,deluxe')
)

为每个项目添加数据行

1
2
3
4
5
for item in items:
cells=table1.add_row().cells
cells[0].text=str(item[0])
cells[1].text=str(item[1])
cells[2].text=str(item[2])

添加图片

1
document.add_picture('a4.png',width=Inches(2))

调整图片大小:

1
document.add_picture('a4.png', width=Inches(1.0), height=Inches(1.0))

若同时定义宽度和高度,则图片会被拉伸或压缩到指定大小;
若仅定义宽度或高度,则图会自适应调整大小。

保存文档

1
document.save('test.docx')

读取

1
2
3
4
5
6
7
8
9
10
11
12
13
14
15
from docx import Document

# 打开文档
document = Document('test.docx')
# 读取标题、段落、列表内容
ps = [ paragraph.text for paragraph in document.paragraphs]
for p in ps:
print(p)
# 读取表格内容
ts = [table for table in document.tables]
for t in ts:
for row in t.rows:
for cell in row.cells:
print(cell.text, end=' ')
print()

实例代码

1
2
3
4
5
6
7
8
9
10
11
12
13
14
15
16
17
18
19
20
21
22
23
24
25
26
27
28
29
30
31
32
33
34
35
36
37
38
39
40
41
42
43
44
45
46
47
48
49
50
51
52
53
54
55
56
57
58
59
60
61
62
63
64
65
66
67
68
69
70
71
72
73
74
75
76
77
78
79
80
81
82
83
84
85
86
87
88
89
90
91
92
93
94
95
96
97
98
99
100
101
102
103
104
105
106
107
108
109
110
111
112
113
114
115
116
117
118
119
120
121
122
123
124
125
126
127
128
129
130
from docx import Document
from docx.enum.text import WD_ALIGN_PARAGRAPH, WD_PARAGRAPH_ALIGNMENT # 设置对象居中、对齐等。
from docx.enum.text import WD_TAB_ALIGNMENT, WD_TAB_LEADER # 设置制表符等
from docx.enum.text import WD_LINE_SPACING # 设置行间距
from docx.shared import Inches # 设置图像大小
from docx.shared import Pt # 设置像素、缩进等
from docx.shared import RGBColor # 设置字体颜色
from docx.shared import Length # 设置宽度
from docx.oxml.ns import qn

document = Document() # 创建一个空白文档

section = document.sections[0]
header = section.header
bt1 = header.paragraphs[0]
bt1.text = "Left Text\tCenter Text\tRight Text"
bt1.style = document.styles["Header"]


document.styles['Normal'].font.name = '宋体' # 设置西文字体
document.styles['Normal']._element.rPr.rFonts.set(
qn('w:eastAsia'), '宋体') # 设置中文字体
p = document.add_paragraph() # 添加一个段落
p.paragraph_format.alignment = WD_ALIGN_PARAGRAPH.JUSTIFY # 设置对齐方式
p.paragraph_format.line_spacing_rule = WD_LINE_SPACING.ONE_POINT_FIVE # 设置行间距
p.paragraph_format.space_after = Pt(0) # 设置段后间距
run = p.add_run('content') # 延长段落
run.font.color.rgb = RGBColor(255, 0, 0) # 设置字体颜色
run.font.size = Pt(22) # 设置字号
run.font.bold = True # 设置下划线


p1 = document.add_paragraph('新增段落P1')
pin1 = p1.insert_paragraph_before('在p1前插入段落pin1')

t1 = document.add_paragraph('此处Tetle信息', 'Title')

h1 = document.add_heading('此处默认标题1')
h2 = document.add_heading('此处添加标题2', level=2)
h3 = document.add_heading('此处添加标题3', level=3)

p2 = document.add_paragraph('新增段落p2并设置style类型', style='List Bullet')
p3 = document.add_paragraph('新增段落p3并指定style类型')
p3.style = 'List Bullet'

paragraph = document.add_paragraph()
r1 = paragraph.add_run('通过.bold=True来设置粗体')
r1.bold = True
r1.style = 'Emphasis'
r2 = paragraph.add_run('也可以')
r3 = paragraph.add_run(
'\n通过.italic=True来设置斜体,\n通过.font.size来设置字体大小,\n通过.font.color.rgb=RGBColor来设置字体颜色')
r3.italic = True
r3.font.size = Pt(20)
r3.font.color.rgb = RGBColor(200, 77, 150)

p4 = document.add_paragraph('准备开始设置居中、左右对齐、缩进等')
p4.paragraph_format.alignment = WD_PARAGRAPH_ALIGNMENT.CENTER

p5 = document.add_paragraph('content123456789876543')
p5.paragraph_format.left_indent = Inches(0.5)
p5.paragraph_format.first_line_indent = Inches(0.5)

p5.paragraph_format.space_before = Pt(30)
p5.paragraph_format.space_after = Pt(12)

p5.line_spacing_rule = WD_LINE_SPACING.EXACTLY # 固定值
p5.paragraph_format.line_spacing = Pt(18) # 固定值18磅
p5.line_spacing_rule = WD_LINE_SPACING.MULTIPLE # 多倍行距
p5.paragraph_format.line_spacing = 1.75 # 1.75倍行间距

p5.paragraph_format.keep_with_next = True

document.add_page_break()
p5 = document.add_paragraph('.add_page_break()硬分页,即使文本未满')

table = document.add_table(rows=2, cols=2)
table.style = 'Light Shading Accent 1'

cell = table.cell(0, 1)
cell.text = '通过cell.text()来添加内容'

row = table.rows[1]
row.cells[0].text = '通过.add_table(,)来添加表格'
row.cells[1].text = '通过for row in table.rows内嵌套 for cell in row.cells来循环输出表格内容'

table1 = document.add_table(1, 3)
table1.style = 'Light Shading Accent 2' # 设置表格样式

heading_cells = table1.rows[0].cells # 获取 行列标
heading_cells[0].text = 'Qtx' # 为行列表内的cell单元格 赋值
heading_cells[1].text = 'Sku'
heading_cells[2].text = 'Des'

for row in table.rows:
for cell in row.cells:
print(cell.text)

items = (
(7, '1024', 'plush kitens'),
(3, '2042', 'furbees'),
(1, '1288', 'french poodle collars,deluxe')
)

for item in items:
cells = table1.add_row().cells
cells[0].text = str(item[0])
cells[1].text = str(item[1])
cells[2].text = str(item[2])

# 表格
table = document.add_table(rows=3, cols=2, style='Table Grid')
# 表头
hc = table.rows[0].cells
hc[0].text = '姓名'
hc[1].text = '年龄'
# 表体
bc1 = table.rows[1].cells
bc1[0].text = '张三'
bc1[1].text = '22'
bc2 = table.rows[2].cells
bc2[0].text = '李四'
bc2[1].text = '33'

document.add_picture('a4.png', width=Inches(2))

document.add_picture('a4.png', width=Inches(1.0), height=Inches(1.0))

# 保存
document.save('test.docx')

参考:

python-docx

python-docx表格样式列表

python:docx模块

Python 进阶(七): Word 基本操作