下载解压
离线包:https://nodejs.org/en/download/
1 | xz -d node-v14.2.0-linux-x64.tar.xz |
安装
1 | # 移动到/usr/local |
参考:
离线包:https://nodejs.org/en/download/
1 | xz -d node-v14.2.0-linux-x64.tar.xz |
1 | # 移动到/usr/local |
参考:
1 | unix:///tmp/supervisor.sock no such file |
supervisor 默认配置会把 socket 文件和 pid 守护进程生成在/tmp/目录下,/tmp/目录是缓存目录,Linux 会根据不同情况自动删除其下面的文件。
1 | vi /etc/supervisord.conf |
可选:
1 | sudo chmod 777 /run |
1 | sudo touch /var/run/supervisor.sock |
1 | supervisorctl update |
参考:
“unix:///tmp/supervisor.sock no such file” 错误处理 (亲测)
[https://blog.csdn.net/qq_28885149/article/details/79364685](解决unix:///tmp/supervisor.sock no such file的问题)
1 | ## 启动服务: |
1 | rpm -qa | grep mysql |
1 | # 检查mysql组和用户是否存在,如无则创建 |
查看全部用户:
1 | cat /etc/passwd|grep -v nologin|grep -v halt|grep -v shutdown|awk -F ":" '{print $1 "|" $3 "1" $4}' | more |
若不存在,则创建mysql组和用户
1 | # 创建mysql用户组 |
注:永久性删除用户账号
1 | userdel peter |
官网下载地址:https://dev.mysql.com/downloads/mysql/5.7.html#downloads
版本选择,可以选择一下两种方式:
1 | Red Hat Enterprise Linux |
1 | tar -zxvf mysql-5.7.31-linux-glibc2.12-x86_64.tar.gz |
1 | # 更改所属的组和用户 |
注意:/etc/目录下可能会存在 my.cnf,需要删除
1 | ls /etc/ | grep my.cnf |
my.cnf:
1 | # 对其他远程连接的mysql客户端的配置 |
注:在MySQL中,utf8 编码只支持每个字符最多三个字节,而真正的 UTF-8 是每个字符最多四个字节,
MySQL 的 utf8mb4 才是真正的 UTF-8。utf8mb4 的最低mysql版本支持版本为5.5.3+,若不是,请升级到较新版本。
参考:
语法
chown [-cfhvR] [–help] [–version] user[:group] file…
参数 :
user : 新的文件拥有者的使用者 ID
group : 新的文件拥有者的使用者组(group)
-c : 显示更改的部分的信息
-f : 忽略错误信息
-h :修复符号链接
-v : 显示详细的处理信息
-R : 处理指定目录以及其子目录下的所有文件
–help : 显示辅助说明
–version : 显示版本
1 | # 进入mysql |
1 | # 启动 |
注:错误日志在 /usr/local/mysql/data 下 XXXX.err 文件。
报错:
1 | [root@renshelaodongbangong-sj0001 mysql]# /etc/init.d/mysqld restart |
解决方案:
1 | #找到是否已经有进程占用 |
1 | chkconfig --level 35 mysqld on |
1 | vim /etc/profile |
1 | # 获取初始密码 |
1 | # 登录 |
(1)如果报错:ERROR 2002 (HY000): Can’t connect to local MySQL server through socket ‘/tmp/mysql.sock’ (2),
解决方案,创建软链接:
1 | ln -s /var/lib/mysql/mysql.sock /tmp/mysql.sock |
也可以使用下面的方式连接:
1 | mysql -uroot -h 127.0.0.1 -p |
(2)ERROR 1862 (HY000): Your password has expired. To log in you must change it using a client that supports expired passwords.
使用忽略授权表的方法进入mysql:
1 | vim my.cnf |
使用命令重启mysql:
1 | service mysqld restart |
1 | # 进入mysql |
之后把 my.cnf 的 skip-grant-tables=1 这行注释掉
1 | mysql> use mysql; |
1 | /etc/init.d/mysqld restart |
注意:针对各种云,因为有专门策略,所以不需要操作防火墙;
1 | firewall-cmd --zone=public --add-port=3306/tcp --permanent |
1 | netstat -lnpt | grep 3306 |
1 | CREATE DATABASE data1 |
参考:
监听的 IP 可以选择本地回环地址,特定的 IP 以及任意 IP,分别是:
1 | 127.0.0.1 127.0.0.2 127.0.0.3…… 本地回环地址 |
监听本地回环地址时,则访问仅限于本机应用程序,不需要管理员权限来添加防火墙配置。
本地计算机配置了反向代理服务器,推荐使用本地回环地址。
如果让服务对外公开提供,则需要设置为 0.0.0.0 任意 IP。
1 | public class Program |
1 | { |
使用命令行参数 --urls :
http协议,监听IP 地址,监听端口
1 | dotnet WebApplication1.dll --urls http://0.0.0.0:5000 |
ASPNETCORE_URLS
1 | environment=ASPNETCORE_URLS='http://0.0.0.0:5000' |
参考:
官网下载
下载地址:redis-5.0.8.tar.gz
1 | yum install gcc |
1 | tar -zxvf redis-5.0.8.tar.gz |
编辑 redis.conf:
1 | vim /ldjc/rj/redis-5.0.8/redis.conf |
进入vim 输入 / 再按 回车用来搜索关键字
比如如下命令会定位到文件中出现 bind 的位置并会将关键词用颜色区分。
/bind
搜索 daemonize no 改为 daemonize yes
搜索 requirepass password 添加 requirepass 设置的密码
requirepass password
搜索 bind 127.0.0.1 然后使用 #注释掉
1 | # bind 127.0.0.1 |
命令:
1 | cd /ldjc/rj/redis-5.0.8 |
示例:
1 | [] |
注意:针对各种云,因为有专门策略,所以不需要操作防火墙;
1 | firewall-cmd --zone=public --add-port=6379/tcp --permanent |
1 | [root@localhost bin]# pkill redis-server |
下载setuptools 46.2.0离线包
参考:installing
1 | ## 解压 |
需要安装 uzip 命令:
1 | yum install zip |
下载supervisor 4.2.0离线包
参考:installing
进入文件所在目录:
1 | ## 解压 |
验证安装是否成功
1 | supervisorctl --help |
1 | ##创建supervisor所需目录 |
在 [include] 标签中添加 /etc/supervisord.d/*.conf
1 | [include] |
长时间运行会报错 unix:///tmp/supervisor.sock no such file,参考
1 | supervisord -c /etc/supervisord.conf ## 启动 |
新建 WebApplication1.conf:
1 | touch /etc/supervisord.d/WebApplication1.conf |
内容:
注意:supervisor配置文件中的注释使用英文分号 ;
配置文件名需要与program标签内名称一致!!!
asp net core 站点:
1 | [program:WebApplication1] |
注意:如果配置Linux开机启动服务报错,则需要配置 dotnet 命令全路径:/root/dotnet/dotnet
supervisor FATAL can't find command 'dotnet'
webapp 站点,使用 npm http-server:
1 | [program:webapp] |
详细命令参考:Configuration File
查看站点日志:
1 | vim /var/log/WebApplication1.err.log |
注意:针对各种云,因为有专门策略,所以不需要操作防火墙;
1 | firewall-cmd --zone=public --add-port=5000/tcp --permanent |
1 | curl -X GET "http://localhost:5000/weatherforecast" -H "accept: application/json" |
1 | [root@host supervisor-4.2.0]# touch /usr/lib/systemd/system/supervisord.service |
supervisord.service:
1 | # supervisord service for systemd (CentOS 7.0+) |
设置成功后,可以使用下列命令:
1 | # 重启指定应用 |
参考:
1 | ## 创建文件夹 |
1 | cd /etc/yum.repos.d/ |
介绍:
1 | [local] #库名称 |
1 | yum clean all |
1 | yum install libicu |
参考:
1.绝大多数开源软件都是直接以原码形式发布的
2.源代码一般会被打成.tar.gz的归档压缩文件
3.源代码需要编译成为二进制形式之后才能够运行使用
4.源代码基本编译流程:
1).configure 检查编译环境;
2)make对源代码进行编译;
3)make insall 将生成的可执行文件安装到当前计算机中
1.源代码形式的特点:操作复杂、编译时间长、极易出现问题、依赖关系复杂
2.为了方便,RPM(redhat package manager)
3.RPM通过将代码基于特定平台系统编译为可执行文件,并保存依赖关系,来简化开源软件的安装管理。针对不同的系统设定不同的包
4.常用命令规范:linuxcast-1.2.0-30.el6.1686.rpm 包名-版本号-适用平台-32/64-rpm
5.使用
1 | ## 安装 |
1.rpm软件包形式的管理虽然方便,但是需要手工解决软件包的依赖关系。很多时候安装一个软件安装一个软件需要安装1个或者多个其他软件,手动解决时,很复杂,yum解决这些问题。Yum是rpm的前端程序,主要目的是设计用来自动解决rpm的依赖关系,其特点:
1)自动解决依赖关系;
2)可以对rpm进行分组,基于组进行安装操作;
3)引入仓库概念,支持多个仓库;
4)配置简单
2.yum仓库用来存放所有的现有的.rpm包,当使用yum安装一个rpm包时,需要依赖关系,会自动在仓库中查找依赖软件并安装。仓库可以是本地的,也可以是HTTP、FTP、nfs形式使用的集中地、统一的网络仓库。
3.仓库的配置文件/etc/yum.repos.d目录下
4.使用:
1 | ## 1 安装 |
5.查询软件:
可以使用 yumsearch **
参考:
1 | wget http://ftp.gnu.org/gnu/make/make-4.3.tar.gz |
参考:
CentOS,是基于 Red Hat Linux 提供的可自由使用源代码的企业级 Linux 发行版本;是一个稳定,可预测,可管理和可复制的免费企业级计算平台。
1 | mv /etc/yum.repos.d/CentOS-Base.repo /etc/yum.repos.d/CentOS-Base.repo.backup |
1 | CentOS 6 |
运行 yum makecache 生成缓存
其他
非阿里云ECS用户会出现 Couldn’t resolve host ‘mirrors.cloud.aliyuncs.com’ 信息,不影响使用。用户也可自行修改相关配置: eg:
1 | sed -i -e '/mirrors.cloud.aliyuncs.com/d' -e '/mirrors.aliyuncs.com/d' /etc/yum.repos.d/CentOS-Base.repo |
参考
rpm包安装的,可以用rpm -qa看到,如果要查找某软件包是否安装,用 rpm -qa | grep “软件或者包的名字”。
deb包安装的,可以用dpkg -l能看到。如果是查找指定软件包,用dpkg -l | grep “软件或者包的名字”;
yum方法安装的,可以用yum list installed查找,如果是查找指定包,命令后加 | grep “软件名或者包名”;
如果是以源码包自己编译安装的,例如.tar.gz或者tar.bz2形式的,这个只能看可执行文件是否存在了,
上面两种方法都看不到这种源码形式安装的包。如果是以root用户安装的,可执行程序通常都在/sbin:/usr/bin目录下
pip安装的所有包:
1 | pip list |
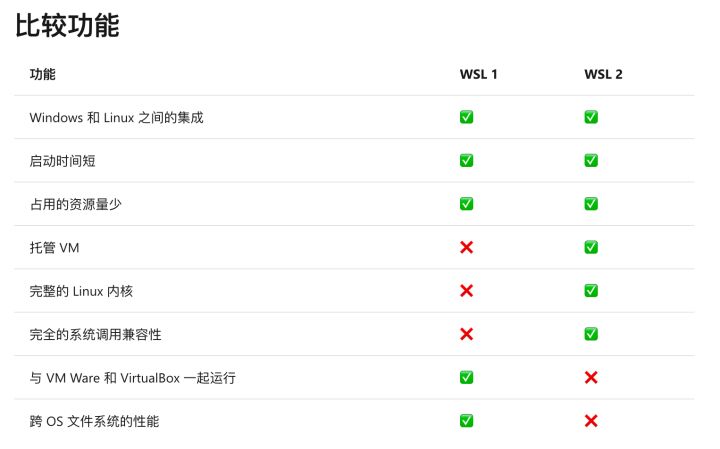
WSL1 和 WSL2
相比于 WSL1,WSL2 通过虚拟机的方式带来了更完整的 Linux 内核,但这种方式也引入了一些问题,微软给出了下面的图表来展示这些不同:
1 | # 完全未安装 WSL 时才有效 |
--install 命令执行以下操作:
摘自:Background tasks with hosted services in ASP.NET Core
BackgroundService is a base class for implementing a long running IHostedService.
ExecuteAsync(CancellationToken) is called to run the background service. The implementation returns a Task that represents the entire lifetime of the background service. No further services are started until ExecuteAsync becomes asynchronous, such as by calling . Avoid performing long, blocking initialization work in . The host blocks in StopAsync(CancellationToken) waiting for to complete.awaitExecuteAsyncExecuteAsync
The cancellation token is triggered when IHostedService.StopAsync is called. Your implementation of should finish promptly when the cancellation token is fired in order to gracefully shut down the service. Otherwise, the service ungracefully shuts down at the shutdown timeout. For more information, see the IHostedService interface section.ExecuteAsync
当继承 IHostedService 接口实现 BackgroundService 或者 BackgroundTasks ,其实现类在注入时,不受注入的先后顺序影响。
下面的例子,ConsumerManager 依赖 IKafkaEventBusContainer 的实现:
1 | serviceCollection.AddHostedService<ConsumerManager>(); |
参考: