ASP.NET Core基于Consul服务治理实现
直接运行ASP.NET Core程序
参照:Docker & Fabio & Consul群集 & ASP.NET Core 2.0实践
目录结构:
1
2
3
| web
|--ConsulTest
|--ConsulTest1
|
复制一份新目录
1
| cp -R ConsulTest ConsulTest1
|
修改docker-compose.override.yml配置文件:
1
2
3
4
5
6
7
8
| version: '3.4'
services:
consultest:
environment:
- ASPNETCORE_ENVIRONMENT=Development
ports:
- "8080:8080"
|
修改bundleconfig.json:
注:service.ip需要使用以下命令查询:
1
| docker inspect -f '{{range .NetworkSettings.Networks}}{{.IPAddress}}{{end}}' consultest_consultest_1
|
1
2
3
4
5
6
7
8
9
10
11
12
13
14
15
16
17
| {
"Service": {
"IP": "172.22.0.2",
"Name": "ConsulDemo1",
"Port": "8080"
},
"Consul": {
"IP": "172.17.0.5",
"Port": "8500"
},
"Logging": {
"IncludeScopes": false,
"LogLevel": {
"Default": "Warning"
}
}
}
|
修改Program.cs
1
2
3
4
5
| public static IWebHost BuildWebHost(string[] args) =>
WebHost.CreateDefaultBuilder(args)
.UseStartup<Startup>()
.UseUrls("http://*:8080")
.Build();
|
运行以下命令,启动服务:
1
| docker-compose up -d --build
|
使用配置文件重新启动consul客户端
准备配置文件,取名services_config.json(命名规则,需要使用.json后缀)
注:配置中的web service服务需要提前启动,以获取IP,port信息。
目录结构:
1
2
3
4
5
| document
|--consul
|--client1.josn
|--config
|--services_config.json
|
1
2
3
4
5
6
7
8
9
10
11
12
13
14
15
16
17
18
19
20
21
22
23
24
25
26
27
28
29
30
31
32
33
34
35
36
37
38
| {
"services":[
{
"id": "EDC_DNC_MSAD_CLIENT_SERVICE_01",
"name" : "Client-Service",
"tags": [
"urlprefix-/ClientService80"
],
"address": "172.21.0.2",
"port": 80,
"checks": [
{
"name": "clientservice80_check",
"http": "http://172.21.0.2:80/api/health",
"interval": "10s",
"timeout": "5s"
}
]
},
{
"id": "EDC_DNC_MSAD_CLIENT_SERVICE_02",
"name" : "Client-Service",
"tags": [
"urlprefix-/ClientService8080"
],
"address": "172.22.0.2",
"port": 8080,
"checks": [
{
"name": "clientservice8080_check",
"http": "http://172.22.0.2:8080/api/health",
"interval": "10s",
"timeout": "5s"
}
]
}
]
}
|
在document文件夹下运行以下命令:
1
| docker run --name=client1 -it -d -p 8500:8500 -v $PWD/consul:/consul consul agent -config-dir=/consul/config -config-file=/consul/client1.json
|
-config-dir - 要加载的配置文件的目录。 Consul将加载后缀为“.json”的所有文件。加载顺序是按字母顺序排列的,并且与上面的配置文件选项一样使用相同的合并例程。可以多次指定此选项以加载多个目录。不加载config目录的子目录。
结果:
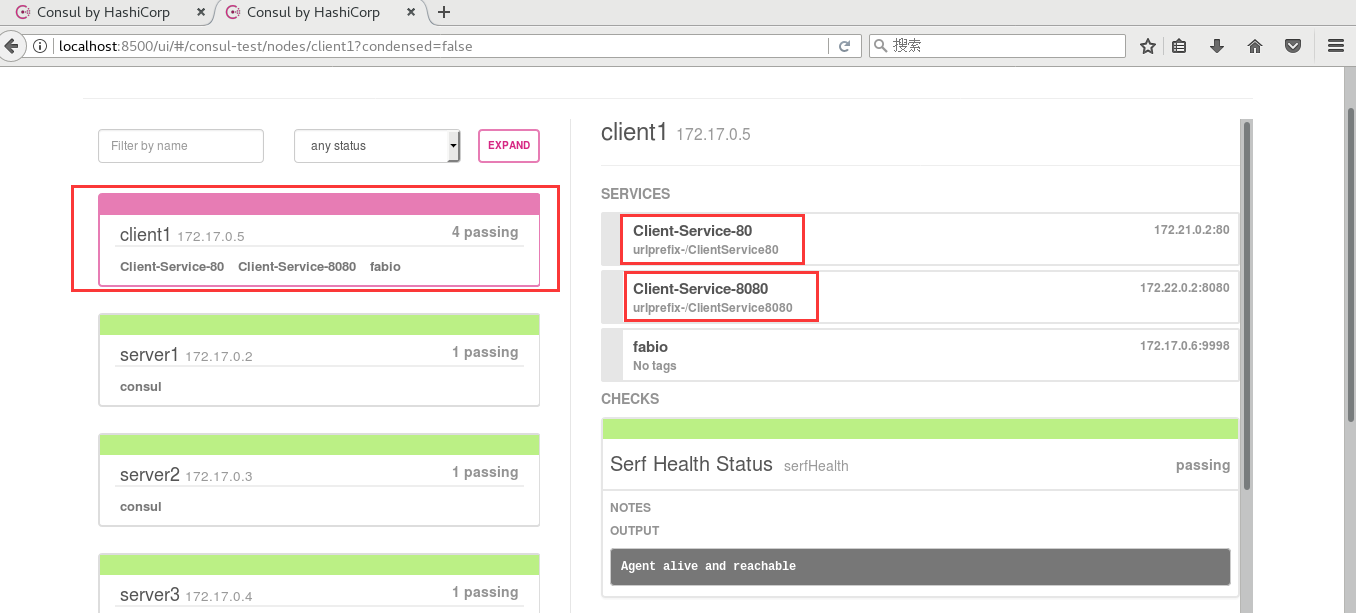
通过API进行服务发现
1
| curl http://localhost:8500/v1/catalog/service/Client-Service | python -m json.tool
|
结果:
1
2
3
4
5
6
7
8
9
10
11
12
13
14
15
16
17
18
19
20
21
22
23
24
25
26
27
28
29
30
31
32
33
34
35
36
37
38
39
40
41
42
43
44
45
46
47
48
49
50
51
52
53
| [root@localhost document]
% Total % Received % Xferd Average Speed Time Time Time Current
Dload Upload Total Spent Left Speed
0 0 0 0 0 0 0 0 --:--:-- --:--:-- --:--:-- 100 945 100 945 0 0 51053 0 --:--:-- --:--:-- --:--:-- 52500
[
{
"Address": "172.17.0.5",
"CreateIndex": 24219,
"Datacenter": "consul-test",
"ID": "8bc069e0-821b-b714-751d-c6fe07dfa7ea",
"ModifyIndex": 24442,
"Node": "client1",
"NodeMeta": {
"consul-network-segment": ""
},
"ServiceAddress": "172.21.0.2",
"ServiceEnableTagOverride": false,
"ServiceID": "EDC_DNC_MSAD_CLIENT_SERVICE_01",
"ServiceMeta": {},
"ServiceName": "Client-Service",
"ServicePort": 80,
"ServiceTags": [
"urlprefix-/ClientService80"
],
"TaggedAddresses": {
"lan": "172.17.0.5",
"wan": "172.17.0.5"
}
},
{
"Address": "172.17.0.5",
"CreateIndex": 24220,
"Datacenter": "consul-test",
"ID": "8bc069e0-821b-b714-751d-c6fe07dfa7ea",
"ModifyIndex": 24443,
"Node": "client1",
"NodeMeta": {
"consul-network-segment": ""
},
"ServiceAddress": "172.22.0.2",
"ServiceEnableTagOverride": false,
"ServiceID": "EDC_DNC_MSAD_CLIENT_SERVICE_02",
"ServiceMeta": {},
"ServiceName": "Client-Service",
"ServicePort": 8080,
"ServiceTags": [
"urlprefix-/ClientService8080"
],
"TaggedAddresses": {
"lan": "172.17.0.5",
"wan": "172.17.0.5"
}
}
|
可以看到返回了两个服务实例的信息,当然,这里建议服务名还是不要有空格为好。此外,在服务发现的过程中,会加以一定的负载均衡策略,从这两个服务实例中选择一个返回给服务消费端,比如:随机、轮询、加权轮询、基于性能的最小连接数等等。
Consul集群之Key/Value存储
Consul除了可以实现服务注册和服务发现之外,还提供了强大的KV(Key/Value)存储。我们可以使用Consul的分层KV存储干任何事情,比如:动态配置,特征标记,协调,leader选举等。KV存储的API是基于http的。
查看所有KV
通过curl http://localhost:8500/v1/kv/?recurse命令
或者通过Web UI 查看。
新增KV
1
| curl -X PUT -d 'consulvalue' http://172.17.0.5:8500/v1/kv/web/value1
|
key:value1, value:consulvalue
查看key/value:
1
2
| [root@localhost ConsulTest]
[{"LockIndex":0,"Key":"web/value1","Flags":0,"Value":"Y29uc3VsdmFsdWU=","CreateIndex":24586,"ModifyIndex":24592}]
|
由于Consul的Value是经过Base64编码的(主要是为了允许非UTF-8的字符),所以这里看到的是编码后的结果。我们可以通过解码得到最终的Value值。
验证KV是否同步
1
2
3
4
5
6
7
8
9
10
11
| [root@localhost document]
/
consulvalue
/
[root@localhost document]
/
consulvalue
/
[root@localhost document]
/
consulvalue
|
编辑KV和删除KV
编辑:(同添加KV)
1
| curl -X PUT -d 'consulvalue' http://172.17.0.5:8500/v1/kv/web/value1
|
删除:
1
| curl -X DELETE http://172.17.0.5:8500/v1/kv/web/value1
|
Consul服务告警之Watch机制
添加NoticeService服务
源码参考:https://github.com/syxdevcode/ConsulTest.git
首先在ConsulTest目录运行以下命令更新源代码:
1
2
| git checkout . ##撤销更改
git pull origin master
|
在NoticeService目录运行以下命令,启动服务:
1
| docker-compose up -d --build
|
查看生成的容器的IP:
1
2
| docker inspect -f '{{range .NetworkSettings.Networks}}{{.IPAddress}}{{end}}' noticeservice_noticeservice_1
172.23.0.2
|
修改配置文件
添加watch.json配置文件
目录结构:
1
2
3
4
5
6
| document
|--consul
|--client1.josn
|--config
|--services_config.json
|--watch.json
|
在config文件夹下,添加watch.json文件,内容如下:
1
2
3
4
5
6
7
8
9
10
11
12
13
14
15
| {
"watches": [
{
"type": "checks",
"handler_type": "http",
"state": "critical",
"http_handler_config": {
"path": "http://172.23.0.2:8081/notice",
"method": "POST",
"timeout": "10s",
"header": { "Authorization": [ "token" ] }
}
}
]
}
|
细节请参考:
https://www.consul.io/docs/agent/watches.html
https://www.consul.io/api/health.html
state支持: any, passing, warning, or critical。
修改services_config.json文件
1
2
3
4
5
6
7
8
9
10
11
12
13
14
15
16
17
18
19
20
21
22
23
24
25
26
27
28
29
30
31
32
33
34
35
36
37
38
39
40
41
42
43
44
45
46
47
48
49
50
51
52
53
54
55
| {
"services": [
{
"id": "EDC_DNC_MSAD_CLIENT_SERVICE_01",
"name": "Client-Service",
"tags": [
"urlprefix-/ClientService80"
],
"address": "172.21.0.2",
"port": 80,
"checks": [
{
"name": "clientservice80_check",
"http": "http://172.21.0.2:80/api/health",
"interval": "10s",
"timeout": "5s"
}
]
},
{
"id": "EDC_DNC_MSAD_CLIENT_SERVICE_02",
"name": "Client-Service",
"tags": [
"urlprefix-/ClientService8080"
],
"address": "172.22.0.2",
"port": 8080,
"checks": [
{
"name": "clientservice8080_check",
"http": "http://172.22.0.2:8080/api/health",
"interval": "10s",
"timeout": "5s"
}
]
},
{
"id": "EDC_DNC_MSAD_NOTICE_SERVICE",
"name": "Client-Service",
"tags": [
"urlprefix-/NoticeService8081"
],
"address": "172.23.0.2",
"port": 8081,
"checks": [
{
"name": "noticeservice_check",
"http": "http://172.23.0.2:8081/api/health",
"interval": "10s",
"timeout": "5s"
}
]
}
]
}
|
重启client1,并且查看NoticeService是否注册成功:
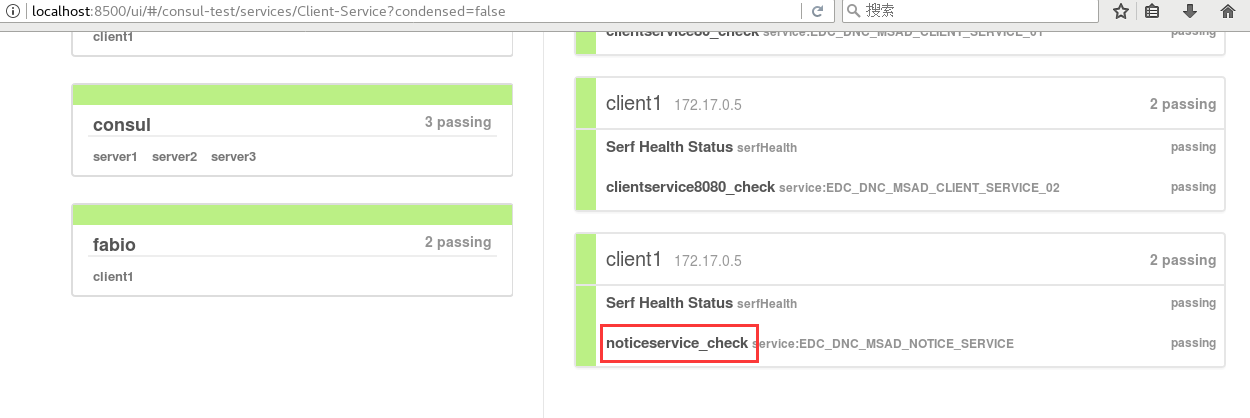
测试服务预警
(1) 手动关闭三个dotnet core服务中的其中一个,如:
1
| docker stop consultest1_consultest_1
|
(2) 收到邮件。
1
2
3
4
5
6
7
8
9
| 健康检查故障:
--------------------------------------
Node:client1
Service ID:EDC_DNC_MSAD_CLIENT_SERVICE_02
Service Name:Client-Service
Check ID:service:EDC_DNC_MSAD_CLIENT_SERVICE_02
Check Name:clientservice8080_check
Check Status:critical
Check Output:Get http://172.22.0.2:8080/api/health: net/http: request canceled while waiting for connection (Client.Timeout exceeded while awaiting headers)
|
** 注意:确保你的虚拟机可以访问外网,不然是发布出来Email的**
参考:
.NET Core微服务之基于Consul实现服务治理(续)
https://www.consul.io/docs/agent/watches.html
https://www.consul.io/api/health.html
https://github.com/PlayFab/consuldotnet